Well tonight while I was deleting some spam comments from my blog and watching Dr. Who with my wife, I found a rather interesting comment.
So the story was:
First there is a VB6 DLL that had a class called Class1 with code like the following:
public type emprecord
name as string
end type

Public Sub Fn(T()as emprecord)
 MsgBox "The silence is comming said Prisoner 0"
End Sub
When this little dll was called from a VB.NET big brother
Dim test as new prj.class1
Dim em(0) as prj.emprecord 'able to create it no problem
em(0).name="hello"
test.fn(em)  ' here gives error
An error ocurred... well this is not very document issue with the TLBIMP tool which creates the interop assemblies. See StackOverflow Answer. The workaround is to right click on your type library, select properties, and change Embed interop Types to false.
After that you will be able to call your function.
Today I was writting a custom control which had a custom property whose type was an EnumType.
I needed the DefaultVAlue attribute so Visual Studio.NET will not serialize the value to the container's code.
Usually in C# you can do something like:
[DefaultValue(TheEnum.TheValue)]
public TheEnum MyProperty
{
get { ... }
set { ... }
}
And that works. Well it does not work in VB.NET
To use an enum value for an Enumeration type in VB.NET you should write something like:
<DefaultValue(GetType(TheEnum), "TheValue")> _
Property MyProperty as TheEnum
   Get
       ...
   End Get
   Set
        ...
   End Set
End Property
In VB.NET if you want to make your interfaces available thru COM and make sure that its parameters are of a certain type you have to use the MarshalAs attribute. For the return type it is a little tricky because it has to be added after the As Keyword.
<ComVisible(True)> _
<Guid("15D492C7-CD14-4239-B98D-689F329EEDA4")>
<InterfaceType(ComInterfaceType.InterfaceIsDual)> _
Public Interface MyCOMInterface
	Function FooReturningShort(ByVal data As Integer, <MarshalAs(UnmanagedType.U2)> ByVal shortData As short) As <MarshalAsAttribute(UnmanagedType.U2)> Short
End Interface
In IDL you can have a helpstring attribute that adds descriptions to your interfaces.
To be able to generated those helpstring tags in a VB.NET class you should use the Description tag
For example see this example taken from:http://stackoverflow.com/questions/6668500/getting-the-helpstring-attribute-applied-to-c-sharp-properties-exposed-via-com-i
using System;
using System.ComponentModel;
using System.Runtime.InteropServices;


namespace ClassLibrary1 {
    [ComVisible(true), InterfaceType(ComInterfaceType.InterfaceIsDual)]
    public interface IFoo {
        int property {
            [Description("prop")]
            get;
            [Description("prop")]
            set;
        }
    }
}
NOTE: remenber that in some cases you have to apply the description attribute to both get and set.
ADITIONAL NODE:
After some test, I found that there are some differences with the helpstring behaviour in VB.NET. For example the helpstring attribute is not generated for methods. More on C#/VB.NET Interop Differences http://mheironimus.blogspot.com/2006/10/vbnet-com-interface-issues.html
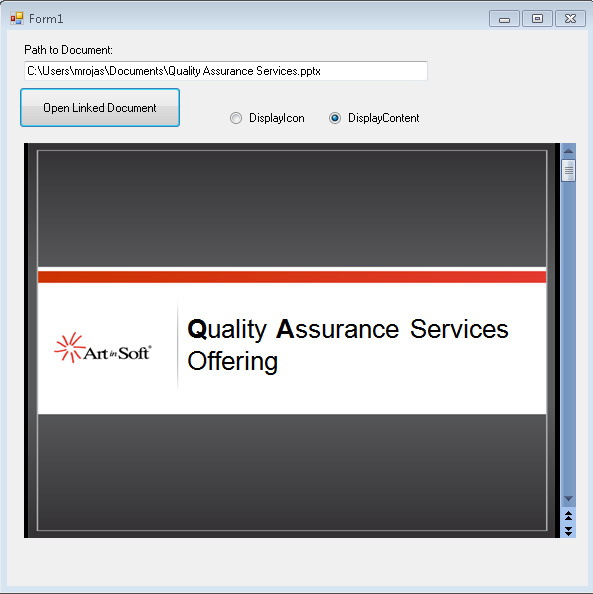
I have developed a very quick replacement for the OLE Container Control that you had in VB6.
I just did it in rush so it just supports basic properties as DisplayType Icon or Content
The content functionality is performed using the Vista feature for content preview. I would have tried using a
WebBrowser control but in new versions of Office, the default is not showing the document on the Browser and
it might be difficult to change the registry in some vista or Win7 environments.
The following picture show the OLEContainer inside a Windows Form.
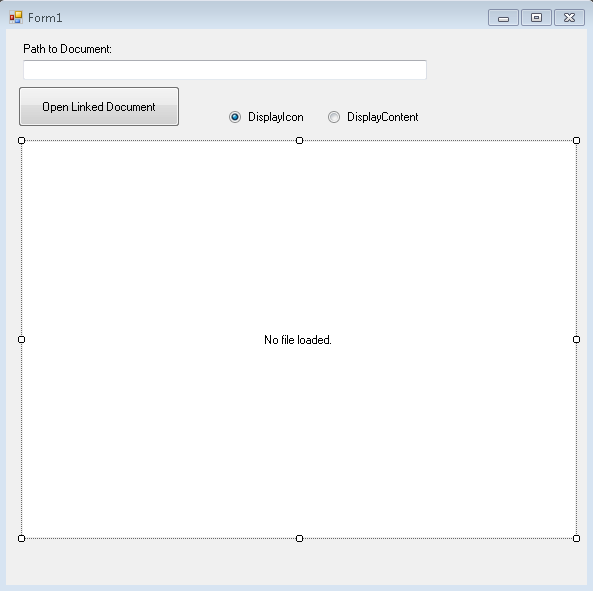
This is the container with the Display set to content:
And the container with display set to icon:

You can call the CreateLink and you can also use the DoVerb Open.
I have attached the example source code in this post.
ReplaceOLEContainer.zip (100.69 kb)
UPDATE
NOTE: I friend also sent me a link to this article in CodeProject which is very similar: http://www.codeproject.com/Tips/487566/OLE-container-surrogate-for-NET
NOTE: This solution only applies for read-only. If you wan to edit your files, then you need a real ActiveX container. MS used to have a sample OCX called DSOFramer that allows you to do that. Warning: this sample is no longer supported by MS becuase it said to have issues However I have used it in the past and it worked fine in some simple scenarios. I have added the control and its source to this post. There is a commercial product from Edraw http://www.edrawsoft.com/edword.php that is supported by them and has samples for C# and VB.NET
NOTE: Another approach, embed the application in your windows form.
In general what you should do is use the SetParent, SetWindowLong and MoveWindow APIs to embed the application. Something like this:
var filename = openFileDialog1.FileName;
                var officeApplicationProgID = "Excel.Application";
                var officeApplicationType = Type.GetTypeFromProgID(officeApplicationProgID, false);
                dynamic officeApplication = Activator.CreateInstance(officeApplicationType);
                officeApplication.Workbooks.Open(filename);
                int pid = 0;
                GetWindowThreadProcessId(officeApplication.HWnd, out pid);
                officeApplication.Visible = true;
                //officeApplication.Visible = false;
                var process = Process.GetProcessById(pid);
                var panel = new Panel();
                panel.Location = new Point(0, 0);
                panel.Size = new Size(this.Size.Width, this.Size.Height);
                var processHandle = process.MainWindowHandle;
                SetParent(processHandle, panel.Handle);
                SetWindowLong(processHandle, GWL_STYLE, WS_VISIBLE + WS_MAXIMIZE + WS_CHILD);
                MoveWindow(processHandle, 0, 0, panel.Width, panel.Height, true);
                this.mainBody.Controls.Add(panel);
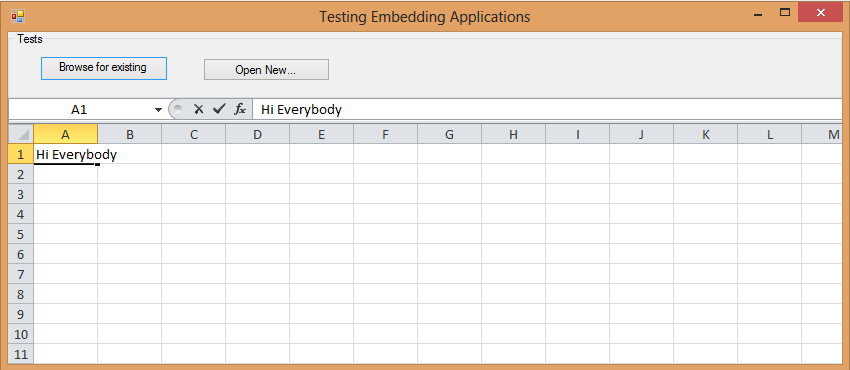
Figure: Example of technique of hosting Excel inside a Windows Form Application
I have attached a sample project. (Remember to free your resources, and close the excel App before closing your application, I skipped that from this sample)
DsoFramer.zip (463.42 kb)
ExampleOfEmbeddingExcelInWindowsForm.zip (53.76 kb)
Silverlight is when you have to add a lot of items.
I know, I know maybe you should choose another way to show that data,
but leaving philosophical-ui design discussions, the real problem is that
usually those components are bind to ObservableCollections.
ObservableCollections are a bit of an exhibitionist.
Each time you add an item it will yell
Hey!! Yoo-hoo! HEY!!! YOU!!
I'm HEREEEEEEEEEEEEEEEEEE!!!!
Look at me!! Look at Me!!! Look Mom No Hands!!! Look Dad no Feet!!! HEY!!!!!!!!
So if you have some code like:
for(int i=0;i<10000;i++)
{
    comboItems.Add("item" + i);
}
A nice thing will be to be able to do something like:
var items = new String[10000]
for(int i=0;i<10000;i++)
{
    items[i]="item" + i;
}
comboItems.AddRange(items);
And then provide just ONE notification of Collection Changed instead of a lot of
little cries for attention.
Well that is the reason for this new version of ObservableCollection that I call
RangeObservableCollection:
using System;
using System.Collections.ObjectModel;
using System.Collections.Generic;

namespace Utils
{
    public class RangeObservableCollection<T> : ObservableCollection<T>
    {
        private bool _suppressNotification = false;

        public RangeObservableCollection() : base() { }

        public RangeObservableCollection(IEnumerable<T> collection) : base(collection) { }

        protected override void OnPropertyChanged(System.ComponentModel.PropertyChangedEventArgs e)
        {
            if (!_suppressNotification) base.OnPropertyChanged(e);
        }

        protected override void OnCollectionChanged(System.Collections.Specialized.NotifyCollectionChangedEventArgs e)
        {
            if (!_suppressNotification)
                base.OnCollectionChanged(e);
        }

        /// <summary>
        /// Adds a collection suppressing notification per item and just raising a notification
        /// for the whole collection
        /// </summary>
        /// <param name="list"></param>
        public void AddRange(IEnumerable<T> list)
        {
            if (list == null) throw new ArgumentNullException("list");
            _suppressNotification = true;
            foreach (T item in list)
            {
                Add(item);
            }
            _suppressNotification = false;
            OnCollectionChanged(new System.Collections.Specialized.NotifyCollectionChangedEventArgs(System.Collections.Specialized.NotifyCollectionChangedAction.Reset));
        }

    }

}
I just came back from executing a Ready assessment for a company in Minnesota, where I analyzed 740,000 lines of code in a VB6 application, of which 660,000 belonged to a single Visual Basic project (.vbp). This is actually the largest single .vbp I have seen so far, beating the previous record of about 500,000 lines of code held by an European company. We have migrated plenty of applications that contain 1+ million lines of code, but they are usually distributed across many .vbp’s.
Though unusual, single vbp’s of this size are perfectly manageable from a migration standpoint, and here are some things that can be done to deal with them:
- Ensure that the migration computer has at the very minimum, 3GB of RAM.
- Look for customization opportunities before you start migrating the code. Customizing the VBUC for this specific VBP can reduce manual effort drastically.
- When making manual changes, start with a small team until you get the project to compile, especially if migrating to VB.NET as the compiler has a maximum of build errors that it can show at any given time.
- Once the application compiles, increase the team size and go for Visual Equivalence by distributing the different forms and user controls across your developers.
Visual Basic 6.0 property pages allow you to work around the
limitations of the Visual Basic Property Browser. For example,
you can use property pages to give users a way to add a collections of
colors to a color list user control.
In the property page you would write code that manages the collection,
something beyond the capabilities of the Visual Basic Property Browser.
In contrast, the Visual Basic .NET Property Browser can be used
to edit any .NET variable type or class. Property Pages are no longer needed.
The Upgrade Wizard and the VBUC do not automatically upgrade your
Visual Basic 6.0 property pages but they can sure be of help.
What if you really what to keep those property pages? Is there any workaround.
mmmm Sure there is.
You can follow these steps.
1. Before migrating your Visual Basic 6.0 project with the VBUC
modify your property pages (.pag) files to resemble common Visual Basic 6.0 forms.
For example a property page looks like this:
VERSION 5.00
Begin VB.PropertyPage PropertyPage1
   Caption         =   "PropertyPage1"
   ClientHeight    =   3600
   ClientLeft      =   0
   ClientTop       =   0
   ClientWidth     =   4800
   PaletteMode     =   0  'Halftone
   ScaleHeight     =   3600
   ScaleWidth      =   4800
   Begin VB.TextBox Text1
      Height          =   495
      Left            =   480
      TabIndex        =   1
      Text            =   "Text1"
      Top             =   1200
      Width           =   2175
   End
   Begin VB.CommandButton Command1
      Caption         =   "Command1"
      Height          =   615
      Left            =   3120
      TabIndex        =   0
      Top             =   480
      Width           =   1455
   End
   Begin VB.Label Label1
      Caption         =   "Label1"
      Height          =   375
      Left            =   240
      TabIndex        =   2
      Top             =   600
      Width           =   1815
   End
End
Attribute VB_Name = "PropertyPage1"
Attribute VB_GlobalNameSpace = False
Attribute VB_Creatable = False
Attribute VB_PredeclaredId = False
Attribute VB_Exposed = False
Can be turned into a Form, to ease migration with simple changes:
VERSION 5.00
Begin VB.Form  PropertyPage1
   Caption         =   "PropertyPage1"
   ClientHeight    =   3600
   ClientLeft      =   0
   ClientTop       =   0
   ClientWidth     =   4800
   PaletteMode     =   0  'Halftone
   ScaleHeight     =   3600
   ScaleWidth      =   4800
   Begin VB.TextBox Text1
      Height          =   495
      Left            =   480
      TabIndex        =   1
      Text            =   "Text1"
      Top             =   1200
      Width           =   2175
   End
   Begin VB.CommandButton Command1
      Caption         =   "Command1"
      Height          =   615
      Left            =   3120
      TabIndex        =   0
      Top             =   480
      Width           =   1455
   End
   Begin VB.Label Label1
      Caption         =   "Label1"
      Height          =   375
      Left            =   240
      TabIndex        =   2
      Top             =   600
      Width           =   1815
   End
End
Attribute VB_Name = "PropertyPage1"
Attribute VB_GlobalNameSpace = False
Attribute VB_Creatable = False
Attribute VB_PredeclaredId = False
Attribute VB_Exposed = False
If the form had a event like:
Private Sub PropertyPage_Initialize()
End Sub
Change that to Form_Load()
2. Rename the file from .pag to .frm.
3. Remove the .pag from the VB6 project
4. Add the .frm file to the VB6 project
5. Run the VBUC tool.
Once migrated you have a close migration of your original Property Page.
Remember however that some things change in .NET and you will need to manually finish some details.
For example, you need to review code in the
PropertyPage_ApplyChanges(),
PropertyPage_EditProperty(PropertyName As String)
PropertyPage_SelectionChanged().
Ok. Once you take your Property Page to .NET how do you integrate it with your control.
Well that’s easy. There you could create a ControlDesigner or just use an UITypeEditor.
Let’s see the UITypeEditor aproach.
The general idea with this aproach is to provide an UITypeEditor (this is just a way to provide an
editor in the property Browser that is not supported by default. And taking advantage of that editor
we will show the form that was produced after migrating out Property Pages. If you want an interface
more similar to what you had on Visual Basic 6.0 you can modify the property page and add a TabControl.
Ok. So these are the steps to follow:
1. First you need to create a type for which you will provide a Type Editor. We will call this type CustomData
namespace CustomEditor
{
    public class CustomData
    {
    }
}
2.Now we will add a property to our control.
        public CustomData Custom
        {
            get;
            set;
        }
3. Now add attributes to associate an editor
        [Description("Custom"), Editor(typeof(CustomDataEditor), typeof(UITypeEditor))]
        public CustomData Custom
        {
            get;
            set;
        }
4. And now lets implement the CustomDataEditor
using System.Windows.Forms.Design;

namespace CustomEditor
{
    public class CustomDataEditor : UITypeEditor
    {
        public CustomDataEditor() {}

        public override UITypeEditorEditStyle GetEditStyle(System.ComponentModel.ITypeDescriptorContext context)
        {

            return UITypeEditorEditStyle.Modal;
        }

        public override object EditValue(System.ComponentModel.ITypeDescriptorContext context, IServiceProvider provider, object value)
        {
            IWindowsFormsEditorService frmsvr = (IWindowsFormsEditorService)provider.GetService(typeof(IWindowsFormsEditorService));
            if (frmsvr == null) return null;
            PropertyPageForm propPage = new PropertyPageForm();
            propPage.control = (MyControl)context.Instance;
            frmsvr.ShowDialog(f);
            return null;
        }

    }
}
5. In the previous put attention to the highlighted details. What we are doing is getting a reference
to the WindowsFormEditor service so we property open the PropertyPage that has now been turned into a form.
It is important that you add a public property to the migrated PropertyPage like:
public MyControl control { get; set; };
because that will give you a reference to the actual control that is on the form. The property page is just an interface
you will need to set the values into properties on your control, in order for them to be serialized.
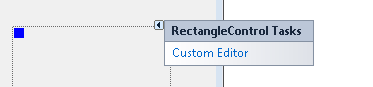
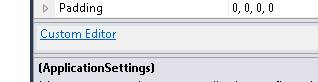
6. Once you do that, when you see the property editor for your control you will see something like:
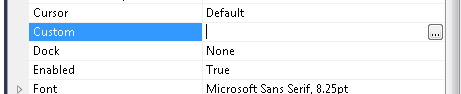
When you press the … button it will show up your property page form.
You could also add other visual elements like:
Or
But that is maybe for another post.
Regards
The following C# code shows how to use WMI to query printers information, set and get default printer.
public bool SetDefaultPrinter()
{
    System.Management.ManagementObjectSearcher search =
                   default(System.Management.ManagementObjectSearcher);
    System.Management.ManagementObjectCollection results =
                   default(System.Management.ManagementObjectCollection);
    System.Management.ManagementObject printer =
                   default(System.Management.ManagementObject);


    search =
     new System.Management.ManagementObjectSearcher("select * from win32_printer");
    results = search.Get();
    //Get Default Printer
    System.Management.ManagementObject defaultPrinter = null;
    foreach (System.Management.ManagementObject foundPrinter in results)
    {
        System.Management.PropertyDataCollection
              propertyDataCollection = foundPrinter.Properties;

         if ((bool)foundPrinter["Default"]) // DEFAULT PRINTER
         {
              System.Diagnostics.Debug.WriteLine(foundPrinter["Name"]);
              System.Diagnostics.Debug.WriteLine(foundPrinter["Location"]);
         }
     }


     //Sets new default Printer
     foreach (System.Management.ManagementObject foundPrinter in results)
     {
         System.Diagnostics.Debug.Print(foundPrinter["Name"].ToString());
         if (foundPrinter["Name"].Equals("PDFCreator"))
         {
             System.Management.ManagementBaseObject outParams =
                   foundPrinter.InvokeMethod("SetDefaultPrinter", null, null);
             if (outParams == null)
                 System.Diagnostics.Debug.WriteLine("Unable to set default printer");
             Int32 retVal = (int)(uint)outParams.Properties["ReturnValue"].Value;
             if (retVal == 0)
                return true;
             else
                return false;
         }
     }

    return false;

}
How do you write a Windows Service in VB6?
Althought this is not a recommend practice due to the stability issues and VB6 support, if for
any reason you need to do this I provide a guide of how to do that in VB6 and how do the same thing
in VB.NET and C#.
Using the NTSVC.ocx
This is an OCX implement by Mauricio Ordonez some time ago.
It is very simple to use. You just drop it on a form and add some code to your VB6.
Example: VB6 Form with the NTSVC.ocx control
Private Sub Form_Load()
Me.Visible = False
Dim strDisplayName As String
On Error GoTo Err_Load
strDisplayName = NTService1.DisplayName
If Command = "-install" Then
' Enable interaction with desktop.
NTService1.Interactive = True
If NTService1.Install Then
MsgBox strDisplayName & " installed successfully"
Else
MsgBox strDisplayName & " failed to install"
End If
End
ElseIf Command = "-uninstall" Then
If NTService1.Uninstall Then
MsgBox strDisplayName & " uninstalled successfully"
Else
MsgBox strDisplayName & " failed to uninstall"
End If
End
ElseIf Command = "-debug" Then
NTService1.Debug = True
ElseIf Command <> "" Then
MsgBox "Invalid command option"
End
End If
' Connect service to Win32 services controller.
NTService1.StartService
Err_Load:
' Error starting service
End Sub
Private Sub Timer1_Timer()
MsgBox "hola"
End Sub
NOTE: Remember that VB6 is not a supported platform and that even if it is true
that you can still run VB6 code in Windows Vista and Windows 7 MS does not support this
platform anymore.
How can I convert my VB6 service to .NET?
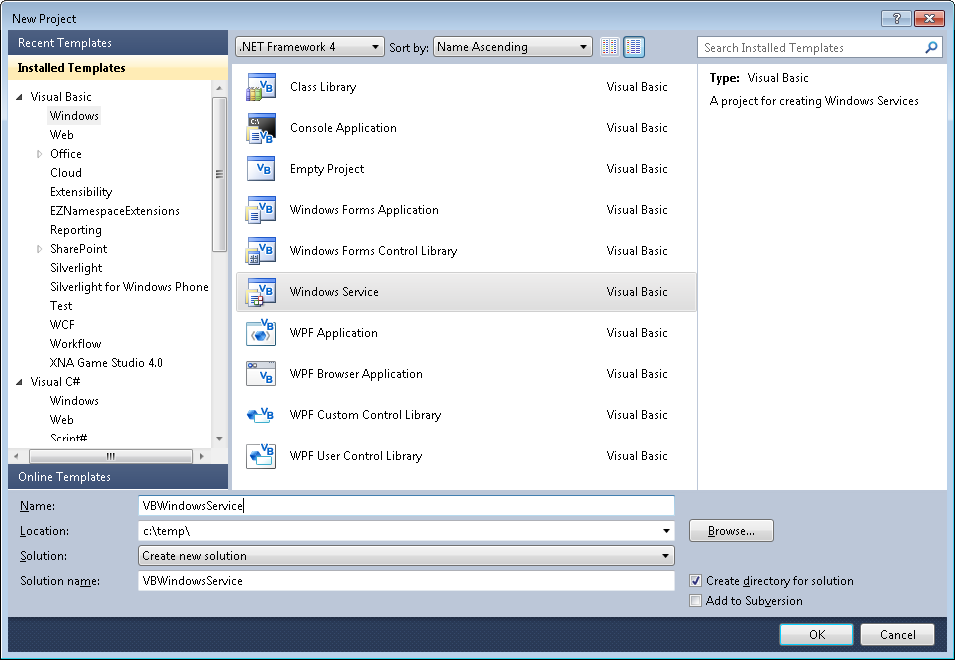
To create a Windows Service in VB.NET follow this steps.
1. First you need to create a Windows Service Project:
a. Open Visual Studio 2010
b. Go to the File\New\Project….
c. Select the Windows Service Template
d. And you just put your code in the OnStart method:
Public Class Service1

    Protected Overrides Sub OnStart(ByVal args() As String)
        ' Add code here to start your service. This method should set things
        ' in motion so your service can do its work.
        ExecuteWindowsServiceCode()
    End Sub

    Protected Overrides Sub OnStop()
        ' Add code here to perform any tear-down necessary to stop your service.
    End Sub

    Private Sub ExecuteWindowsServiceCode()
        'TODO Add Some Code
    End Sub

End Class
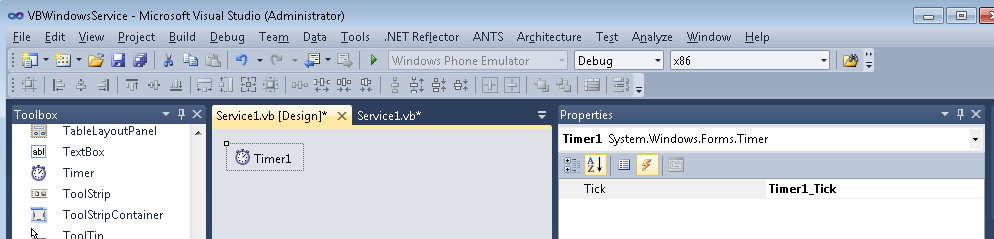
e. Another typical thing to do in Windows Service is to add a Timer Control, you you can have
your windows service performs some actions every number of seconds. To do that, drag a
Timer Control on your Service component, execute the Start method of the timer control on the OnStart method and
handle the Tick event:
Public Class Service1

    Protected Overrides Sub OnStart(ByVal args() As String)
        ' Add code here to start your service. This method should set things
        ' in motion so your service can do its work.
        Timer1.Start()
        ExecuteWindowsServiceCode()
    End Sub

    Protected Overrides Sub OnStop()
        ' Add code here to perform any tear-down necessary to stop your service.
        Timer1.Stop()
    End Sub

    Private Sub ExecuteWindowsServiceCode()
        'TODO Add Some Code
    End Sub

    Private Sub Timer1_Tick(sender As System.Object, e As System.EventArgs) Handles Timer1.Tick
        MsgBox("Viva la vida Loca!")
    End Sub
End Class
If you need to recover some of your code from your VB6 project, download our Visual Basic Conversion Tool VBUC tool.
How do I Install my Windows Service?
In general you just need to use the command line utility installutil.exe for more details see this other post.
If you were in VB6 HelpContextID will be familiar for you (http://msdn.microsoft.com/en-us/library/aa267690(v=vs.60).aspx). In those sweet VB6 days all you had to do was:
Private Sub Form_Load ()
   App.HelpFile = "VB.HLP"
   Frame1.HelpContextID = 21004
   Text1.HelpContextID = 21001
   Form1.HelpContextID = 21005
End Sub
And each time you pressed the F1 button your application will have opened the .hlp file and show you the Help Topic corresponding to that ID. After migration from VB6 to WinForms Help you now have the HelpProvider.SetHelpKeyword http://msdn.microsoft.com/en-us/library/system.windows.forms.helpprovider.sethelpkeyword.aspx And you had to do something like:
internal System.Windows.Forms.HelpProvider HelpProvider1;
...
HelpProvider1.HelpNamespace = "sample.chm";
HelpProvider1.SetHelpKeyword(TextBox1, "1007.html");
HelpProvider1.SetHelpNavigator(TextBox1, HelpNavigator.Topic);
HelpProvider1.SetHelpKeyword(ListBox1, "1006.html");
HelpProvider1.SetHelpNavigator(ListBox1, HelpNavigator.Topic);
And all that seems nice. But, what can you do when you cross over to SilverlightjQuery15205164761650376022_1357918518660? Well, in general there are several systems that allow you to author your help files in html or convert your .hlp or .chm files to html, but how do you link your components to that help system in order to provide context-sensitive help???? Ok. So one of the possible solutions is very very simple. In general, the solution that I will show in this post is this: 1) First implement an attached property for adding a HelpKeyword to Silverlight components 2) Set the helpkeyword in the desired components 3) Provide logic that will open the appropiate help file. Ok. So let's implement a Silverlight Attached property. An attached propery is like adding a new property to your controls. This new attached property will be called Helpkeyword
using System;
using System.Windows.Shapes;
namespace System.Windows.Controls
{
    public class HelpProvider
    {
        public static readonly DependencyProperty HelpKeyword =
            DependencyProperty.RegisterAttached("HelpKeyword", typeof(string), typeof(HelpProvider), new PropertyMetadata(null));
        public static void SetHelpKeyword(UIElement element, string keyword)
        {
            element.SetValue(HelpKeyword, keyword);
        }

        public static string GetHelpKeyword(UIElement element)
        {
            return (string)element.GetValue(HelpKeyword);
        }
    }
}
Ok. So once we have the attached property we have to use it, and set it on the code: To set it on the code we must add a namespace:
<UserControl x:Class="SilverlightApplication.MainPage"
    xmlns="http://schemas.microsoft.com/winfx/2006/xaml/presentation"
    ...
    xmlns:help="clr-namespace:System.Windows.Controls"
    mc:Ignorable="d"
    ....>
And apply the attribute to components
<Button help:HelpProvider.HelpKeyword="helpforbutton1" Content="Button" ...  />
<TextBox help:HelpProvider.HelpKeyword="helpfortext1" Height="47" ... />
So that almost everything, now we just need to trigger the appropiate logic, to do that we will add a KeyUp handler to the top most element, in this example a grid. NOTE: if Silverlight is running on the browser F1 is not an option. I just used F2 here as an example.
<Grid x:Name="LayoutRoot" Background="White" Height="205" KeyUp="LayoutRoot_KeyUp">
<Button help:HelpProvider.HelpKeyword="helpforbutton1" ...  />
<TextBox help:HelpProvider.HelpKeyword="helpfortext1" ... />
</Grid>
using System;
using System.Windows;
using System.Windows.Controls;
using System.Windows.Input;
using System.Windows.Browser;

namespace SilverlightApplication
{
    public partial class MainPage : UserControl
    {
        public MainPage()
        {
            InitializeComponent();
        }

        private void LayoutRoot_KeyUp(object sender, KeyEventArgs e)
        {
            //check for the specific key. For now use F2 as the Help Shortcut
            if (e.Key==Key.F2) {
                    var uielement = FocusManager.GetFocusedElement() as UIElement;
                    if (uielement!=null)
                    {

                        var keyword = HelpProvider.GetHelpKeyword(uielement);
                        var host = HtmlPage.Document.DocumentUri.Host;
                        var port = HtmlPage.Document.DocumentUri.Port;
                        var url = string.Format("http://{0}:{1}/help/{2}.html", host,port,keyword);
                        HtmlPage.Window.Navigate(new Uri(url),"_blank");
                    }
            } // else ignore the keystroke
        }
    }
}
This property can be used on the IDE:
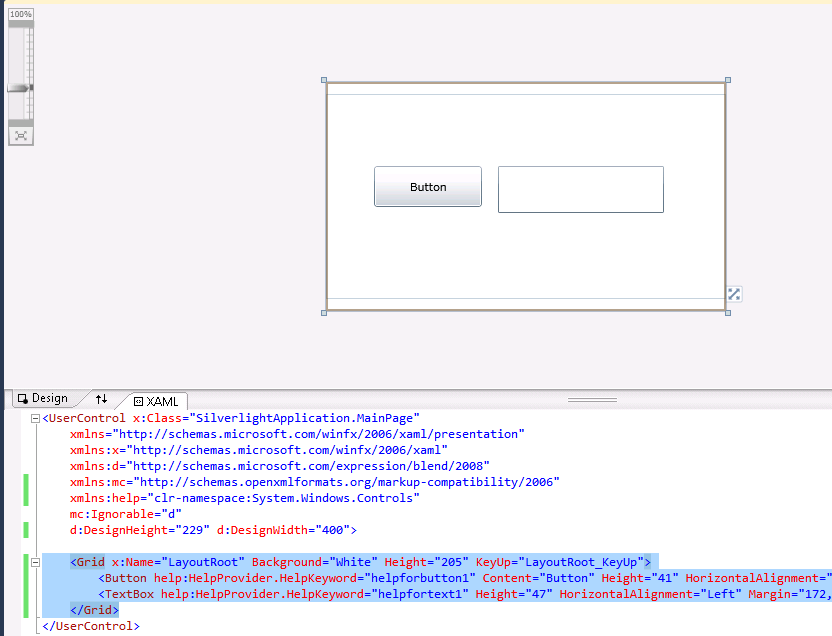
On code
var uielement = FocusManager.GetFocusedElement() as UIElement;
if (uielement!=null) {
var keyword = HelpProvider.GetHelpKeyword(uielement);
}
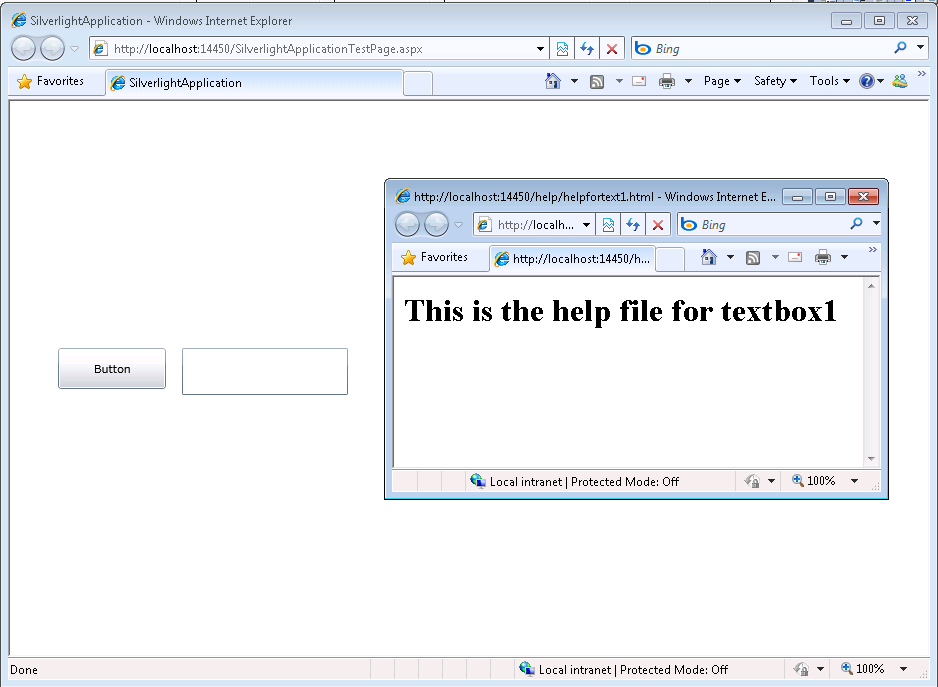
This is an image of the application running.
And you can download the code from: CODE
If you have any questions or would like more info on Silverlight migration check www.silverlightmigration.com
In VB6 when you have an ActiveX Library it was very important to use
the BinaryCompatibility setting to make sure that your applications did not break after a change.
So let’s first introduce what is binary compatibility and how to accomplish that in .NET.
Binary Compatibility allows to make changes to your components or COM classes without recompiling
every application you've made that uses the component.
And why do you need it. Why compatibility breaks.
On lets see.
An ActiveX Control or DLL expose Public interfaces.
Those interfaces have all of the properties, methods, events, etc. that you've marked as Public.
In other words, everything you've added that shows in Intellisense while working outside of your component.
Now let's say you have create a class, with two Methods Method1 and Method2
When you compile, VB generates all the COM infraestructure you need for your component.
It defines a CoClass and an interface and an entry for each method.
For a vb class with two methods:
Sub Method1()

End Sub

Sub Method2()

End Sub
It will produce a typelib like:
// Generated .IDL file (by the OLE/COM Object Viewer)
//
// typelib filename: <could not determine filename>
[
  uuid(8ABA2C0C-7CCA-40CD-A944-56707566634A),
  version(1.0)
]
library Project1
{
    // TLib :     // TLib : OLE Automation : {00020430-0000-0000-C000-000000000046}
    importlib("stdole2.tlb");

    // Forward declare all types defined in this typelib
    interface _Class1;

    [
      odl,
      uuid(6B86684C-B3DD-4680-BF95-8DEE2C17AF5B),
      version(1.0),
      hidden,
      dual,
      nonextensible,
      oleautomation
    ]
    interface _Class1 : IDispatch {
        [id(0x60030000)]
        HRESULT Method1();
        [id(0x60030001)]
        HRESULT Method2();
    };

    [
      uuid(C71C7AB0-552A-4D5D-A9FB-AF33830A697E),
      version(1.0)
    ]
    coclass Class1 {
        [default] interface _Class1;
    };
};
As you can see in the typelib there are IDs associated to each coclass, interface and
methods. Those IDs are the ones use when you generate the .exe file for your application.
Now if you modify your Class to:
Sub Method3()

End Sub

Sub Method4()

End Sub

Sub Method1()

End Sub

Sub Method2()

End Sub
and you use No Compatibility the typelib after your changes will be:
// Generated .IDL file (by the OLE/COM Object Viewer)
//
// typelib filename: <could not determine filename>

[
  uuid(FE5C56C2-E03A-4DC0-994D-B68543C72A46),
  version(1.0)
]
library Project1
{
    // TLib :     // TLib : OLE Automation : {00020430-0000-0000-C000-000000000046}
    importlib("stdole2.tlb");

    // Forward declare all types defined in this typelib
    interface _Class1;

    [
      odl,
      uuid(A3032E1E-52FE-42E0-98FF-84A9DD4FD8C3),
      version(1.0),
      hidden,
      dual,
      nonextensible,
      oleautomation
    ]
    interface _Class1 : IDispatch {
        [id(0x60030000)]
        HRESULT Method3();
        [id(0x60030001)]
        HRESULT Method4();
        [id(0x60030002)]
        HRESULT Method1();
        [id(0x60030003)]
        HRESULT Method2();
    };

    [
      uuid(72721504-CC56-4BB9-9447-C7193FE8C02D),
      version(1.0)
    ]
    coclass Class1 {
        [default] interface _Class1;
    };
};
As you can see, now the ids for the methods, CoClass are different, so your applications will return errors like: Error 430 (Automation error, the component dies horribly) or Error 429 (can't create the object at all)
But if you instead used BinaryCompatibility then the typelib for your class will be:
// Generated .IDL file (by the OLE/COM Object Viewer)
//
// typelib filename: <could not determine filename>
[
  uuid(8ABA2C0C-7CCA-40CD-A944-56707566634A),
  version(1.1)
]
library Project1
{
    // TLib :     // TLib : OLE Automation : {00020430-0000-0000-C000-000000000046}
    importlib("stdole2.tlb");

    // Forward declare all types defined in this typelib
    interface _Class1;
    [
      odl,
      uuid(6E9C59C3-82D7-444C-92FB-01B49D91A2FF),
      version(1.1),
      hidden,
      dual,
      nonextensible,
      oleautomation
    ]
    interface _Class1 : IDispatch {
        [id(0x60030002)]
        HRESULT Method3();
        [id(0x60030003)]
        HRESULT Method4();
        [id(0x60030000)]
        HRESULT Method1();
        [id(0x60030001)]
        HRESULT Method2();
    };

    [
      uuid(C71C7AB0-552A-4D5D-A9FB-AF33830A697E),
      version(1.1)
    ]
    coclass Class1 {
        [default] interface _Class1;
    };

    typedef [uuid(6B86684C-B3DD-4680-BF95-8DEE2C17AF5B), version(1.0), public]
    _Class1 Class1___v0;
};
If you compare now the two typelibs you can see the Method1 and Method2 keep the same ids.
For each version a typedef is generated that will point to the last version. For example adding a Method5 will add new entry like:
    typedef [uuid(6B86684C-B3DD-4680-BF95-8DEE2C17AF5B), version(1.0), public]
    _Class1 Class1___v0;

    typedef [uuid(6E9C59C3-82D7-444C-92FB-01B49D91A2FF), version(1.1), public]
    _Class1 Class1___v1;
Well that is what binary compatibility does. Now how to achieve binary compatibility in .NET
Binary Compatibility in .NET
Achieving binary compatibility in .NET is really easy. You just need to give more information to
make explicit how your typelib information will be. I will follow an approach as the one I already explained in this post:
http://blogs.artinsoft.net/mrojas/archive/2010/06/23/exposing-c-classes-thru-interop.aspx
Lets take our previous example:
using System;
using System.Runtime.InteropServices;

namespace InteropExamples
{
    public class Class1
    {
        public void Method3()
        {
        }
        public void Method4()
        {
        }
        public void Method1()
        {
        }
        public void Method2()
        {
        }
        public void Method5()
        {
        }
    }
}
In previous posts I had recommended using partial classes and using interfaces to explicitly specify what you what to be seen in COM. This means you start up with something like:
  public partial class Class1
    {
        public void Method3()
        {
        }
        public void Method4()
        {
        }
        public void Method1()
        {
        }
        public void Method2()
        {
        }
    }

    [ComVisible(true)]
    public interface _Class1
    {
        void Method3();
        void Method4();
        void Method1();
        void Method2();

    }
    [ComVisible(true)]
    [ClassInterface(ClassInterfaceType.None)]
    [ComDefaultInterface(typeof(_Class1))]
    partial class Class1 : _Class1
    {
        #region _Class1 Members

        void _Class1.Method3()
        {
            Method3();
        }

        void _Class1.Method4()
        {
            Method4();
        }

        void _Class1.Method1()
        {
            Method1();
        }

        void _Class1.Method2()
        {
            Method2();
        }

        #endregion
    }
Now to make this code binary compatible then you have to make sure that the tlb file generated for your class is almost identical to that generated before. To acomplish that we must make sure that we your methods, interfaces and classes have the same guids and ids. Lets see how:
using System;
using System.Runtime.InteropServices;

namespace InteropExamples
{
    public partial class Class1
    {

        public void Method3()
        {
            System.Windows.Forms.MessageBox.Show("3 N");
        }

        public void Method4()
        {
            System.Windows.Forms.MessageBox.Show("4 N");
        }

        public void Method5()
        {
            System.Windows.Forms.MessageBox.Show("5 N");
        }


        public void Method1()
        {
            System.Windows.Forms.MessageBox.Show("1 N");
        }

        public void Method2()
        {
            System.Windows.Forms.MessageBox.Show("2 N");
        }
    }

    [ComVisible(true)] //This to make the interface Visible for COM
    [TypeLibType((TypeLibTypeFlags)((short)TypeLibTypeFlags.FHidden |
        (short)TypeLibTypeFlags.FDual |
        (short)TypeLibTypeFlags.FNonExtensible |
        (short)TypeLibTypeFlags.FOleAutomation))] //This to use the same flags as in previous tlb
    [Guid("9BAFD76D-8E6B-439C-8B6D-37260BFA3317")] //This is to make the class have the guid
    public interface _Class1
    {
        [DispId(0x60030000)]
        void Method1();
        [DispId(0x60030001)]
        void Method2();
        [DispId(0x60030002)]
        void Method3();
        [DispId(0x60030003)]
        void Method4();
        [DispId(0x60030004)]
        void Method5();


    }

    [ComVisible(true)] //This to make the class Visible for COM
    [ClassInterface(ClassInterfaceType.None)] //This is to make sure that we have control on interface generation
    [ComDefaultInterface(typeof(_Class1))] //To set default interface
    [ProgId("Project1.Class1")] //To set ProgId
    [Guid("C71C7AB0-552A-4D5D-A9FB-AF33830A697E")] //Maintain same Guid.
    partial class Class1 : _Class1, Class1___v0, Class1___v1
    {
        #region _Class1 Members

        void _Class1.Method3()
        {
            Method3();
        }

        void _Class1.Method4()
        {
            Method4();
        }

        void _Class1.Method1()
        {
            Method1();
        }

        void _Class1.Method2()
        {
            Method2();
        }

        #endregion


        #region Class1___v0 Members

        void Class1___v0.Method1()
        {
            Method1();
        }

        void Class1___v0.Method2()
        {
            Method2();
        }

        void Class1___v0.Method3()
        {
            Method3();
        }

        void Class1___v0.Method4()
        {
            Method4();
        }

        void Class1___v0.Method5()
        {
            Method5();
        }

        #endregion

        #region Class1___v1 Members

        void Class1___v1.Method1()
        {
            Method1();
        }

        void Class1___v1.Method2()
        {
            Method2();
        }

        void Class1___v1.Method3()
        {
            Method3();
        }

        void Class1___v1.Method4()
        {
            Method4();
        }

        void Class1___v1.Method5()
        {
            Method5();
        }

        #endregion
    }

    //This is to keep compatibility with old versions
    //we cannot generate a typedef so we will need to add all of the versions
    //for BinaryCompatibility
    [ComVisible(true)]
    [Guid("6B86684C-B3DD-4680-BF95-8DEE2C17AF5B")]
    [TypeLibType(TypeLibTypeFlags.FHidden)]
    public interface Class1___v0
    {
        [DispId(0x60030000)]
        void Method1();
        [DispId(0x60030001)]
        void Method2();
        [DispId(0x60030002)]
        void Method3();
        [DispId(0x60030003)]
        void Method4();
        [DispId(0x60030004)]
        void Method5();
    }

    //This is to keep compatibility with old versions
    //we cannot generate a typedef so we will need to add all of the versions
    //for BinaryCompatibility
    [ComVisible(true)]
    [Guid("4A7A3317-BF13-443E-9DB0-2C5EA21F00CA")]
    [TypeLibType(TypeLibTypeFlags.FHidden)]
    public interface Class1___v1
    {
        [DispId(0x60030000)]
        void Method1();
        [DispId(0x60030001)]
        void Method2();
        [DispId(0x60030002)]
        void Method3();
        [DispId(0x60030003)]
        void Method4();
        [DispId(0x60030004)]
        void Method5();
    }

}
Sadly in .NET you cannot use Interface Inheritance in COM. If there is interface inheritance YOU HAVE TO IMPLEMENT each interface. In the case of code that comes from VB6. VB6 just uses typedefs, so you really don’t know which methods belong to each version. So in the end all versions have all methods.
The other alternative to this method, is just to implement last version. And after generating the tlb, decompile it to an .IDL file add the typedefs and recompiled it. I explained something similar in this post:http://blogs.artinsoft.net/mrojas/archive/2010/05/17/interop-remove-prefix-from-c-enums-for-com.aspx
Ok. I hope this helps you to have an more clear idea of what Binary Compatibility is and how to do it in .NET. I am attaching some sample code. It show an ActiveX library that uses BinaryCompatibility and three version on an aplications that uses the different versions. And also a .NET class library that is equivalent to the VB6 one. HERE
Enjoy.
AutoCAD 2010 will not be supporting VBA.
Quoting
“If you utilize VBA macros in your work environment, they will no longer work unless the VBA module is installed on your system. “
“When you run a command that requires VBA, a message dialog box will be displayed stating that VBA is no longer installed with AutoCAD and directing you to a website where you can download the VBA module. “
And also you can see that Autodesk states: “Autodesk is evaluating how long VBA will be supported in Autodesk products in the future. Though supported in the AutoCAD 2010-based products, it may or may not be supported in future releases. Therefore, it is strongly recommended that VB developers develop all new code using VB .NET.”
VBA does not support 64bit systems in a native way.
But If you want some advice from the VB migration experts or help on your migration project from VBA to VB.NET or C# you can us contact Artinsoft Migration Services.
We build the VB Upgrade Wizard that shipped with Visual Studio and have been doing VB migrations for years.
In VB6 ActiveX-EXEs or ActiveX OLE Server where used for several
reasons. Sometimes it was performance (because it allowed you to run
your code in another process) and sometimes as way to share resources
between several applications, like connection information, database
connections, mainframe info, etc.
During migration some of this ActiveX-Exes can be migrated as simple
Assembly DLLs, but other require more attention. Specially if they have
global variables that hold state shared by several programs.
In that is your case what are your options then?
1. Convert those ActiveX-Exes to Windows Services.
This option is simple. You modify your migrated assembly to work as a Windows Service. The easier way to do that is:
a) Start Microsoft Visual Studio 2005\2008
b) Go to File\New…\Project… and Select Windows Service
That will generated code like:
using System;
using System.Collections.Generic;
using System.ComponentModel;
using System.Data;
using System.Diagnostics;
using System.Linq;
using System.ServiceProcess;
using System.Text;
namespace WindowsService1
{
public partial class Service1 : ServiceBase
{
public Service1() { InitializeComponent(); }
protected override void OnStart(string[] args) { }
protected override void OnStop() { }
}
}
c) Add a reference to the Remoting Assemblies: System.Runtime.Remoting;
d) Modify the previous code:
Add two using statements like:
using System.Runtime.Remoting.Channels.Http;
using System.Runtime.Remoting.Channels;
using System.Runtime.Remoting;
Add a simple event log for tracing:
private static EventLog evt = new EventLog(“Application”);
private static string SVC_NAME = “ActiveX Server Example Svc”;
And modify the OnStart and OnStop methods to look like:
protected override void OnStart(string[] args)
{
HttpChannel chnl = new HttpChannel(1234);
ChannelServices.RegisterChannel(chnl,true );
RemotingConfiguration.RegisterWellKnownServiceType(typeof(MyClass), “MyClass.soap”, WellKnownObjectMode.Singleton);
evt.WriteEntry(SVC_NAME + ” Started”);
}
protected override void OnStop() { evt.WriteEntry(SVC_NAME +” Stoppped”); }
Also make sure that MyClass extends MarshalByRefClass
2. Convert those ActiveX-Exes using the Artinsoft ActiveX migration helpers.
Sometimes, you need your migrated application to replicate some of
the original ActiveX EXE \OLE DLL VB6 characteristics. For example you
need your ActiveX-EXE to start just when the first instance is created
and to resemble the VB6 logic for Process creation\destruction.
For that purpose Artinsoft has created some helpers that our
migration tool is able to automatically use in the generated code if it
detects that this functionality is needed.
The code will then be changed from:
Dim myInstance As New MyProject.MyClass
To the following Helper method:
myInstance = MyProjectFactory.Create< MyProject.MyClass>(myInstance);
And destroy calls can be changed to the following Helper method:
myInstance= MyProjectFactory.Dispose<MyProject.MyClass >( myInstance);
The migration tool will modify your ActiveX-EXEs or OLE Servers to
be Windows EXE and the helper will then locate the assembly that
contains the desired Class, create an instance and initilize a Remoting
channel to the desired classes. Settings as SingleUse and MultiUse are
also taken care by the helpers.
3. Other possible alternatives are using WFC and COM+ that I will comment in another post.
We have seen a situation that can be a little annoying.
I usually find that situation in ASP.NET projects, but it can also happen in Winforms.
The issue is like this:
- You have a VStudio Solution
- You have added all the needed references
- All your code compiles
BUT
When you run the application it terminates at a certain point with a
FileNotFound exception indicating that the assembly blablabla or one of its
dependencies could not be loaded.
Whats hapenning!!!
Do this:
1) Look at the bin\debug or bin\release and make sure that the assembly is in those directories.
2) If the assembly is not there, then go to the project references in the solution explorer, right click and select properties and set the Copy Local Setting

| vb Constant | Decimal Value | Hex Value | .NET |
| vbDstInvert | 5570569 | H550009 | System.Drawing.CopyPixelOperation.DestinationInvert
|
| vbMergeCopy |
12583114 |
HC000CA |
System.Drawing.CopyPixelOperation.MergeCopy
|
| vbMergePaint |
12255782 |
HBB0226 |
System.Drawing.CopyPixelOperation.MergePaint
|
| vbNotSrcCopy |
3342344 |
H330008 |
System.Drawing.CopyPixelOperation.NotSourceCopy
|
| vbNotSrcErase |
1114278 |
H1100A6 |
System.Drawing.CopyPixelOperation.NotSourceErase
|
| vbPatCopy |
15728673 |
HF00021 |
System.Drawing.CopyPixelOperation.PatCopy
|
| vbPatInvert |
5898313 |
H5A0049 |
System.Drawing.CopyPixelOperation.PatInvert
|
| vbPatPaint |
16452105 |
HFB0A09 |
System.Drawing.CopyPixelOperation.PatPaint
|
| vbSrcAnd |
8913094 |
H8800C6 |
System.Drawing.CopyPixelOperation.SourceAnd
|
| vbSrcCopy |
13369376 |
HCC0020 |
System.Drawing.CopyPixelOperation.SourceCopy
|
| vbSrcErase |
4457256 |
H440328 |
System.Drawing.CopyPixelOperation.SourceErase
|
| vbSrcInvert |
6684742 |
H660046 |
System.Drawing.CopyPixelOperation.SourceInvert
|
| vbSrcPaint |
15597702 |
HEE0086 |
System.Drawing.CopyPixelOperation.SourcePaint
|
I found this email in my inbox today:
“Hi Mauricio,I came across a reference to your blog at :http://stackoverflow.com/questions/1286746/c-open-link-in-new-tab-webbrowser-control
I have been studying your writings on extending the WebBrowser control, and verified that the extended web code you wrote for C# compiles and works fine in VS 2010 beta, against FrameWork 4.0.
Many thanks for the valuble code and writing !
I am "stuck" on how to read the contents of an IE browser page when the page is displaying a local file, like the contents of the Favorites folder.
All my attempts to get at the Document or DomDocument by casting it to the usual mshtml.dll interfaces fail.
I am NOT asking you to answer my question, or respond, but if you ever get interested in blogging about this aspect of use of IE, I think many people would be interested.
I have done a lot of research on the net, and posted my own question on StackOverFlow : so far not one real pointer, and, possibly, this is not "doable" (?) : maybe what you are seeing when IE shows a file contents is a kind of "virtual explorer" view that is not parseable.
best, Bill xxxxxx”
And I decided to take at look at it to see if I could be of any help and I found out that it is easy and doable.
So I find an useful link by Andreas M. if you want to look at it.
In general My Favorites, Desktop, etc are special folder. So they need a trick to be able to access them.

Take the code from my ExtendedWebBrowser sample published in http://blogs.artinsoft.net/mrojas/archive/2009/05/01/opening-popup-in-a-newwindow.aspx
and http://blogs.artinsoft.net/mrojas/archive/2009/08/07/newwindow3.aspx and
1. Add a reference to %windir%\system32\shell32.dll
2. Add a new property to the ExtendedWebBrowser like:
    /// <summary>
    /// Returns the shell folderview object displayed in the webbrowser control.
    /// </summary>
    public Shell32.IShellFolderViewDual2 FolderView
    {
        get
        {
            return ((SHDocVw.WebBrowser)base.ActiveXInstance).Document
                     as Shell32.IShellFolderViewDual2;
        }
    }
And now you can access the special folder from your code. As Bill mentioned, that “page” or “special page” is not real HTML and not parseable but you can examine its contents for example you can do something like:
        /// <summary>
        /// Button 1_ click
        /// </summary>
        private void button1_Click(object sender, EventArgs e)
        {
            Shell32.IShellFolderViewDual2 specialFolder = this.extendedWebBrowser1.FolderView;
            string folderName = specialFolder.Folder.Title;
            string parentFolder = specialFolder.Folder.ParentFolder.Title;
            foreach (Shell32.ShellFolderItem f in specialFolder.Folder.Items())
            {
                if (f.IsFolder)
                    System.Diagnostics.Debug.WriteLine("Folder:" + f.Name);
                else
                    System.Diagnostics.Debug.WriteLine("File:" + f.Name);
            } // foreach
        } // button1_Click(sender, e)
If I have a PInvoke call like the following:
[DllImport("Advapi32.dll", CharSet=CharSet.Auto)]
static extern Boolean FileEncryptionStatus(String filename,
   out UInt32 status);
What is the difference between
[DllImport("Advapi32.dll", CharSet=CharSet.Auto)] static extern Boolean FileEncryptionStatus(String filename, out UInt32 status);
and
[DllImport("Advapi32.dll", CharSet=CharSet.Auto)] static extern Boolean FileEncryptionStatus(String filename, ref UInt32 status);
Well, as long as I have tested it, they exactly the same. From the MSDN you can even read
“I could have selected the ref keyword here as well, and in fact both result in the same machine code at run time. The out keyword is simply a specialization of a by-ref parameter that indicates to the C# compiler that the data being passed is only being passed out of the called function. In contrast, with the ref keyword the compiler assumes that data may flow both in and out of the called function.”
“When marshaling pointers through P/Invoke, ref and out are only used with value types in managed code. You can tell a parameter is a value type when its CLR type is defined using the struct keyword. Out and ref are used to marshal pointers to these data types”
So what should you use? Well using the out keyword for PInvoke will just add some information or documentation to your method, but because these functions are implemented in C or C++ they might treat an out parameter as an IN parameter so I really prefere to use ref when I’m calling functions with PInvoke.
Recently an user of the ExtendedBrowser v2 commented that he needed access to the NewWindow3 event.
The NewWindow3 event is raised when a new window is to be created. It extends NewWindow2 with additional information about the new window.
Syntax
Private Sub object_NewWindow3( _
	ByRef ppDisp As Object, _
	ByRef Cancel As Boolean, _
	ByVal dwFlags As Long, _
	ByVal bstrUrlContext As String, _
	ByVal bstrUrl As String)
Parameters
object Object expression that resolves to the objects in the Applies To list. ppDisp Object expression that, optionally, receives a new, hidden WebBrowser or InternetExplorer object with no URL loaded. Cancel A Boolean value that determines whether the current navigation should be canceled. true Cancel the navigation. false Do not cancel the navigation. dwFlags The flags from the NWMFenumeration that pertain to the new window.
typedef enum NWMF
{
NWMF_UNLOADING = 0x00000001,
NWMF_USERINITED = 0x00000002,
NWMF_FIRST = 0x00000004,
NWMF_OVERRIDEKEY = 0x00000008,
NWMF_SHOWHELP = 0x00000010,
NWMF_HTMLDIALOG = 0x00000020,
NWMF_FROMDIALOGCHILD = 0x00000040,
NWMF_USERREQUESTED = 0x00000080,
NWMF_USERALLOWED = 0x00000100,
NWMF_FORCEWINDOW = 0x00010000,
NWMF_FORCETAB = 0x00020000,
NWMF_SUGGESTWINDOW = 0x00040000,
NWMF_SUGGESTTAB = 0x00080000,
NWMF_INACTIVETAB = 0x00100000
} NWMF;
bstrUrlContext The URL of the page that is opening the new window. bstrUrlThe URL that is opened in the new window.
Please notice:
Note The NewWindow3 event is only fired when a new instance of Internet Explorer is about to be created. Calling showModalDialog or showModelessDialog does not trigger an event because they are not new instances of Internet Explorer. They are implemented as MSHTML host windows, which allows them to render and display HTML content but not hyperlinks between documents.
You can download from here
DOWNLOAD CODE HERE v3_1
ExtendedBrowserExampleVBNET.zip (92.56 kb)
I was looking for a “.net” way of detecting the CapsLock state, but almost all the references pointed to pinvoke code like:
<DllImport("user32.dll")> _
Public Shared Function GetKeyState(VirtKey As Integer) As Integer
End Sub
And I finally found two ways:
1) You can call methods from the System.Console class:
You can use the System.Console.CapsLock property and if you want the NumLock state use: System.Console.NumberLock
or
2) You can call make an instance of Microsoft.VisualBasic.Devices.Keyboard. (For this if you are in C# you need to add a reference to Microsoft.VisualBasic.dll)
For example:
Microsoft.VisualBasic.Devices.Keyboard key = new Microsoft.VisualBasic.Devices.Keyboard();
and use properties like:
key.CapsLock
key.NumLock
key.ScrollLock
key.ShiftKeyDown
key.CtrlKeyDown
key.AltKeyDown