Most of our clients come from a medium-size to a big enterprise level. In these scenarios is very common to have different department using different technologies to solve their business needs.
These different technologies can be on a very homogeneous platform like .NET where you can easily interact between your VB.NET and C# assemblies, or they could be on differente technologies like ASP, Classic VB, C++, or Powerbuilder.
This post is about PowerBuilder, and in order to interact with PowerBuilder I think the easiest way is to expose your assemblies thru COM Interop.
So if there is some .NET functionality that you want to expose to PowerBuilder you just need to expose that functionality with a class in a ClassLibrary project with COM attributes.
Let’s begin with a simple program to show how to comunicate Powerbuilder with C#.
NOTE: If you don’t have Powerbuilder you can get a trial version from: http://www.sybase.com/detail?id=1052162
- Open Microsoft Visual Studio
- On the File Menu, choose the New option, and in the File submenu choose Project….

Figure 1. Visual Studio File Menu. Choosing the option for a new project
- When you choose that option a dialog window will shown with the available options for new projects. In the option for C# Projects choose “Class Library”

Figure 2. New Project dialog window
You must introduce the new project name, location and solution name. Type something like ClassLibrary1, D:\PowerBuilder, ClassLibrary1.
1. When you finish creating your project you will have a code file called Class1.cs.
2. Change that code for something like :
using System;
using System.Collections.Generic;
using System.Text;

namespace SimpleClass
{
    public class Class1
    {
        public int AddTenToParameter(int param1)
        {
            return param1 + 10;
        }

        public void SayHi()
        {
            System.Windows.Forms.MessageBox.Show("Hello World!");
        }

        public String GiveMeDate()
        {
            return DateTime.Now.ToLongDateString();
        }
    }
}
This will allow to test things like parameter passing, using different return types like strings or integers. But Before you continue you must add a reference to System.Windows.Forms to be able to use the MessageBox.

Figure 3. Adding a reference

Figure 3. Reference to System.Windows.Forms
3. Right click on the solution file and select properties:

Figure 4. Option to change project properties
4. Select the Register for COM Interop checkbox

Figure 5. Project properties window
5. Return to Class1.cs code file
6. Add an using statement after the existing using lines on Class1.cs file:
using System.Runtime.InteropServices;
7. Add the following attributes to the class:
[ComVisible(true)]

[ClassInterface(ClassInterfaceType.AutoDual)]

[ProgId("ClassLibrary1.Class1")]
Note: the ProgId is very important, because these value will be use in PB to comunicate with the this code
8. Now you must edit the AssemblyInfo.cs

Figure 6. AssemblyInfo.cs File
Now make sure to establish the COM settings in this file with statements like the following:
// Setting ComVisible to false makes the types in this assembly not visible
// to COM components. If you need to access a type in this assembly from
// COM, set the ComVisible attribute to true on that type.
[assembly: ComVisible(true)]
// The following GUID is for the ID of the typelib if this project is exposed to COM
[assembly: Guid("69efac5b-d887-40f4-a7e9-2721ac3c1598")]
The Guid is also very important, because this is used to differentiate this component and it must be unique.
To generate a new GUID you can got to the Tools Menu and choose the option Create GUID

Figure 7. Option menu to create a GUID
In the Create Guid dialog box, choose the fourth option and press Copy to put the contents on the Clipboard. Later, copy that value in the GUID attribute but remove the “{“ y “}”.
Now we are set. You only need to build the solution and the DLL. The build process with register the COM component.
If you will use the component on another computer you need to create an instalation program.
Using your program from Powerbuilder
Using your program from Powerbuilder is very easy. You just need code like the following:

Figure 8. PB Code to call a C# class thru COM
When you execute this program you will have 3 messageboxes :
- Hello World!
- 30
- Monday, March 02, 2009 (this message will change depending of the day, locale and regional settings)
Creating an instalation program
- Right click the solution and in the context menu choose Add and then new project.

Figure 9. Context Menu to add a new project
On the dialog box for Add New projec, look for the Other Project Types section and the choose Setup Project.

Figure 10. Creating a setup project
In this dialog bos indicate the name and location of the setup project. For example Setup1 and D:\Powerbuilder\ClassLibrary1.
Later, add a project to the setup program. To do that rigth click on the setup project and select Add, and in the submenu choose Project Output.

Figure 11. Adding a project to the setup project.
A dialog box will be shown with a combo that allow you to select the proyects in the solution. Choose ClassLibrary1 and press OK.

Figure 12. Adding project output to the setup project.
When you build this instalation program two files will be produced:
Release
D:\PowerBuilder\ClassLibrary1\Setup1\Release\Setup.exe
D:\PowerBuilder\ClassLibrary1\Setup1\Release\Setup1.msi
Debug
D:\PowerBuilder\ClassLibrary1\Setup1\Debug\Setup.exe
D:\PowerBuilder\ClassLibrary1\Setup1\Debug\Setup1.msi
When you run the instalation program, this program will handle the instalation of the .NET component and the COM registration.
My good friend Jafet, was recently dealing with an interesting bug in Visual Studio.
He created a simple Visual Studio Project that had just an interface that he exposed thru COM. He’s intention was to compile the Class Library and use the TLB file in other projects, but after building the solution he found out that there was no TLB file generated.
After some tests he finally found out that Visual Studio does not generates a TLB if there are not classes in the Project. So your options are, add a dummy class to your project or invoke the TLB tool from the command line.
:)
My first language ever was GW-Basic. I was a teenager doing in summer work at a company that made polls about hair products and things like that. At that time I didn’t had a computer. They were tooooo expensive.
And I found a manual for GW-Basic. I stole it, to make a copy, my boss found out and he fired me :(. But then I had the power!! jeje. With my cousin Esteban we started out first programs. And we got our first sale :) :) :). It was the typical POS software for a small video rental company.
Ahhh, and that was just the beginning.
So, I really appreciate basic, with all its strengths and weaknesses. I do most of my development now in C#, I think due to my C++, java years, and know I am more used to its syntax, and I really prefer C#. But I consider Basic a real treasure.
Well recently while digging in the Microsoft Dev Labs I discovered SmallBasic. I was just browsing for some new stuff and I am glad to have found this jewel.
Artinsoft (the company I work for) is a company that has devoted a lot of time in the research of automatic software migration to other platforms.Not for nothing one of our flapship products is Visual Basic Upgrade Companion, so basic in any form is always a delight for me. (I will soon post a brief article about bringing VBScript back to life in VB.NET just wait and see)
Ok. Back to SmallBasic.
First of all. The interface is great!!!
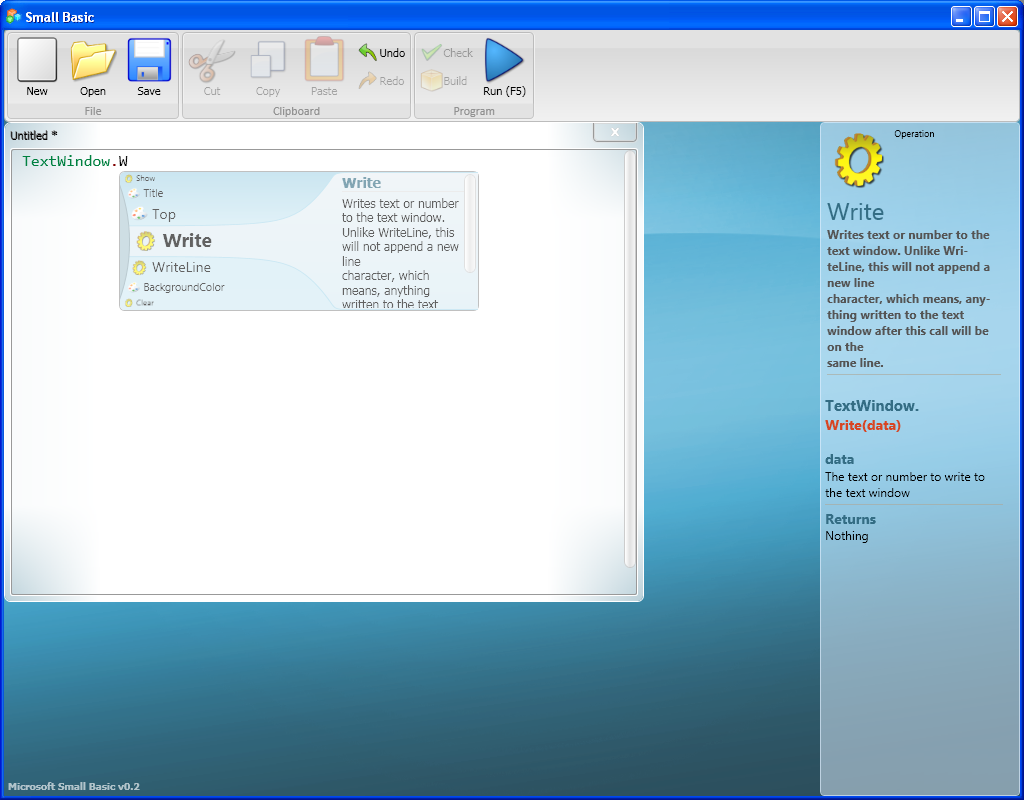
It has a cool intellisense guide and you can even extend it :)
And they even resurrected LOGO!

I just hope to write a cool Turtle Graphics routine soon!
:)
COM
The idea is to make a class or several classes available thru COM. Then the compiled dll or the TLB is used to generate and Interop Assembly and call the desired functions.
With this solution the current C++ code base line can be kept or might require just subtle changes.
Calling a function thru com is involved in a lot of marshalling and can add an additional layer that is not really needed in the architecture of the solution.
Creating a Managed Wrapper with Managed C++
The idea with this scenario is to provide a class in Managed C++ that will be available in C#. This class is just a thin proxy that redirects calls to the Managed object.
Let’s see the following example:
If we have a couple of unmanaged classes like:
class Shape {
public:
Shape() {
nshapes++;
}
virtual ~Shape() {
nshapes--;
};
double x, y;
void move(double dx, double dy);
virtual double area(void) = 0;
virtual double perimeter(void) = 0;
static int nshapes;
};
class Circle : public Shape {
private:
double radius;
public:
Circle(double r) : radius(r) { };
virtual double area(void);
virtual double perimeter(void);
};
The first thing we can try, to expose our classes to .NET it to set the setting for managed compilation:

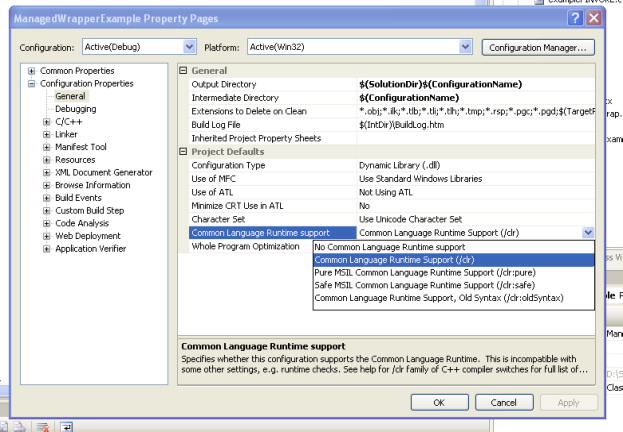
If your project compiles then you are just very close, and what you need is to add some managed classes to your C++ project to expose your native classes:
Let’s see the Shape class:
//We can use another namespace, to avoid name collition.
//In this way we can replicate the structure of our C++ classes.
namespace exposedToNET
{
//Shape is an abstract class so the better thing
// to do is to generate an interface
public interface class Shape : IDisposable
{
public:
//public variables must be exposed as properties
property double x
{
double get();
void set(double value);
}
property double y
{
double get();
void set(double value);
}
//method do not expose any problems
void move(double dx, double dy);
double area();
double perimeter();
//public static variables must
static property int nshapes;
};
//Static methods or variables of abstract class are added here
public ref class Shape_Methods
{
//public static variables must be exposed as static properties
public:
static property int nshapes
{
int get()
{
return ::Shape::nshapes;
}
void set(int value)
{
::Shape::nshapes = value;
}
}
};
}
And for the Circle class we will have something like this:
namespace exposedToNET
{
public ref class Circle : Shape
{
private:
::Circle* c;
public:
Circle(double radius)
{
c = new ::Circle(radius);
}
~Circle()
{
delete c;
}
//public variables must be exposed as properties
property double x
{
virtual double get()
{
return c->x;
}
virtual void set(double value)
{
c->x = value;
}
}
property double y
{
virtual double get()
{
return c->y;
}
virtual void set(double value)
{
c->y = value;
}
}
//method do not expose any problems
virtual void move(double dx, double dy)
{
return c->move(dx,dy);
}
virtual double area()
{
return c->area();
}
virtual double perimeter()
{
return c->perimeter();
}
//public static variables must be exposed as static properties
static property int nshapes
{
int get()
{
return ::Shape::nshapes;
}
void set(int value)
{
::Shape::nshapes = value;
}
}
};
}
DOWNLOAD EXAMPLE CODE
SWIG
SWIG is a software development tool that connects programs written in C and C++ with a variety of high-level programming languages.
This is a great tool used for several languages like Python, Perl, Ruby, Scheme, and even in different platforms.
The exposure mechanism used in this scheme is platform invoke, the issues here are similar to those of COM because there is some marshaling going on. This scheme might be more efficient than the COM one but I haven’t really test it to be completely sure that it is better.
I have reviewed the SWIG code and it might also be possible to modify its code to generate wrappers using managed C++, but this is an interesting exercise that I have to leave for my readers. Sorry I just don’t have enough time.
But how is SWIG used?
In SWIG what you do is that you add a .i file to your project. This file provides directives for some code generation that specify exactly what you want to expose and how.
This can very helpful if you just want to expose some methods.
If you are lazy like me you can just add something like:
/* File : example.i */
%module example
%{
#include "example.h" ß you put here includes with the definitions for your classes
%}
/* Let's just grab the original header file here */
%include "example.h" ß add alse the include here
And SWIG will add a file like example_wrap.cxx that you have to compile with the rest of your C++ code.
It will also generate a set of C# classes that you use in your C# application, so it seams to your program that all the code is just C#.
SWIG is a great tool and has been testing in a lot of platforms.
Most people migrating their application want to move ahead and take advantage of new technologies and new operating systems.
So if you had a VB6 application and you migrated it with us to .NET we will recommend and automate the process to use ADO.NET.
Why?
You can still use ODBC but i will list some compelling reasons:
* There a very fast ADO.NET drivers available. Using ODBC implies addind an interop overhead that can affect performance.
* Some vendors do not support and/or certify the use of ODBC drivers for .NET. So in those cases if you use ODBC your are on your own.
During my consulting experience I have seen several problems using ODBC drivers ranging from just poor performance, problems with some SQL statements, stored procedures calls, database specific features or complete system inestability.
* and also problems running in 64-bit.
This last one is very concerning. If you made all the effort to migrate an application to .NET and run it on for example on a Windows 2003 64 bit server it wont be able to use your 32-bit ODBC drivers unless you go to the the Build tab, and set Platform Target to "x86".
This is very sad because your application cannot take advantage of all the 64 bit resources.
If you are lucky enough you might find a 64 bit version of your ODBC driver but I will really recommend going straigth to 64-bit and use ADO.NET. And that's exactly what we can really help you to do specially in our version 2.2 of the VBUC.
This post describes an an interesting workaround that you can use to support the migration of ActiveX Documents with the Artinsoft Visual Basic Upgrade Companion which is one of the Artinsoft \ Mobilize.NET tools you can use to modernize your Visual Basic, Windows Forms and PowerBuilder applications.
Currently the Visual Basic Upgrade Companion does not allow you to process ActiveX Document directly, but there is a workaround: in general ActiveX Document are something really close to an User Control which is a element that is migrated automatically by the Visual Basic Upgrade Companion.
This post provides a link to a tool (DOWNLOAD TOOL) that can fix your VB6 projects, so the Visual Basic Upgrade Companion processes them. To run the tool:
1) Open the command prompt
2) Go to the Folder where the .vbp file is located
3) Execute a command line command like:
FixUserDocuments Project1.vbp
This will generate a new project called Project1_modified.vbp. Migrate this new project and now UserDocuments will be supported.
First Some History
VB6 allows you to create UserDocuments, which can be embedded inside an ActiveX container. The most common one is Internet Explorer. After compilation, the document is contained in a Visual Basic Document file (.VBD) and the server is contained in either an .EXE or .DLL file. During development, the project is in a .DOB file, which is a plain text file containing the definitions of the project’s controls, source code, and so on.
If an ActiveX document project contains graphical elements that cannot be stored in text format, they will be kept in a .DOX file. The .DOB and .DOX files in an ActiveX document project are parallel to the .FRM and .FRX files of a regular Visual Basic executable project.
The trick to support ActiveX documents is that in general they are very similar to UserControls, and .NET UserControls can also be hosted in a WebBrowser. The following command line tool can be used to update your VB6 projects. It will generate a new solution where UserDocuments will be defined as UserControls.
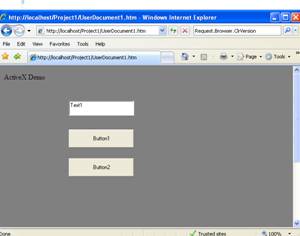
If you have an ActiveX document like the following:
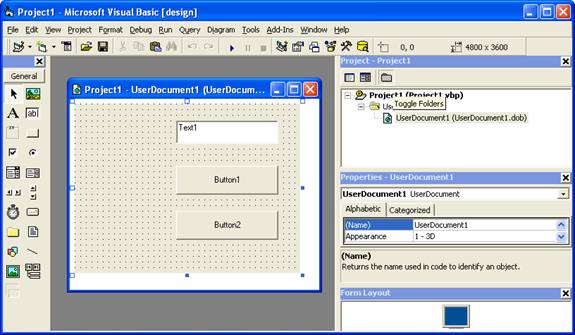
Then after running the tool you will have an Project like the following:
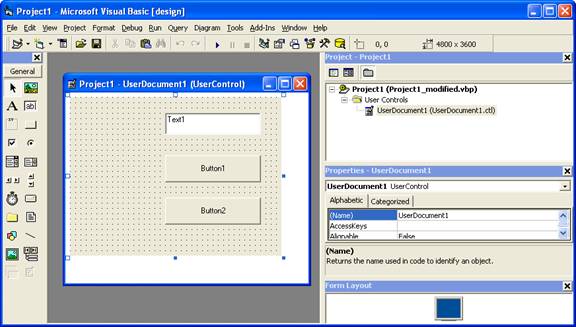
So after you have upgraded the projet with the Fixing tool, open the Visual Basic Upgrade Companion and migrate your project.
After migration you will get something like this:
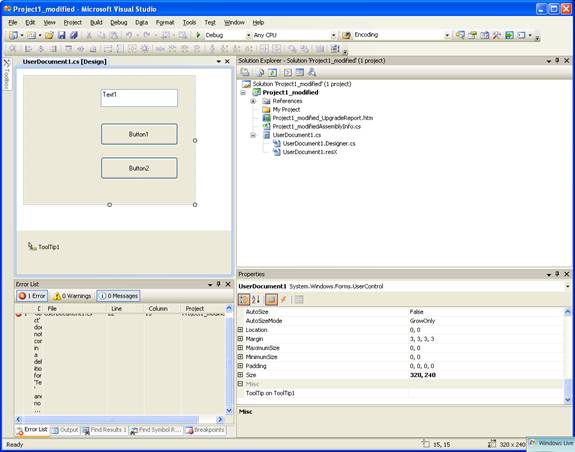
To use your migrated code embedded in a Web Browser copy the generated assemblies and .pdb to the directory you will publish:
Next create an .HTM page. For example UserDocument1.htm
The contents of that page should be something like the following:
|
<html>
<body>
<p>ActiveX Demo<br> <br></body>
<object id="UserDocument1"
classid="http:<AssemblyFileName>#<QualifiedName of Object>"
height="500" width="500" VIEWASTEXT>
</object>
<br><br>
</html>
For example:
<html>
<body>
<p>ActiveX Demo<br> <br></body>
<object id="UserDocument1"
classid="http:Project1.dll#Project1.UserDocument1"
height="500" width="500" VIEWASTEXT>
</object>
<br><br>
</html>
|
Now all that is left is to publish the output directory.
To publish your WinForms user control follow these steps.
- Create a Virtual Directory:
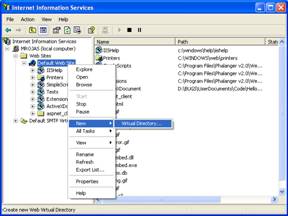
- A Wizard to create a Virtual Directory will appear.

Click Next
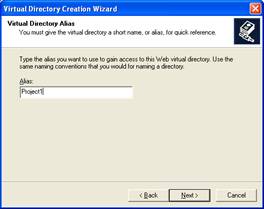
Name the directory as you want. For example Project1. Click Next
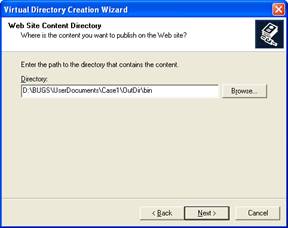
Select the location of your files. Click the Browse button to open a dialog box where you can select your files location. Click Next
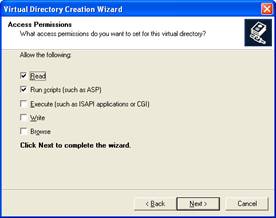
Check the read and run scripts checks and click next
Now Click Finish
- Properties for the Virtual Directory will look like this:
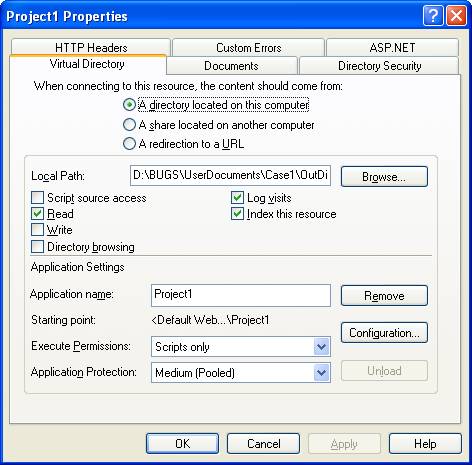
NOTE: to see this dialog right click over the virtual directory
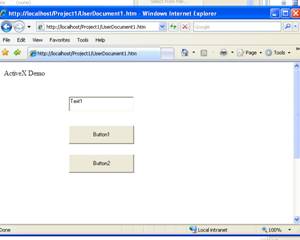
- Now just browse to the address lets say http:\\localhost\Project1\UserDocument1.htm
And that should be all! :)
The colors are different because of the Host configuration however a simple CSS like:
<style>
body {background-color: gray;}
</style>
Can make the desired change:
Notice that there will be security limitations, for example for thinks like MessageBoxes.
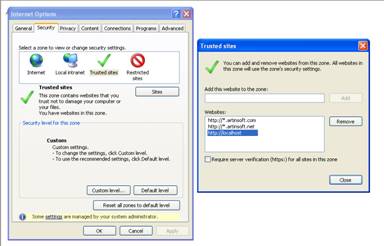
You can allow restricted operations by setting your site as a restricted site:
For example:
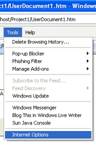
Restrictions
The constraints for this solution include:
* This solutions requires Windows operating system on the client side
* Internet Explorer 6.0 is the only browser that provides support for this type of hosting
* It requires .NET runtime to be installed on the client machine.
* It also requires Windows 2000 and IIS 5.0 or above on the server side
Due to all of the above constraints, it might be beneficial to detect the capabilities of the client machine and then deliver content that is appropriate to them. For example, since forms controls hosted in IE require the presence of the .NET runtime on the client machine, we can write code to check if the client machine has the .NET runtime installed. You can do this by checking the value of the Request.Browser.ClrVersion property. If the client machine has .NET installed, this property will return the version number; otherwise it will return 0.0.
Adding a script like:
<script>
if ((navigator.userAgent.indexOf(".NET CLR")>-1))
{
//alert ("CLR available " +navigator.userAgent);
}
else
alert(".NET SDK/Runtime is not available for us from within " + "your web browser or your web browser is not supported." + " Please check with http://msdn.microsoft.com/net/ for " + "appropriate .NET runtime for your machine.");
</script>
Will help with that.
References:
ActiveX Documents Definitions:
http://www.aivosto.com/visdev/vdmbvis58.html
Hosting .NET Controls in IE
http://www.15seconds.com/issue/030610.htm
During migratio of a simple project, we found an interesting migration details.
The solution has a project with two Forms. Form1 and Form2. Form1 has a command button and in the Click for that command button it performs a code like UnLoad Form2.
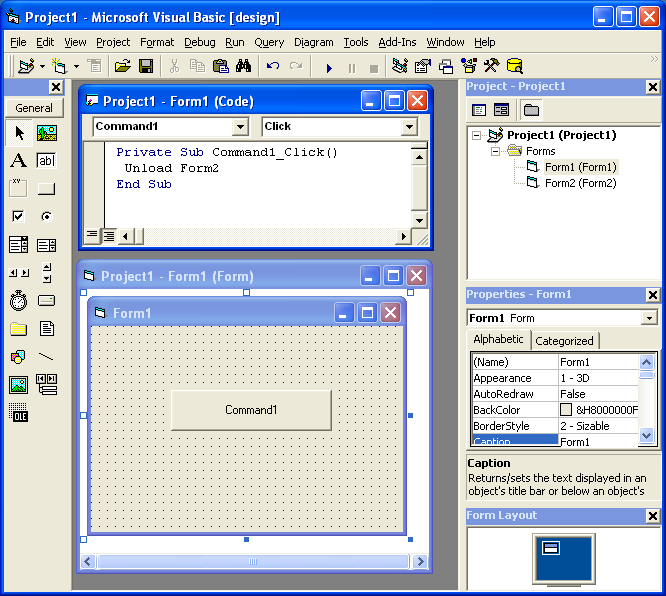
But it could happen that Form2 has not been loaded but in VB6 it is not a problem. In .NET the code will be something like form2.Close() and it could cause problems.
A possible fix is to add some flag that indicates if the form was instanciated and the call the event.
Have you ever wished to modify the way Visual Studio imported a COM Class. Well finally you can.
The Managed, Native, and COM Interop Team (wow what a name). It looks like the name of that goverment office in the Ironman movie.
Well this fine group of men, have release the source code of the TLBIMP tool. I'm more that happy for this.
I can know finally get why are some things imported the way they are.
http://www.codeplex.com/clrinterop
You can dowload also the P/Invoke assistant. This assistant has a library of signatures so you can invoke any Windows API.
The WebBrowser control for .NET is just a wrapper for the IE ActiveX control. However this wrapper does not expose all the events that the IE ActiveX control exposes.
For example the ActiveX control has a NewWindow2 that you can use to intercept when a new window is gonna be created and you can even use the ppDisp variable to give a pointer to an IE ActiveX instance where you want the new window to be displayed.
So, our solution was to extend the WebBrowser control to make some of those events public.
In general the solution is the following:
- Create a new Class for your Event that extend any of the basic EventArgs classes.
- Add constructors and property accessor to the class
- Look at the IE Activex info and add the DWebBrowserEvents2 and IWebBrowser2 COM interfaces. We need them to make our hooks.
- Create a WebBrowserExtendedEvents extending System.Runtime.InteropServices.StandardOleMarshalObject and DWebBrowserEvents2. We need this class to intercept the ActiveX events. Add methos for all the events that you want to intercept.
- Extend the WebBrowser control overriding the CreateSink and DetachSink methods, here is where the WebBrowserExtendedEvents class is used to make the conneciton.
- Add EventHandler for all the events.
And thats all.Here is the code. Just add it to a file like ExtendedWebBrowser.cs
using System;
using System.Windows.Forms;
using System.ComponentModel;
using System.Runtime.InteropServices;

    //First define a new EventArgs class to contain the newly exposed data
    public class NewWindow2EventArgs : CancelEventArgs
    {

        object ppDisp;

        public object PPDisp
        {
            get { return ppDisp; }
            set { ppDisp = value; }
        }


        public NewWindow2EventArgs(ref object ppDisp, ref bool cancel)
            : base()
        {
            this.ppDisp = ppDisp;
            this.Cancel = cancel;
        }
    }

    public class DocumentCompleteEventArgs : EventArgs
    {
        private object ppDisp;
        private object url;

        public object PPDisp
        {
            get { return ppDisp; }
            set { ppDisp = value; }
        }

        public object Url
        {
            get { return url; }
            set { url = value; }
        }

       public DocumentCompleteEventArgs(object ppDisp,object url)
        {
           this.ppDisp = ppDisp;
           this.url = url;

        }
    }

    public class CommandStateChangeEventArgs : EventArgs
    {
        private long command;
        private bool enable;
        public CommandStateChangeEventArgs(long command, ref bool enable)
        {
            this.command = command;
            this.enable = enable;
        }

        public long Command
        {
            get { return command; }
            set { command = value; }
        }

        public bool Enable
        {
            get { return enable; }
            set { enable = value; }
        }
    }


    //Extend the WebBrowser control
    public class ExtendedWebBrowser : WebBrowser
    {
        AxHost.ConnectionPointCookie cookie;
        WebBrowserExtendedEvents events;


        //This method will be called to give you a chance to create your own event sink
        protected override void CreateSink()
        {
            //MAKE SURE TO CALL THE BASE or the normal events won't fire
            base.CreateSink();
            events = new WebBrowserExtendedEvents(this);
            cookie = new AxHost.ConnectionPointCookie(this.ActiveXInstance, events, typeof(DWebBrowserEvents2));

        }

        public object Application
        {
            get
            {
                IWebBrowser2 axWebBrowser = this.ActiveXInstance as IWebBrowser2;
                if (axWebBrowser != null)
                {
                    return axWebBrowser.Application;
                }
                else
                    return null;
            }
        }

        protected override void DetachSink()
        {
            if (null != cookie)
            {
                cookie.Disconnect();
                cookie = null;
            }
            base.DetachSink();
        }

        //This new event will fire for the NewWindow2
        public event EventHandler<NewWindow2EventArgs> NewWindow2;

        protected void OnNewWindow2(ref object ppDisp, ref bool cancel)
        {
            EventHandler<NewWindow2EventArgs> h = NewWindow2;
            NewWindow2EventArgs args = new NewWindow2EventArgs(ref ppDisp, ref cancel);
            if (null != h)
            {
                h(this, args);
            }
            //Pass the cancellation chosen back out to the events
            //Pass the ppDisp chosen back out to the events
            cancel = args.Cancel;
            ppDisp = args.PPDisp;
        }


        //This new event will fire for the DocumentComplete
        public event EventHandler<DocumentCompleteEventArgs> DocumentComplete;

        protected void OnDocumentComplete(object ppDisp, object url)
        {
            EventHandler<DocumentCompleteEventArgs> h = DocumentComplete;
            DocumentCompleteEventArgs args = new DocumentCompleteEventArgs( ppDisp, url);
            if (null != h)
            {
                h(this, args);
            }
            //Pass the ppDisp chosen back out to the events
            ppDisp = args.PPDisp;
            //I think url is readonly
        }

        //This new event will fire for the DocumentComplete
        public event EventHandler<CommandStateChangeEventArgs> CommandStateChange;

        protected void OnCommandStateChange(long command, ref bool enable)
        {
            EventHandler<CommandStateChangeEventArgs> h = CommandStateChange;
            CommandStateChangeEventArgs args = new CommandStateChangeEventArgs(command, ref enable);
            if (null != h)
            {
                h(this, args);
            }
        }


        //This class will capture events from the WebBrowser
        public class WebBrowserExtendedEvents : System.Runtime.InteropServices.StandardOleMarshalObject, DWebBrowserEvents2
        {
            ExtendedWebBrowser _Browser;
            public WebBrowserExtendedEvents(ExtendedWebBrowser browser)
            { _Browser = browser; }

            //Implement whichever events you wish
            public void NewWindow2(ref object pDisp, ref bool cancel)
            {
                _Browser.OnNewWindow2(ref pDisp, ref cancel);
            }

            //Implement whichever events you wish
            public void DocumentComplete(object pDisp,ref object url)
            {
                _Browser.OnDocumentComplete( pDisp, url);
            }

            //Implement whichever events you wish
            public void CommandStateChange(long command, bool enable)
            {
                _Browser.OnCommandStateChange( command,  ref enable);
            }


        }
        [ComImport, Guid("34A715A0-6587-11D0-924A-0020AFC7AC4D"), InterfaceType(ComInterfaceType.InterfaceIsIDispatch), TypeLibType(TypeLibTypeFlags.FHidden)]
        public interface DWebBrowserEvents2
        {
            [DispId(0x69)]
            void CommandStateChange([In] long command, [In] bool enable);
            [DispId(0x103)]
            void DocumentComplete([In, MarshalAs(UnmanagedType.IDispatch)] object pDisp, [In] ref object URL);
            [DispId(0xfb)]
            void NewWindow2([In, Out, MarshalAs(UnmanagedType.IDispatch)] ref object pDisp, [In, Out] ref bool cancel);
        }

        [ComImport, Guid("D30C1661-CDAF-11d0-8A3E-00C04FC9E26E"), TypeLibType(TypeLibTypeFlags.FOleAutomation | TypeLibTypeFlags.FDual | TypeLibTypeFlags.FHidden)]
        public interface IWebBrowser2
        {
            [DispId(100)]
            void GoBack();
            [DispId(0x65)]
            void GoForward();
            [DispId(0x66)]
            void GoHome();
            [DispId(0x67)]
            void GoSearch();
            [DispId(0x68)]
            void Navigate([In] string Url, [In] ref object flags, [In] ref object targetFrameName, [In] ref object postData, [In] ref object headers);
            [DispId(-550)]
            void Refresh();
            [DispId(0x69)]
            void Refresh2([In] ref object level);
            [DispId(0x6a)]
            void Stop();
            [DispId(200)]
            object Application { [return: MarshalAs(UnmanagedType.IDispatch)] get; }
            [DispId(0xc9)]
            object Parent { [return: MarshalAs(UnmanagedType.IDispatch)] get; }
            [DispId(0xca)]
            object Container { [return: MarshalAs(UnmanagedType.IDispatch)] get; }
            [DispId(0xcb)]
            object Document { [return: MarshalAs(UnmanagedType.IDispatch)] get; }
            [DispId(0xcc)]
            bool TopLevelContainer { get; }
            [DispId(0xcd)]
            string Type { get; }
            [DispId(0xce)]
            int Left { get; set; }
            [DispId(0xcf)]
            int Top { get; set; }
            [DispId(0xd0)]
            int Width { get; set; }
            [DispId(0xd1)]
            int Height { get; set; }
            [DispId(210)]
            string LocationName { get; }
            [DispId(0xd3)]
            string LocationURL { get; }
            [DispId(0xd4)]
            bool Busy { get; }
            [DispId(300)]
            void Quit();
            [DispId(0x12d)]
            void ClientToWindow(out int pcx, out int pcy);
            [DispId(0x12e)]
            void PutProperty([In] string property, [In] object vtValue);
            [DispId(0x12f)]
            object GetProperty([In] string property);
            [DispId(0)]
            string Name { get; }
            [DispId(-515)]
            int HWND { get; }
            [DispId(400)]
            string FullName { get; }
            [DispId(0x191)]
            string Path { get; }
            [DispId(0x192)]
            bool Visible { get; set; }
            [DispId(0x193)]
            bool StatusBar { get; set; }
            [DispId(0x194)]
            string StatusText { get; set; }
            [DispId(0x195)]
            int ToolBar { get; set; }
            [DispId(0x196)]
            bool MenuBar { get; set; }
            [DispId(0x197)]
            bool FullScreen { get; set; }
            [DispId(500)]
            void Navigate2([In] ref object URL, [In] ref object flags, [In] ref object targetFrameName, [In] ref object postData, [In] ref object headers);
            [DispId(0x1f7)]
            void ShowBrowserBar([In] ref object pvaClsid, [In] ref object pvarShow, [In] ref object pvarSize);
            [DispId(-525)]
            WebBrowserReadyState ReadyState { get; }
            [DispId(550)]
            bool Offline { get; set; }
            [DispId(0x227)]
            bool Silent { get; set; }
            [DispId(0x228)]
            bool RegisterAsBrowser { get; set; }
            [DispId(0x229)]
            bool RegisterAsDropTarget { get; set; }
            [DispId(0x22a)]
            bool TheaterMode { get; set; }
            [DispId(0x22b)]
            bool AddressBar { get; set; }
            [DispId(0x22c)]
            bool Resizable { get; set; }
        }
   }
If you have some .NET code that you want to share with VB6, COM has always been a nice option. You just add couple of ComVisible tags and that's all.
But...
Collections can be a little tricky.
This is a simple example of how to expose your Collections To VB6.
Here I create an ArrayList descendant that you can use to expose your collections.
Just create a new C# class library project and add the code below.
Remember to check the Register for ComInterop setting.
using System;
using System.Collections.Generic;
using System.Text;
using System.Runtime.InteropServices;

namespace CollectionsInterop
{

    [Guid("0490E147-F2D2-4909-A4B8-3533D2F264D0")]
    [ComVisible(true)]
    public interface IMyCollectionInterface
    {

        int Add(object value);
        void Clear();
        bool Contains(object value);
        int IndexOf(object value);
        void Insert(int index, object value);
        void Remove(object value);
        void RemoveAt(int index);

        [DispId(-4)]
        System.Collections.IEnumerator GetEnumerator();

        [DispId(0)]
        [System.Runtime.CompilerServices.IndexerName("_Default")]
        object this[int index]
        {
            get;
        }
    }


    [ComVisible(true)]
    [ClassInterface(ClassInterfaceType.None)]
    [ComDefaultInterface(typeof(IMyCollectionInterface))]
    [ProgId("CollectionsInterop.VB6InteropArrayList")]
    public class VB6InteropArrayList : System.Collections.ArrayList, IMyCollectionInterface
    {

        #region IMyCollectionInterface Members


        // COM friendly strong typed GetEnumerator

        [DispId(-4)]
        public System.Collections.IEnumerator GetEnumerator()
        {
            return base.GetEnumerator();
        }


        #endregion
    }


    /// <summary>
    /// Simple object for example
    /// </summary>
    [ComVisible(true)]
    [ClassInterface(ClassInterfaceType.AutoDual)]
    [ProgId("CollectionsInterop.MyObject")]
    public class MyObject
    {
        String value1 = "nulo";

        public String Value1
        {
            get { return value1; }
            set { value1 = value; }
        }
        String value2 = "nulo";

        public String Value2
        {
            get { return value2; }
            set { value2 = value; }
        }
    }


}
To test this code you can use this VB6 code. Remember to add a reference to this class library.
Private Sub Form_Load()
    Dim simpleCollection As New CollectionsInterop.VB6InteropArrayList
    Dim value As New CollectionsInterop.MyObject
    value.Value1 = "Mi valor1"
    value.Value2 = "Autre valeur"
    simpleCollection.Add value

    For Each c In simpleCollection
      MsgBox value.Value1
    Next
End Sub