Recently while we were performing the migration of a blog engine in ASP.NET to Azure we had to deal with some issues with
the differences between IIS6 and IIS7.
Windows Azure Web Roles, use IIS7, with Integrated Pipeline mode and that is a breaking change for some ASP.NET sites.
The are at least two main changes:
First is for HTTP modules and handlers.(This info was taken from: http://arcware.net/use-a-single-web-config-for-iis6-and-iis7/)
" For IIS6, they were configured in the <system.web> section, as such:
<httpModules>
<add name="..." type="..." />
<add name="..." type="..." />
<add name="..." type="..." />
</httpModules>
<httpHandlers>
<add verb="..." path="..." type="..." />
<add verb="..." path="..." type="..." />
</httpHandlers>
However, to get these to work in IIS7 you must *move them* from the <system.web> section to the new <system.webServer> section, which is what IIS7 requires when running in Integrated Pipeline mode (it’s not needed for Classic Pipeline mode)
So instead of the above you have this instead:
<system.webServer>
    </modules>
        <add name="..." type="..." />
    </modules>
    <handlers accessPolicy="Read, Write, Script, Execute">
        <add verb="...." name="..." path="..." type="..." />

</handlers>
</system.webServer>
Notice there are a couple slight changes, which means you can;t just copy and paste
these as-is from <system.web> into <system.webServer>:
<httpModules> and <httpHandlers> have been renamed to <modules> and <handlers>, respectively.
Each handler in IIS7 requires a name attribute. If you don;t specify it, you'll get an error message.
The handlers node has an optional, but good-to-define accessPolicy attribute.
This value depends on your handlers, so use the ones that are right for you."
Second
There are some restrictions in IIS7 when you are running in Integrated mode.
For example you cannot do calls to the request property of an HttpContext object.
All calls to HttpContext.Current.Request will have a problem because Request will be null.
You can see more details here:
http://mvolo.com/blogs/serverside/archive/2007/11/10/Integrated-mode-Request-is-not-available-in-this-context-in-Application_5F00_Start.aspx
I have been playing around with one of my test Azure Web Roles to determine
if it is possible to run it inside Azure, using a Web Role not just a VM Role.
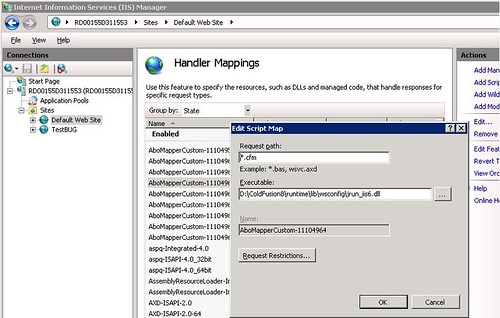
So far I have been able to run Coldfusion 8 in a Web Role, but I have not been able to fully automate this task,
I had to do a remote desktop to the Web Role and perform the following tasks:
-
Add Features to the Web Roles particulary II6 Management Compatibility
-
Make sure that the Handlers for CFM, CFML, CFC are inplace
If you are doing Silverlight development, one thing that can be cumbersome is keeping in sync
your development and production settings. Specially if you are using WCF services because you have
to make sure that your ServiceClient.config file has the right values.
What I usually do is this.
1. First set fixed ports for my application. See http://blogs.msdn.com/b/webdevelopertips/archive/2008/11/07/tip-21-did-you-know-how-to-set-a-fixed-port-for-the-developer-web-server.aspx
2. Modify my hosts file in C:\Windows\System32\drivers\etc adding an entry like:
#
# This is a sample HOSTS file used by Microsoft TCP/IP for Windows.
#
# This file contains the mappings of IP addresses to host names. Each
# entry should be kept on an individual line. The IP address should
# be placed in the first column followed by the corresponding host name.
# The IP address and the host name should be separated by at least one
# space.
#
# Additionally, comments (such as these) may be inserted on individual
# lines or following the machine name denoted by a '#' symbol.
#
# For example:
#
# 102.54.94.97 rhino.acme.com # source server
# 38.25.63.10 x.acme.com # x client host
# localhost name resolution is handled within DNS itself.
127.0.0.1 localhost
127.0.0.1 productionserver.cloudapp.net
In this way all you have to change is your hosts file and you keep the same settings for development and for production
If you dont have Windows Azure Tools installed
1. Open Visual Studio 2010
2. On the File Menu, Click new, and then click Project. This opens the New Project dialog
3. In the New Project dialog under Installed Templates, expand the Visual C# node
4. In project type click Cloud. A project that says Enable Windows Azure Tools appears
5. In Name type for example EnableTools and click OK
6. A project with a web page will appear. Click the Download Windows Azure Tools button. Close Visual Studio. Download and installed them.

Once you have Windows Azure Toolsl installed
1. Open Visual Studio 2010
2. On the File Menu, Click new, and then click Project. This opens the New Project dialog
3. In the New Project dialog under Installed Templates, expand the Visual C# node
4. In project type click Cloud. A project that says Windows Azure Cloud Service appears

5. In Name Type for example Phonebook and click ok. The New Cloud Service Project is shown
If you are developing a Silverlight application with some services select the WCF Service Web Role. Rename it to something appropriate. In this example will be Phonebook.Web and Press OK

Your solution explorer will look like this:

Now you can developing your application. We already have an Silverlight application (that was migrated from VB6 to Silverlight) and some existing Silverlight Class libraries and Server Class Libraries (Class Libraries compiled with the full 4.0 Framework that will be used in the Server Project Phonebook.Web).
To add your Silverlight app. Right Click your server project (Phonebook.Web), then Properties and in Properties go to Silverlight Application and add Phonebook_Silverlight
When everything compiles Go to the Visual Studio Menu Bar, then Debug and then Start Without Debugging. That starts the local development environment on your computer.

You can now start testing and finish development of your application.
There is something you myst notice. Everytime you start the Cloud Service, the Azure test environment starts. By default it will start in http:\\localhost:81 but there was a previous Development Fabric it will start in http:\\localhost:81. This is important for Silverlight applications because you must configure your service end point to a particular port. Make sure that your ServiceReferences.ClientConfig file is in sync with the port that your DevelopmentFabric is using
|
Notes for Azure development:
Sometimes during development it might happen that you get more than one instance of the Development Fabric. This will affect your silverlight apps that rely on WFC services because each new instance starts on a new port. You can use the CSRun tool to stop all instances.
If you have installed the Windows® Azure™ SDK to the default location, the CSRun tool can be found at C:\Program Files\Windows Azure SDK\v1.0\bin\csrun.exe.Then run C:\Program Files\Windows Azure SDK\v1.2\bin\csrun.exe /devfabric:shutdown
|
Publishing your Application
1. Navigate to Azure : https://windows.azure.com/Cloud/Provisioning/Default.aspx
2. On the page that says My Projects. When you are starting you will only see one project line. Click on it

3. Click on New Service

4. Click on Hosted Services

5. In the Create Service page, specify the service properties. In this example we will use Phonebook.Web for service label and a short description and press next.

6. Now your hosted service needs a public url. You must check availability. In this example we will use phonebook. Hosted Affinity tries to group your services and storages in the same area. We have a SQL Azure database that is hosted in North Central US, so we will create a new AffinityGroup and call it PhonebookGroup. Press Create

7. After Creation your Service is ready, and you can start the deployment.

8. In Visual Studio 2010 Right click your Cloud Service. And Select Publish…

9. The Publish Cloud Service Dialog appears. From the Credentials drop down list select <Add>

10. From the Create or select an existing certificate select <Create>.
10.1 In our example we will enter a FriendlyName for the new certificate of PhoneBook.

10.2 Click the “Copy the full path” link in the dialog. Then Open your browser and navigate to https://windows.azure.com/cloud/provisioning/ and click on your project

10.3 Now click on account.And in the Account page click on Manage My API Certificates

10.4 Click the Choose file and paste the full path you had copied before and then click upload

the installed certificate will be shown below.

10.5 Now navigate to AppFabric by clicking AppFabric on the left hand side. This will show your subscription ID. Select it and copy it. You have to pasted on the dialog box in Visual Studio on the textbox that says above it “Copy the subscription ID”

and name those Credentials PhonebookAccount and press OK
11 You need a storage account. If you have not created one. Then you have to follow these steps:
11.1 Open your browser and navigate to https://windows.azure.com/cloud/provisioning/ and click on your project.
11.2 Now click on New Service

11.3 Now click on Storage Account

11.4 The Create Service Page is show. Enter a Service label and Description and Click Next

11.5 Select a name for the public URL, check its availability. And select Affinity.And press Create

12. Press OK on the Publish Cloud Service Dialog

13. Visual studio will upload your application to the cloud

While your application is in staging the only problem might be that the published URL changed and that might be conflictive for your ServiceReferences.ClientConfig.
Once your application is on Staging you can switch it to Production and your are ready for business.
One of the first steps to put your database in Windows Azure is to put your data on the cloud.
1. The first step is to log in to Azure
1.a) Go to https://windows.azure.com/Cloud/Provisioning/Default.aspx
1.b)Type your user name and password.
1.c) When your are logged in go to SQL Azure option on the left hand menu.
1.d) You will see a list of your projects. Click on the project.

2. You must accept Azure Terms of Use

3. Now create a server. You must indicate an administrator username and password. Azure will set the server name.
Press the Create Server button and continue.

4. Now let’s create a new database.Press the Create Database Button

5. Just type your database name, edition and size. Editions can be Web or Business.
At this moment Size for Web Edition is 1GB or 5GB and for Business is 10GB, 20GB, 30GB, 40GB and 50GB.
Prices varies according to the options that you select.
For my purposes I will select a Web Edition of 1GB

6. You should be able to see your new database in the Databases list.

7. Configure Firewall settings so you can connect to the new database.

7.1 Press the Allow Microsoft Services access to this server checkbox.
That will add a Rule Name that allows access from 0.0.0.0 to 0.0.0.0.
Select the rule and press Edit. You must can type something like 0.0.0.0 to 255.255.255.255 to allow access to all IP Address.
Moving your data to SQL Azure
The easiest way to upload a SQL Server database to SQL Azure is to use
the SQL Azure Migration Wizard this is a great tool that you can download from
CodePlex http://sqlazuremw.codeplex.com/
1. Download the tool. In my case I installed it in D:\SQLAzureTools. Run SQLAzureMW.exe

2. Select SQL Database and press Next

3. Select your database and press connect. That will add your database to a list. Click on your database name and press Next

4. Select the tables and other object that you will move to your SQL Azure database

5. Press Next a Summary is presented with all options

6. The wizard will generate a BCP file and a script for your tables.

You can connect to run your scripts with the following command:
> sqlcmd -S tcp:<servername>.database.windows.net -U <username>@<servername> -P <password> –d <database>
Depending on your configuration you might have problems with BCP. In general you need something like:
To export data:
bcp PhoneBook out c:\temp\Phonebook-c.dat –S <Server> –T –c
-T means a trusted connection and native format
To import data
bcp Phonebook.dbo.Phonebook in c:\temp\Phonebook-c.dat -c -U <username>@<servername> -P <Password> -S tcp:<servername>.database.windows.net -c
After importing your data, you are set to keep on developing your applications on Azure
NOTE:
If you dont know the schema name connect to your database and run something like:
SELECT '['+SCHEMA_NAME(schema_id)+'].['+name+']' AS SchemaTable FROM sys.tables