As vb6 migration experts in our company we deal everyday with a lot of issues around Interop and serialization.
One important thing to note is the concept of “Bittable Types”. I’m not making up terms. Those terms actually exist. Just see this link in MSDN.
In a few words, a bittable type is a type that has the same representation in managed and unmanaged code.
Why in earth is that important at all?
Because if you are calling that great C++ DLL implemented some years ago that just works ok, you won’t be able to pass a NON-Bittable type because that DLL will expect a binary representation different from that in the .NET virtual machine.
This is also an issue in other scenarios like:
- Serializing content to files
- Sending messages through messaging mechanisms like named-pipes or sockets.
Well, we have just introduced the problem so now let’s think on a nice solution for this problem.
Well Bittable Types are:
The following types from the System namespace are blittable types:
So now let’s look at a couple of non-BITTABLE types
DateTime
To test this differences let’s make a small test in VB6 and write a Date value to a file:
Private Sub SaveDateToFile()
    Open "C:\test1.bin" For Binary Access Write As #1
    Dim d1 As Date
    d1 = "1/1/2009"
    Put #1, , d1
    Close #1
End Sub
Now let’s make a quick program in Vb.NET
Sub Main()
        Dim f As System.IO.FileStream = System.IO.File.Open("C:\test2.bin", IO.FileMode.Create, IO.FileAccess.Write)
        Dim fw As New System.IO.BinaryWriter(f)
        Dim d As Date
        d = Convert.ToDateTime("1/1/2009")
        Dim val As Long = d.ToBinary()
        fw.Write(val)
        fw.Close()
        Main2()
    End Sub
If we compare these files we will have:

So the values are obviously different. This is because VB6 Date are stores with the OLE Automation DateFormat
So let’s change the C# code for something like:
    Sub Main2()
        Dim f As System.IO.FileStream = System.IO.File.Open("C:\test3.bin", IO.FileMode.Create, IO.FileAccess.Write)
        Dim fw As New System.IO.BinaryWriter(f)
        Dim d As Date
        d = Convert.ToDateTime("1/1/2009")
        fw.Write(d.ToOADate())
        fw.Close()
    End Sub
And now when we compare the files we will have:

So to make your Date values compatible with VB6 format you must user the DateTime method .ToOADate. Now if you are calling a DLL that expects a Date value in the same format used by VB6 then you will have to do this:
        Dim d As Date
        d = Convert.ToDateTime("1/1/2009")
        Dim handle As System.Runtime.InteropServices.GCHandle = System.Runtime.InteropServices.GCHandle.Alloc(d.ToOADate(), Runtime.InteropServices.GCHandleType.Pinned)
        Dim memory_address As IntPtr = handle.AddrOfPinnedObject()
        Try
            APICall(memory_address)
        Finally
            d = DateTime.FromOADate(System.Runtime.InteropServices.Marshal.ReadInt64(memory_address))
            handle.Free()
        End Try
String
Most of the time you wont have to deal with String marshalling because adding marshaling tags to your API call solves most of the problems, but if you arent that luckyly then you might do something like:
IntPtr ptrToStringVar = System.Runtime.InteropServices.Marshal.StringToHGlobalAnsi(strVar);
try
{
   APICall(ptrToStringVar);
}
finally
{
strVar = System.Runtime.InteropServices.Marshal.PtrToStringAnsi(ptrToStringVar);
System.Runtime.InteropServices.Marshal.FreeHGlobal(ptrToStringVar);
}
NOTE: if you have an API that might return an string with /0 characters you must call the API with System.Runtime.InteropServices.Marshal.PtrToStringAnsi(ptrToStringVar,size), if you do that the Framework will take in consideration the size bytes at the ptrToStringVar memory address.
Double and Singles
At least between VB6 and VB.NET the double and single types follows the same format. Well, at least, that is the result of my tests.
Try it yourself, the following shows a simple test for double variables:
VB6
Private Sub SaveDoubleToFile()
    Open "C:\test1.bin" For Binary Access Write As #1
    Dim d1 As Double
    d1 = 1.123
    Put #1, , d1
    Close #1
End Sub

Sub Main()
    SaveDoubleToFile
End Sub
.NET
Module Module1

    Sub Main()
        Dim f As System.IO.FileStream = System.IO.File.Open("C:\test2.bin", IO.FileMode.Create, IO.FileAccess.Write)
        Dim fw As New System.IO.BinaryWriter(f)
        Dim d As Double
        d = 1.123
        fw.Write(d)
        fw.Close()
    End Sub


End Module
So you could make an api call in those cases with something like:
Dim handle As System.Runtime.InteropServices.GCHandle = System.Runtime.InteropServices.GCHandle.Alloc(d, System.Runtime.InteropServices.GCHandleType.Pinned)
Dim ptr As System.IntPtr = handle.AddrOfPinnedObject()
Try
    APICall(ptr)
Finally
    handle.Free()
End Try
One of our clients wanted to change the CreateObject function migration for a function of their own. So they wanted all cases like:
Dim x As Object
Set x = CreateObject("Excel.Application")
To be migrated to something like:
Excel.Application x = (Excel.Application) Utils.MyCreateObject("Excel.Application", "");
Our migratio vb6migration tool provides a new cool feature called CustomMaps. This feature allows you to provide some simple but useful changes to the way things get migrated.
For this case follow these steps:
1. Open the Visual Basic Upgrade Companion.
2. In the Tools Menu choose:

3. Create a new CustomMaps File and an an entry like the following:

Notice the Source name is VBA.Interaction.CreateObject. To find out this name you can look in your VB6 IDE, right click on the CreateObject and select goto Definition.


and for the target name just put the implementation that you what, for example you can write a function like:
class Utils
        {
            public static object MyCreateObject(string className,params object[] ignoreRestParams)
            {
                return Activator.CreateInstance(Type.GetType(className));
            }
        }
and set the SourceName to Utils.MyCreateObject (or NameSpace.Utils.MyCreateObject to use the fully qualified name). You just need to set the New Reference Name column because we will not change the definition of the function.
Most of our clients come from a medium-size to a big enterprise level. In these scenarios is very common to have different department using different technologies to solve their business needs.
These different technologies can be on a very homogeneous platform like .NET where you can easily interact between your VB.NET and C# assemblies, or they could be on differente technologies like ASP, Classic VB, C++, or Powerbuilder.
This post is about PowerBuilder, and in order to interact with PowerBuilder I think the easiest way is to expose your assemblies thru COM Interop.
So if there is some .NET functionality that you want to expose to PowerBuilder you just need to expose that functionality with a class in a ClassLibrary project with COM attributes.
Let’s begin with a simple program to show how to comunicate Powerbuilder with C#.
NOTE: If you don’t have Powerbuilder you can get a trial version from: http://www.sybase.com/detail?id=1052162
- Open Microsoft Visual Studio
- On the File Menu, choose the New option, and in the File submenu choose Project….

Figure 1. Visual Studio File Menu. Choosing the option for a new project
- When you choose that option a dialog window will shown with the available options for new projects. In the option for C# Projects choose “Class Library”

Figure 2. New Project dialog window
You must introduce the new project name, location and solution name. Type something like ClassLibrary1, D:\PowerBuilder, ClassLibrary1.
1. When you finish creating your project you will have a code file called Class1.cs.
2. Change that code for something like :
using System;
using System.Collections.Generic;
using System.Text;

namespace SimpleClass
{
    public class Class1
    {
        public int AddTenToParameter(int param1)
        {
            return param1 + 10;
        }

        public void SayHi()
        {
            System.Windows.Forms.MessageBox.Show("Hello World!");
        }

        public String GiveMeDate()
        {
            return DateTime.Now.ToLongDateString();
        }
    }
}
This will allow to test things like parameter passing, using different return types like strings or integers. But Before you continue you must add a reference to System.Windows.Forms to be able to use the MessageBox.

Figure 3. Adding a reference

Figure 3. Reference to System.Windows.Forms
3. Right click on the solution file and select properties:

Figure 4. Option to change project properties
4. Select the Register for COM Interop checkbox

Figure 5. Project properties window
5. Return to Class1.cs code file
6. Add an using statement after the existing using lines on Class1.cs file:
using System.Runtime.InteropServices;
7. Add the following attributes to the class:
[ComVisible(true)]

[ClassInterface(ClassInterfaceType.AutoDual)]

[ProgId("ClassLibrary1.Class1")]
Note: the ProgId is very important, because these value will be use in PB to comunicate with the this code
8. Now you must edit the AssemblyInfo.cs

Figure 6. AssemblyInfo.cs File
Now make sure to establish the COM settings in this file with statements like the following:
// Setting ComVisible to false makes the types in this assembly not visible
// to COM components. If you need to access a type in this assembly from
// COM, set the ComVisible attribute to true on that type.
[assembly: ComVisible(true)]
// The following GUID is for the ID of the typelib if this project is exposed to COM
[assembly: Guid("69efac5b-d887-40f4-a7e9-2721ac3c1598")]
The Guid is also very important, because this is used to differentiate this component and it must be unique.
To generate a new GUID you can got to the Tools Menu and choose the option Create GUID

Figure 7. Option menu to create a GUID
In the Create Guid dialog box, choose the fourth option and press Copy to put the contents on the Clipboard. Later, copy that value in the GUID attribute but remove the “{“ y “}”.
Now we are set. You only need to build the solution and the DLL. The build process with register the COM component.
If you will use the component on another computer you need to create an instalation program.
Using your program from Powerbuilder
Using your program from Powerbuilder is very easy. You just need code like the following:

Figure 8. PB Code to call a C# class thru COM
When you execute this program you will have 3 messageboxes :
- Hello World!
- 30
- Monday, March 02, 2009 (this message will change depending of the day, locale and regional settings)
Creating an instalation program
- Right click the solution and in the context menu choose Add and then new project.

Figure 9. Context Menu to add a new project
On the dialog box for Add New projec, look for the Other Project Types section and the choose Setup Project.

Figure 10. Creating a setup project
In this dialog bos indicate the name and location of the setup project. For example Setup1 and D:\Powerbuilder\ClassLibrary1.
Later, add a project to the setup program. To do that rigth click on the setup project and select Add, and in the submenu choose Project Output.

Figure 11. Adding a project to the setup project.
A dialog box will be shown with a combo that allow you to select the proyects in the solution. Choose ClassLibrary1 and press OK.

Figure 12. Adding project output to the setup project.
When you build this instalation program two files will be produced:
Release
D:\PowerBuilder\ClassLibrary1\Setup1\Release\Setup.exe
D:\PowerBuilder\ClassLibrary1\Setup1\Release\Setup1.msi
Debug
D:\PowerBuilder\ClassLibrary1\Setup1\Debug\Setup.exe
D:\PowerBuilder\ClassLibrary1\Setup1\Debug\Setup1.msi
When you run the instalation program, this program will handle the instalation of the .NET component and the COM registration.
COM
The idea is to make a class or several classes available thru COM. Then the compiled dll or the TLB is used to generate and Interop Assembly and call the desired functions.
With this solution the current C++ code base line can be kept or might require just subtle changes.
Calling a function thru com is involved in a lot of marshalling and can add an additional layer that is not really needed in the architecture of the solution.
Creating a Managed Wrapper with Managed C++
The idea with this scenario is to provide a class in Managed C++ that will be available in C#. This class is just a thin proxy that redirects calls to the Managed object.
Let’s see the following example:
If we have a couple of unmanaged classes like:
class Shape {
public:
Shape() {
nshapes++;
}
virtual ~Shape() {
nshapes--;
};
double x, y;
void move(double dx, double dy);
virtual double area(void) = 0;
virtual double perimeter(void) = 0;
static int nshapes;
};
class Circle : public Shape {
private:
double radius;
public:
Circle(double r) : radius(r) { };
virtual double area(void);
virtual double perimeter(void);
};
The first thing we can try, to expose our classes to .NET it to set the setting for managed compilation:

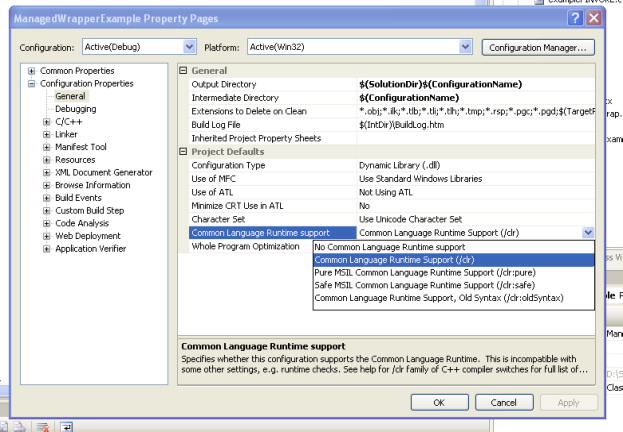
If your project compiles then you are just very close, and what you need is to add some managed classes to your C++ project to expose your native classes:
Let’s see the Shape class:
//We can use another namespace, to avoid name collition.
//In this way we can replicate the structure of our C++ classes.
namespace exposedToNET
{
//Shape is an abstract class so the better thing
// to do is to generate an interface
public interface class Shape : IDisposable
{
public:
//public variables must be exposed as properties
property double x
{
double get();
void set(double value);
}
property double y
{
double get();
void set(double value);
}
//method do not expose any problems
void move(double dx, double dy);
double area();
double perimeter();
//public static variables must
static property int nshapes;
};
//Static methods or variables of abstract class are added here
public ref class Shape_Methods
{
//public static variables must be exposed as static properties
public:
static property int nshapes
{
int get()
{
return ::Shape::nshapes;
}
void set(int value)
{
::Shape::nshapes = value;
}
}
};
}
And for the Circle class we will have something like this:
namespace exposedToNET
{
public ref class Circle : Shape
{
private:
::Circle* c;
public:
Circle(double radius)
{
c = new ::Circle(radius);
}
~Circle()
{
delete c;
}
//public variables must be exposed as properties
property double x
{
virtual double get()
{
return c->x;
}
virtual void set(double value)
{
c->x = value;
}
}
property double y
{
virtual double get()
{
return c->y;
}
virtual void set(double value)
{
c->y = value;
}
}
//method do not expose any problems
virtual void move(double dx, double dy)
{
return c->move(dx,dy);
}
virtual double area()
{
return c->area();
}
virtual double perimeter()
{
return c->perimeter();
}
//public static variables must be exposed as static properties
static property int nshapes
{
int get()
{
return ::Shape::nshapes;
}
void set(int value)
{
::Shape::nshapes = value;
}
}
};
}
DOWNLOAD EXAMPLE CODE
SWIG
SWIG is a software development tool that connects programs written in C and C++ with a variety of high-level programming languages.
This is a great tool used for several languages like Python, Perl, Ruby, Scheme, and even in different platforms.
The exposure mechanism used in this scheme is platform invoke, the issues here are similar to those of COM because there is some marshaling going on. This scheme might be more efficient than the COM one but I haven’t really test it to be completely sure that it is better.
I have reviewed the SWIG code and it might also be possible to modify its code to generate wrappers using managed C++, but this is an interesting exercise that I have to leave for my readers. Sorry I just don’t have enough time.
But how is SWIG used?
In SWIG what you do is that you add a .i file to your project. This file provides directives for some code generation that specify exactly what you want to expose and how.
This can very helpful if you just want to expose some methods.
If you are lazy like me you can just add something like:
/* File : example.i */
%module example
%{
#include "example.h" ß you put here includes with the definitions for your classes
%}
/* Let's just grab the original header file here */
%include "example.h" ß add alse the include here
And SWIG will add a file like example_wrap.cxx that you have to compile with the rest of your C++ code.
It will also generate a set of C# classes that you use in your C# application, so it seams to your program that all the code is just C#.
SWIG is a great tool and has been testing in a lot of platforms.
We found some machines that do not show the "Attach To Process" option.
This is very important for us, specially if you are testing the migration of an VB6 ActiveX EXE or ActiveX DLL to C#.
There is a bug reported by Microsoft http://support.microsoft.com/kb/929664
Just follow the Tool/Import Settings wizard to the end. Close and restart VS and the options will reapper.
Also you might find that the Configuration Manager is not available to switch between Release and Build for example.
To fix this problem just go to Tools -> Options -> Projects and Solutions -> General... make sure the option "Show advanced build configurations" is checked.
Have you ever wished to modify the way Visual Studio imported a COM Class. Well finally you can.
The Managed, Native, and COM Interop Team (wow what a name). It looks like the name of that goverment office in the Ironman movie.
Well this fine group of men, have release the source code of the TLBIMP tool. I'm more that happy for this.
I can know finally get why are some things imported the way they are.
http://www.codeplex.com/clrinterop
You can dowload also the P/Invoke assistant. This assistant has a library of signatures so you can invoke any Windows API.
As part of the VB Companion Development group, my day to day includes
migrating several project from different clients, to develop custom mappings
and custom functionality for their migration needs or to add new features
for the next VB Companion version.
A long part of the initialization in the migration process consists of the load and
analysis of the COM references indicated in the .VBP project file.
Sometimes I have notice that there are several references that are never used.
Removing these references will provide a great save in time because the migration will
not have to incur in any time for TypeLib and TypeInfo extraction.
I look for a tool that let me get rid of the VB6 unused referencences but I found none.
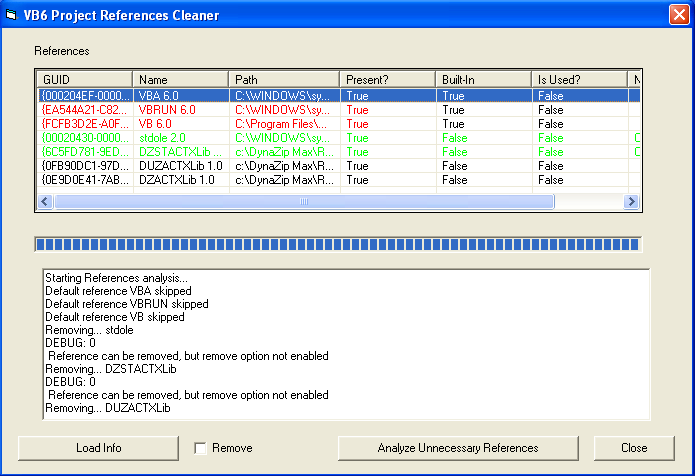
So I decided to create one myself. And I created the VB6 Project References Cleaner Addin
The concept of the tool is simple, someone from a group posted the idea I just implemented.
The addin goes thru all the references and one by one tries to remove it.
And then compiles the project. It the project compiles,then the reference was not neccesary.
If you mark the remove option the tool will remove the references for you.
This tool will NOT SAVE the project file. You decide if you what to save it.
I'm attaching the source code and the dll. To used it just take the VB6References.dll and run:
regsvr32 VB6References.dll
After that the tool will appear in the Addins menu in VB6
SOURCE CODE and BINARIES