Is very simple. To get the control with the focus do something just use the FocusManager.GetFocusedElement()
See: http://msdn.microsoft.com/en-us/library/system.windows.input.focusmanager(v=VS.95).aspx
You can also add an extension method like:
public static class FocusExtensionMethods
{
public static bool HasFocus(this Control c)
{
return FocusManager.GetFocusedElement() == c;
}
}
My friend Jesus has been working on an interesting task. We has been implementing some code so we can connect
a WIA compatible scanner with a Silverlight App.
Once he got the scanner to work, he had to send that data to the Silverlight app.
Something like:
var stream = new MemoryStream(data);
BitmapImage bmp = new BitmapImage();
bmp.SetSource(stream);
During this interesting test the infamous Catastrophic failure was raised. This exception
is caused if the data is in an invalid or unsupported format. You can see about this issue in
these links:
http://connect.microsoft.com/VisualStudio/feedback/details/436047/silverlight-3-bitmapimage-setsource-catastrophic-failure
http://forums.silverlight.net/p/232426/569554.aspx
However, Jesus found a interesting solution. Use an appropriate encoder. He found this page:
http://blogs.msdn.com/b/jstegman/archive/2009/09/08/silverlight-3-sample-updates.aspx
With references of Encoder for: .ICO, BMP and GIF
With this code you can do something beautiful like this:
Stream    file = …

// Decode
Texture texture = Silverlight.Samples.BMPDecoder.Decode(file);
//Texture is another class in this sample that will return a writeable Bitmap
//And with that texture object you just load the image like this:
WriteableBitmap        wb = texture.GetWriteableBitmap();
wb.Invalidate();
img.Source = wb;

Nice!!!!
Silverlight is when you have to add a lot of items.
I know, I know maybe you should choose another way to show that data,
but leaving philosophical-ui design discussions, the real problem is that
usually those components are bind to ObservableCollections.
ObservableCollections are a bit of an exhibitionist.
Each time you add an item it will yell
Hey!! Yoo-hoo! HEY!!! YOU!!
I'm HEREEEEEEEEEEEEEEEEEE!!!!
Look at me!! Look at Me!!! Look Mom No Hands!!! Look Dad no Feet!!! HEY!!!!!!!!
So if you have some code like:
for(int i=0;i<10000;i++)
{
    comboItems.Add("item" + i);
}
A nice thing will be to be able to do something like:
var items = new String[10000]
for(int i=0;i<10000;i++)
{
    items[i]="item" + i;
}
comboItems.AddRange(items);
And then provide just ONE notification of Collection Changed instead of a lot of
little cries for attention.
Well that is the reason for this new version of ObservableCollection that I call
RangeObservableCollection:
using System;
using System.Collections.ObjectModel;
using System.Collections.Generic;

namespace Utils
{
    public class RangeObservableCollection<T> : ObservableCollection<T>
    {
        private bool _suppressNotification = false;

        public RangeObservableCollection() : base() { }

        public RangeObservableCollection(IEnumerable<T> collection) : base(collection) { }

        protected override void OnPropertyChanged(System.ComponentModel.PropertyChangedEventArgs e)
        {
            if (!_suppressNotification) base.OnPropertyChanged(e);
        }

        protected override void OnCollectionChanged(System.Collections.Specialized.NotifyCollectionChangedEventArgs e)
        {
            if (!_suppressNotification)
                base.OnCollectionChanged(e);
        }

        /// <summary>
        /// Adds a collection suppressing notification per item and just raising a notification
        /// for the whole collection
        /// </summary>
        /// <param name="list"></param>
        public void AddRange(IEnumerable<T> list)
        {
            if (list == null) throw new ArgumentNullException("list");
            _suppressNotification = true;
            foreach (T item in list)
            {
                Add(item);
            }
            _suppressNotification = false;
            OnCollectionChanged(new System.Collections.Specialized.NotifyCollectionChangedEventArgs(System.Collections.Specialized.NotifyCollectionChangedAction.Reset));
        }

    }

}
The VS Profiler Team has an excellent post teaching how to use the VS2010 profiler with Silverlight Applications.
The steps are simple.
Run the A Visual Studio Command Prompt
And follow these steps:
- VSPerfClrEnv /sampleon
- "c:\Program Files (x86)\Internet Explorer\iexplore.exe" C:\Breakout\Breakout\Bin\Release\TestPage.html
- VSPerfCmd /start:sample /output:MyFile /attach:<PID of iexplore.exe process>
- Run your scenario
- VSPerfCmd /detach
- VSPerfCmd /shutdown
- VSPerfClrEnv /off
NOTE: information reposted from http://blogs.msdn.com/b/profiler/archive/2010/04/26/vs2010-silverlight-4-profiling.aspx
When the finish you will have a file called MyFile.vsp and just open that with VS2010.
In Silverlight you can put an application in FullScreen mode using code like the one exposed here:
http://msdn.microsoft.com/en-us/library/cc189023(v=vs.95).aspx
However that does not allows you to start the application in FullScreen, because the application
can only enter in FullScreen with an user event.
So, one possible approach is to use javascript. So you can do something like this:
<HTML>
<HEAD>

<script LANGUAGE="JavaScript">

<!--
    closeTime = "2000";
    function closeTimer() {
        setTimeout("newURL()", closeTime);
    }

    function newURL() {
        newURLWindow = window.open("FullScreenModeTestPage.html", "redirect", "fullscreen=yes");
        self.close()
    }
//-->
</script>

<BODY onLoad="closeTimer()">
<center>
<H1>YOU WILL BE REDIRECTED; NEW A NEW WINDOW WILL OPEN IN FULLSCREEN; PRESS ALT+F4 TO CLOSE IT!</H1>
</center>
 </BODY>
</HTML>
I’m very fond of one of our newest products www.silverlightmigration.com 
It provides a way to refresh your applications to take full advantage of XAML,
solves deployment issues, runs in Windows, Mac OSX and in some Linux with
MoonLight
And we are event tuning it up for the next jump: Windows 8… keep tuned for that.
One of the things a like most about this solution is XAML theming.
In general there are good themes but today I would like to recommend the SystemColors theme
from http://blogs.msdn.com/b/corrinab/archive/2010/04/12/9994045.aspx
You can download it from here.
This theme allows you to style all core, sdk and toolkit controls so they will use the theme that
you currently have in Windows. These might be very useful for some LOB applications,
so the applications can see more like native applications, and with the advent of Silverlight 5 and more
native integration, better Out-of-Browser execution I think it is just fine.
See some screen shots:


If you were in VB6 HelpContextID will be familiar for you (http://msdn.microsoft.com/en-us/library/aa267690(v=vs.60).aspx). In those sweet VB6 days all you had to do was:
Private Sub Form_Load ()
   App.HelpFile = "VB.HLP"
   Frame1.HelpContextID = 21004
   Text1.HelpContextID = 21001
   Form1.HelpContextID = 21005
End Sub
And each time you pressed the F1 button your application will have opened the .hlp file and show you the Help Topic corresponding to that ID. After migration from VB6 to WinForms Help you now have the HelpProvider.SetHelpKeyword http://msdn.microsoft.com/en-us/library/system.windows.forms.helpprovider.sethelpkeyword.aspx And you had to do something like:
internal System.Windows.Forms.HelpProvider HelpProvider1;
...
HelpProvider1.HelpNamespace = "sample.chm";
HelpProvider1.SetHelpKeyword(TextBox1, "1007.html");
HelpProvider1.SetHelpNavigator(TextBox1, HelpNavigator.Topic);
HelpProvider1.SetHelpKeyword(ListBox1, "1006.html");
HelpProvider1.SetHelpNavigator(ListBox1, HelpNavigator.Topic);
And all that seems nice. But, what can you do when you cross over to SilverlightjQuery15205164761650376022_1357918518660? Well, in general there are several systems that allow you to author your help files in html or convert your .hlp or .chm files to html, but how do you link your components to that help system in order to provide context-sensitive help???? Ok. So one of the possible solutions is very very simple. In general, the solution that I will show in this post is this: 1) First implement an attached property for adding a HelpKeyword to Silverlight components 2) Set the helpkeyword in the desired components 3) Provide logic that will open the appropiate help file. Ok. So let's implement a Silverlight Attached property. An attached propery is like adding a new property to your controls. This new attached property will be called Helpkeyword
using System;
using System.Windows.Shapes;
namespace System.Windows.Controls
{
    public class HelpProvider
    {
        public static readonly DependencyProperty HelpKeyword =
            DependencyProperty.RegisterAttached("HelpKeyword", typeof(string), typeof(HelpProvider), new PropertyMetadata(null));
        public static void SetHelpKeyword(UIElement element, string keyword)
        {
            element.SetValue(HelpKeyword, keyword);
        }

        public static string GetHelpKeyword(UIElement element)
        {
            return (string)element.GetValue(HelpKeyword);
        }
    }
}
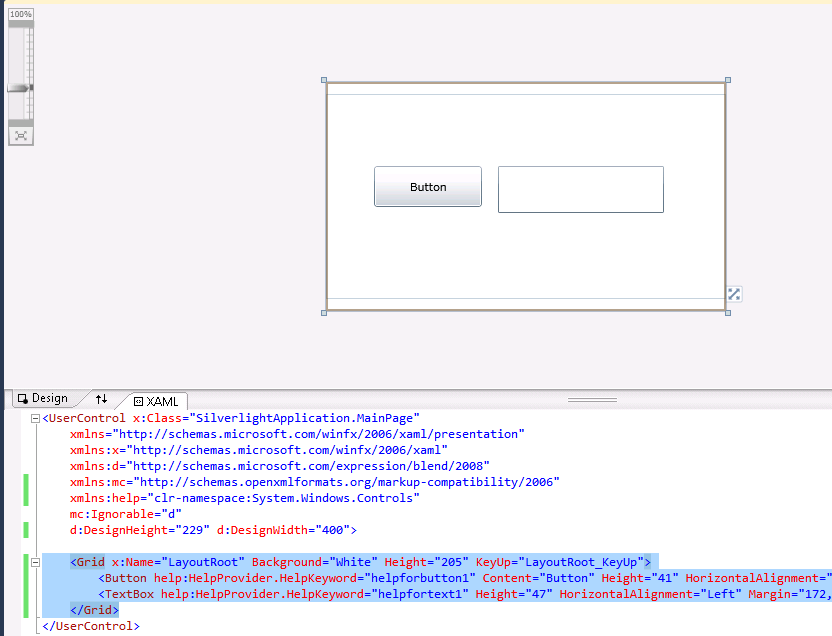
Ok. So once we have the attached property we have to use it, and set it on the code: To set it on the code we must add a namespace:
<UserControl x:Class="SilverlightApplication.MainPage"
    xmlns="http://schemas.microsoft.com/winfx/2006/xaml/presentation"
    ...
    xmlns:help="clr-namespace:System.Windows.Controls"
    mc:Ignorable="d"
    ....>
And apply the attribute to components
<Button help:HelpProvider.HelpKeyword="helpforbutton1" Content="Button" ...  />
<TextBox help:HelpProvider.HelpKeyword="helpfortext1" Height="47" ... />
So that almost everything, now we just need to trigger the appropiate logic, to do that we will add a KeyUp handler to the top most element, in this example a grid. NOTE: if Silverlight is running on the browser F1 is not an option. I just used F2 here as an example.
<Grid x:Name="LayoutRoot" Background="White" Height="205" KeyUp="LayoutRoot_KeyUp">
<Button help:HelpProvider.HelpKeyword="helpforbutton1" ...  />
<TextBox help:HelpProvider.HelpKeyword="helpfortext1" ... />
</Grid>
using System;
using System.Windows;
using System.Windows.Controls;
using System.Windows.Input;
using System.Windows.Browser;

namespace SilverlightApplication
{
    public partial class MainPage : UserControl
    {
        public MainPage()
        {
            InitializeComponent();
        }

        private void LayoutRoot_KeyUp(object sender, KeyEventArgs e)
        {
            //check for the specific key. For now use F2 as the Help Shortcut
            if (e.Key==Key.F2) {
                    var uielement = FocusManager.GetFocusedElement() as UIElement;
                    if (uielement!=null)
                    {

                        var keyword = HelpProvider.GetHelpKeyword(uielement);
                        var host = HtmlPage.Document.DocumentUri.Host;
                        var port = HtmlPage.Document.DocumentUri.Port;
                        var url = string.Format("http://{0}:{1}/help/{2}.html", host,port,keyword);
                        HtmlPage.Window.Navigate(new Uri(url),"_blank");
                    }
            } // else ignore the keystroke
        }
    }
}
This property can be used on the IDE:
On code
var uielement = FocusManager.GetFocusedElement() as UIElement;
if (uielement!=null) {
var keyword = HelpProvider.GetHelpKeyword(uielement);
}
This is an image of the application running.
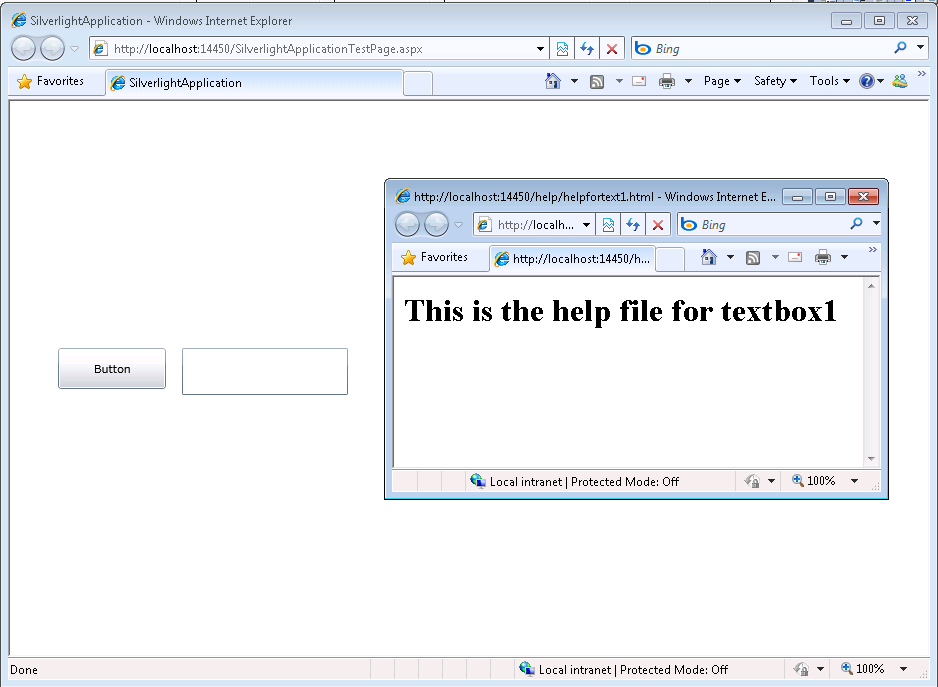
And you can download the code from: CODE
If you have any questions or would like more info on Silverlight migration check www.silverlightmigration.com
Windows Phone 7 (WP7) is out! and it’s a great platform for developing new Apps. After being involved with Silverlight for a while
I am glad to have now the option to deploy apps to Windows Phone 7.
But we have to recognize that there are tons of great Apps for iPhone already. You might even have some of them.
So it’s porting time. Here at Artinsoft we love to upgrade/port application to all platforms.
So I will provide here some basic thoughts to help you upgrade your code.
For this post let’s discuss a little about applications written for XCode.
XCode applications are written in Objetive-C.Let’s map some examples:
In Objective-C your class will be usually
#import <Foundation/NSObject.h>
#import <Foundation/NSObject.h>

@interface Fraction: NSObject {
    int numerator;
    int denominator;
}

-(void) print;
-(void) setNumerator: (int) n;
-(void) setDenominator: (int) d;
-(int) numerator;
-(int) denominator;
@end
How you should understand that? Well this is just the list of methods in your class something like:
using System;
public class Fraction {
    int _numerator;
    int _denominator;
    public void print() { /* TODO*/}
    public int numerator   { get { /* TODO */ } set { /*TODO*/} }
    public int denominator { get { /* TODO */ } set { /*TODO*/} }
}
The code for these methods will be in the .m file.
#import "Fraction.h"
#import <stdio.h>

@implementation Fraction
-(void) print {
    printf( "%i/%i", numerator, denominator );
}

-(void) setNumerator: (int) n {
    numerator = n;
}

-(void) setDenominator: (int) d {
    denominator = d;
}

-(int) denominator {
    return denominator;
}

-(int) numerator {
    return numerator;
}
@end
So that will complement your class implementation for something like:
using System;
public class Fraction
{
    int _numerator;
    int _denominator;
    public void print()
    {
        Console.Write("{0}/{1}" ,numerator,denominator);
    }
    public int numerator
    {
        get { return _numerator; }
        set { _numerator = value; }
    }
    public int denominator
    {
        get { return _denominator; }
        set { _denominator = value; }
    }
}
Ok An now let’s look at the Objective-C main.m:
#import <stdio.h>
#import "Fraction.h"

int main( int argc, const char *argv[] ) {
    // create a new instance
    Fraction *frac = [[Fraction alloc] init];
    Fraction *frac2 = [[Fraction alloc] init];

    // set the values
    [frac setNumerator: 1];
    [frac setDenominator: 3];

    // combined set
    [frac2 setNumerator: 1 andDenominator: 5];

    // print it
    printf( "The fraction is: " );
    [frac print];
    printf( "\n" );

    // print it
    printf( "Fraction 2 is: " );
    [frac2 print];
    printf( "\n" );

    // free memory
    [frac release];
    [frac2 release];

    return 0;
}
Which can be rewritten in C# as:
using System;
static class ProgramMain{static int Main(string[] argv) {
    // create a new instance
    Fraction frac = new Fraction();
    // set the values frac.Numerator = 1; frac.Denominator = 3;
    // print it
    Console.Write( "The fraction is: " );
    frac.print();    Console.Write( "\n" );
    // free memory frac = null;
    return 0;
}}
Well this is just for warming up. In following posts we will be looking
at more Objective-C \ XCode concept mapping to C#.
I recommend looking at the site http://wp7mapping.interoperabilitybridges.com/
that provides a lot about mapping iOS API
This problem appear to web because I opened some forms with
Expression Web 4.0 and it seems to have modified my project files.
I finally found that to solve it all I have to do is to:
1. Open the .csproj with a text editor
2. Look for the ToolsVersion an change it from 4.0 to 3.5
And that’s all.
The actual Isolated Storage location is fixed but depends on the operating system where the Silverlight application is running:
From: http://msdn.microsoft.com/en-us/library/3ak841sy.aspx#isolated_storage_locations
| Operating system | Location in file system |
| Windows 98, Windows Me - user profiles not enabled | Roaming-enabled stores =
<SYSTEMROOT>\Application Data
Non Roaming stores = WINDOWS\Local Settings\Application Data |
| Windows 98, Windows Me - user profiles enabled | Roaming-enabled stores =
<SYSTEMROOT>\Profiles\<user>\Application Data
Non roaming stores = Windows\Local Settings\Application Data |
| Windows NT 4.0 | <SYSTEMROOT>\Profiles\<user>\Application Data |
| Windows NT 4.0 - Service Pack 4 | Roaming-enabled stores =
<SYSTEMROOT>\Profiles\<user>\Application Data
Non roaming stores =
<SYSTEMROOT>\Profiles\<user>\Local Settings\Application Data |
| Windows 2000, Windows XP, Windows Server 2003 - upgrade from Windows NT 4.0 | Roaming-enabled stores =
<SYSTEMROOT>\Profiles\<user>\Application Data
Non roaming stores =
<SYSTEMROOT>\Profiles\<user>\Local Settings\Application Data |
| Windows 2000 - clean installation (and upgrades from Windows 98 and Windows NT 3.51) | Roaming-enabled stores =
<SYSTEMDRIVE>\Documents and Settings\<user>\Application Data
Non roaming stores =
<SYSTEMDRIVE>\Documents and Settings\<user>\Local Settings\Application Data |
| Windows XP, Windows Server 2003 - clean installation (and upgrades from Windows 2000 and Windows 98) | Roaming-enabled stores =
<SYSTEMDRIVE>\Documents and Settings\<user>\Application Data
Non roaming stores =
<SYSTEMDRIVE>\Documents and Settings\<user>\Local Settings\Application Data |
| Windows Vista | Roaming-enabled stores =
<SYSTEMDRIVE>\Users\<user>\AppData\Roaming
Non roaming stores =
<SYSTEMDRIVE>\Users\<user>\AppData\Local |
The amount of data that you can put on the isolated storage is limited by the UserQuota property.
By default an application has 1MB of storage space.
(see http://msdn.microsoft.com/en-us/library/system.io.isolatedstorage.isolatedstoragefile.increasequotato(VS.95).aspx)
If more space is needed the user can call the method increaseQuotaTo() that will allow prompting the user for permision to increase the amount of storage.
This will show a prompt dialog like:

To define policies I recommed looked at the Group Policy settings page
http://www.microsoft.com/GetSilverlight/resources/documentation/grouppolicysettings.aspx#isolated-storage and we might see more details about that in another post.