If you still have Visual Studio 2003 projects and you are just in the process of upgrading / modernizing them, then the following addin will be very helpful. Mike Meinz, took a very useful macro and package it as a VS 2012 addin
See: http://www.codeproject.com/Articles/528990/A-Visual-Studio-add-in-to-move-Windows-Forms-Desig
For us who each day move lots of code from Vb6 and VB.NET to MVVM. ASP.NET MVC, etc, this kind of tools become very handy.
The web platform provides an excellent mechanism simplify your app distribution and deployment issues.
There is no longer a need for CD-ROMs, or to send a computer technician to install the app on each client computer. Other related problems such as verifying that the client has the right application version, application dependencies and security can be simplified.
When you modernize your legacy app with Mobilize.Net\Artinsoft you could take advantage of several options. In terms of application distribution\deployment thru web technologies or running your application inside a web browser we have several post describing different way of doing this.
Using ClickOnce deployment over the web to simplify Windows Form Application deployment
Embedding Windows Forms Applications directly in a WebBrowser
Embedding Windows Forms Applications in a WebBrowser using XBAP
Silverlight as a mechanism for simplification of application deployment
WPF applications distribution on the browser using XBAP
Use HTML5 deploy your applications everywhere
WPF is great and powerful technology to create compelling Windows Desktop applications when you need a rich user interface.
Artinsoft/Mobilize.NET provide tools and services that allows you to modernize your VB6, Windows Forms and Powebuilder apps to WPF. Once your applications are on WPF you can also benefit from features like XBAP...
"XAML Browser Applications (XBAP, pronounced "ex-bap") are Windows Presentation Foundation (.xbap) applications that are hosted and run inside a web browser such asFirefox or Internet Explorer. Hosted applications run in a partial trust sandbox environment and are not given full access to the computer's resources like opening a new network connection or saving a file to the computer disk and not all WPF functionality is available. The hosted environment is intended to protect the computer from malicious applications; however it can also run in full trust mode by the client changing the permission."
XBAP is in general a simplification of the Click Once deployment, but specifically for WPF applications.
Artinsoft\Mobilize.Net helps legacy application to be modernized using the Windows Forms technology. Doing this upgrade revitalizes your application code and allows you to take advantage of the new platforms features like ClickOnce deployment.
What is ClickOnce deployment?
"ClickOnce is a deployment technology that enables you to create self-updating Windows-based applications that can be installed and run with minimal user interaction. Visual Studio provides full support for publishing and updating applications deployed with ClickOnce technology if you have developed your projects with Visual Basic and Visual C#.
ClickOnce deployment overcomes three major issues in deployment:
-
Difficulties in updating applications. With Microsoft Windows Installer deployment, whenever an application is updated, the user can install an update, an msp file, and apply it to the installed product; with ClickOnce deployment, you can provide updates automatically. Only those parts of the application that have changed are downloaded, and then the full, updated application is reinstalled from a new side-by-side folder.
-
Impact to the user's computer. With Windows Installer deployment, applications often rely on shared components, with the potential for versioning conflicts; with ClickOnce deployment, each application is self-contained and cannot interfere with other applications.
-
Security permissions. Windows Installer deployment requires administrative permissions and allows only limited user installation; ClickOnce deployment enables non-administrative users to install and grants only those Code Access Security permissions necessary for the application.
In the past, these issues sometimes caused developers to decide to create Web applications instead of Windows-based applications, sacrificing a rich user interface for ease of installation. By using applications deployed using ClickOnce, you can have the best of both technologies."
Click Once Deployment Strategies
There are 3 deployment strategies:
- Install from Web or a Network Share
- Install from a CD
- Start from the Web or Network share
For a quick overview of how to use the ClickOnce deployment take a look at Shahar Gvirtz's post http://weblogs.asp.net/shahar/archive/2008/01/29/how-to-use-clickonce-to-deploy-your-applications.aspx
A friend at work asked me how do I make my form bigger that the screen resolution. I was not able to do it, but
he google it and found a solution from: http://social.msdn.microsoft.com/Forums/en/vblanguage/thread/65c48eea-408a-45ed-a1cc-ea0336047798
This is just the transliteration of that code in C# just as a reference
using System;
using System.Collections;
using System.Collections.Generic;
using System.Data;
using System.Diagnostics;
using System.Runtime.InteropServices;
using System.Windows.Forms;

public class Form1 : Form
{
	[DllImport("User32.dll", CharSet = CharSet.Ansi, SetLastError = true, ExactSpelling = true)]
	private static extern bool MoveWindow(IntPtr hWnd, int x, int y, int w, int h, bool Repaint);

	private void Form1_Load(System.Object sender, System.EventArgs e)
	{
		this.MaximumSize = new Size(5000, 800);
		bool Result = MoveWindow(this.Handle, this.Left, this.Top, 5000, 500, true);
	}
	public Form1()
	{
		Load += Form1_Load;
	}

}
If you were in VB6 HelpContextID will be familiar for you (http://msdn.microsoft.com/en-us/library/aa267690(v=vs.60).aspx). In those sweet VB6 days all you had to do was:
Private Sub Form_Load ()
   App.HelpFile = "VB.HLP"
   Frame1.HelpContextID = 21004
   Text1.HelpContextID = 21001
   Form1.HelpContextID = 21005
End Sub
And each time you pressed the F1 button your application will have opened the .hlp file and show you the Help Topic corresponding to that ID. After migration from VB6 to WinForms Help you now have the HelpProvider.SetHelpKeyword http://msdn.microsoft.com/en-us/library/system.windows.forms.helpprovider.sethelpkeyword.aspx And you had to do something like:
internal System.Windows.Forms.HelpProvider HelpProvider1;
...
HelpProvider1.HelpNamespace = "sample.chm";
HelpProvider1.SetHelpKeyword(TextBox1, "1007.html");
HelpProvider1.SetHelpNavigator(TextBox1, HelpNavigator.Topic);
HelpProvider1.SetHelpKeyword(ListBox1, "1006.html");
HelpProvider1.SetHelpNavigator(ListBox1, HelpNavigator.Topic);
And all that seems nice. But, what can you do when you cross over to SilverlightjQuery15205164761650376022_1357918518660? Well, in general there are several systems that allow you to author your help files in html or convert your .hlp or .chm files to html, but how do you link your components to that help system in order to provide context-sensitive help???? Ok. So one of the possible solutions is very very simple. In general, the solution that I will show in this post is this: 1) First implement an attached property for adding a HelpKeyword to Silverlight components 2) Set the helpkeyword in the desired components 3) Provide logic that will open the appropiate help file. Ok. So let's implement a Silverlight Attached property. An attached propery is like adding a new property to your controls. This new attached property will be called Helpkeyword
using System;
using System.Windows.Shapes;
namespace System.Windows.Controls
{
    public class HelpProvider
    {
        public static readonly DependencyProperty HelpKeyword =
            DependencyProperty.RegisterAttached("HelpKeyword", typeof(string), typeof(HelpProvider), new PropertyMetadata(null));
        public static void SetHelpKeyword(UIElement element, string keyword)
        {
            element.SetValue(HelpKeyword, keyword);
        }

        public static string GetHelpKeyword(UIElement element)
        {
            return (string)element.GetValue(HelpKeyword);
        }
    }
}
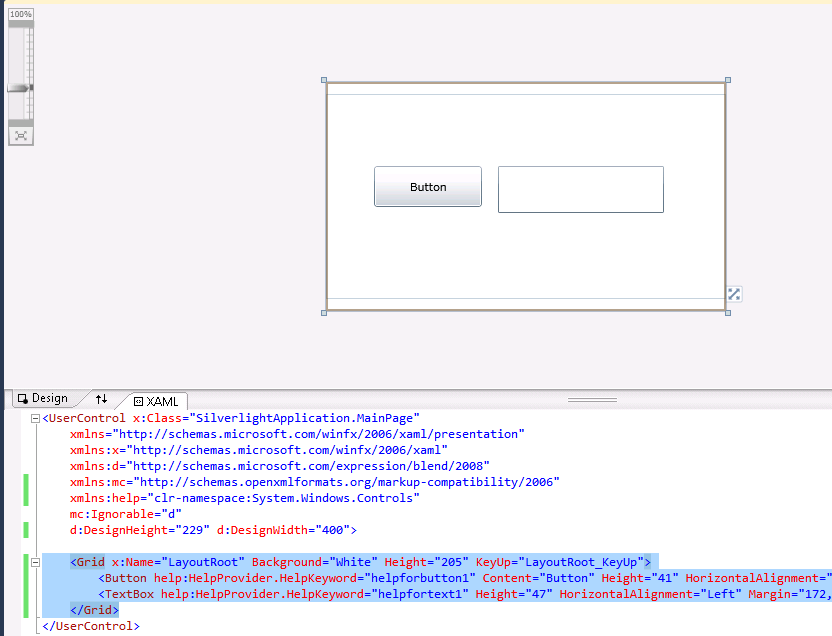
Ok. So once we have the attached property we have to use it, and set it on the code: To set it on the code we must add a namespace:
<UserControl x:Class="SilverlightApplication.MainPage"
    xmlns="http://schemas.microsoft.com/winfx/2006/xaml/presentation"
    ...
    xmlns:help="clr-namespace:System.Windows.Controls"
    mc:Ignorable="d"
    ....>
And apply the attribute to components
<Button help:HelpProvider.HelpKeyword="helpforbutton1" Content="Button" ...  />
<TextBox help:HelpProvider.HelpKeyword="helpfortext1" Height="47" ... />
So that almost everything, now we just need to trigger the appropiate logic, to do that we will add a KeyUp handler to the top most element, in this example a grid. NOTE: if Silverlight is running on the browser F1 is not an option. I just used F2 here as an example.
<Grid x:Name="LayoutRoot" Background="White" Height="205" KeyUp="LayoutRoot_KeyUp">
<Button help:HelpProvider.HelpKeyword="helpforbutton1" ...  />
<TextBox help:HelpProvider.HelpKeyword="helpfortext1" ... />
</Grid>
using System;
using System.Windows;
using System.Windows.Controls;
using System.Windows.Input;
using System.Windows.Browser;

namespace SilverlightApplication
{
    public partial class MainPage : UserControl
    {
        public MainPage()
        {
            InitializeComponent();
        }

        private void LayoutRoot_KeyUp(object sender, KeyEventArgs e)
        {
            //check for the specific key. For now use F2 as the Help Shortcut
            if (e.Key==Key.F2) {
                    var uielement = FocusManager.GetFocusedElement() as UIElement;
                    if (uielement!=null)
                    {

                        var keyword = HelpProvider.GetHelpKeyword(uielement);
                        var host = HtmlPage.Document.DocumentUri.Host;
                        var port = HtmlPage.Document.DocumentUri.Port;
                        var url = string.Format("http://{0}:{1}/help/{2}.html", host,port,keyword);
                        HtmlPage.Window.Navigate(new Uri(url),"_blank");
                    }
            } // else ignore the keystroke
        }
    }
}
This property can be used on the IDE:
On code
var uielement = FocusManager.GetFocusedElement() as UIElement;
if (uielement!=null) {
var keyword = HelpProvider.GetHelpKeyword(uielement);
}
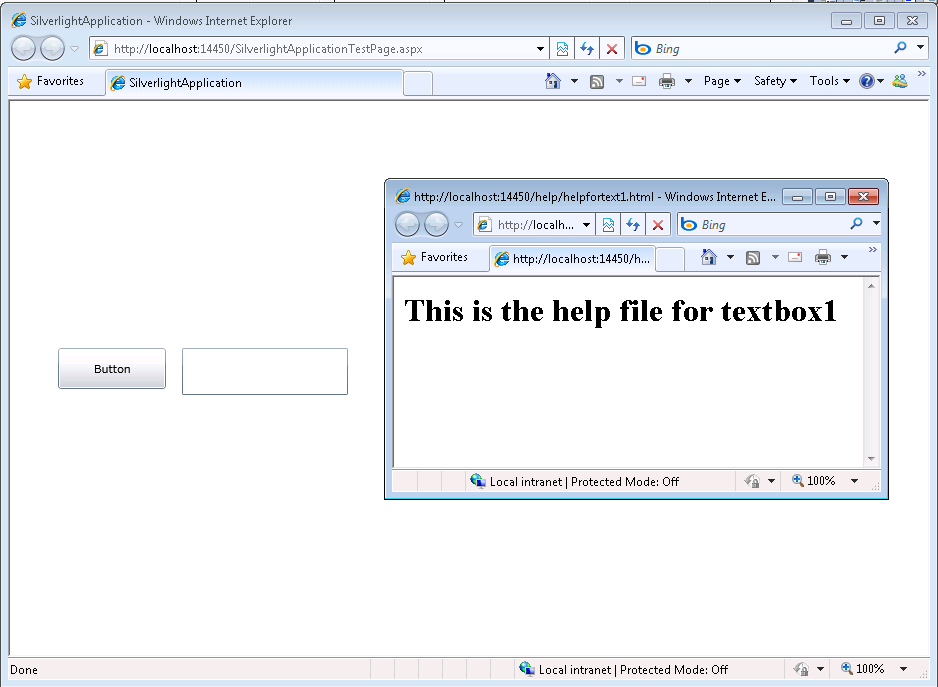
This is an image of the application running.
And you can download the code from: CODE
If you have any questions or would like more info on Silverlight migration check www.silverlightmigration.com
I was recently trying to get the exact width of a string. And I found that the Graphics.MeasureString does not give an exact result.
I finally found Pierre Arnaud
post in Code Project, which gave me a good explaination and solution of what was happening.
You can see in the image Pierre put in his post:

That Graphics.measurestring will return a size that might be bigger that the actual drawn size, this is due some GDI+ details that he explains in that post.
I really like the second proposed solution:
static public int MeasureDisplayStringWidth(Graphics graphics, string text,Font font)
{
System.Drawing.StringFormat format = new System.Drawing.StringFormat ();
System.Drawing.RectangleF rect = new System.Drawing.RectangleF(0, 0,1000, 1000);
System.Drawing.CharacterRange[] ranges = { new System.Drawing.CharacterRange(0, text.Length) };
System.Drawing.Region[] regions = new System.Drawing.Region[1];
format.SetMeasurableCharacterRanges (ranges);
regions = graphics.MeasureCharacterRanges (text, font, rect, format);
rect = regions[0].GetBounds (graphics);
return (int)(rect.Right + 1.0f);
}
This post describes an an interesting workaround that you can use to support the migration of ActiveX Documents with the Artinsoft Visual Basic Upgrade Companion which is one of the Artinsoft \ Mobilize.NET tools you can use to modernize your Visual Basic, Windows Forms and PowerBuilder applications.
Currently the Visual Basic Upgrade Companion does not allow you to process ActiveX Document directly, but there is a workaround: in general ActiveX Document are something really close to an User Control which is a element that is migrated automatically by the Visual Basic Upgrade Companion.
This post provides a link to a tool (DOWNLOAD TOOL) that can fix your VB6 projects, so the Visual Basic Upgrade Companion processes them. To run the tool:
1) Open the command prompt
2) Go to the Folder where the .vbp file is located
3) Execute a command line command like:
FixUserDocuments Project1.vbp
This will generate a new project called Project1_modified.vbp. Migrate this new project and now UserDocuments will be supported.
First Some History
VB6 allows you to create UserDocuments, which can be embedded inside an ActiveX container. The most common one is Internet Explorer. After compilation, the document is contained in a Visual Basic Document file (.VBD) and the server is contained in either an .EXE or .DLL file. During development, the project is in a .DOB file, which is a plain text file containing the definitions of the project’s controls, source code, and so on.
If an ActiveX document project contains graphical elements that cannot be stored in text format, they will be kept in a .DOX file. The .DOB and .DOX files in an ActiveX document project are parallel to the .FRM and .FRX files of a regular Visual Basic executable project.
The trick to support ActiveX documents is that in general they are very similar to UserControls, and .NET UserControls can also be hosted in a WebBrowser. The following command line tool can be used to update your VB6 projects. It will generate a new solution where UserDocuments will be defined as UserControls.
If you have an ActiveX document like the following:
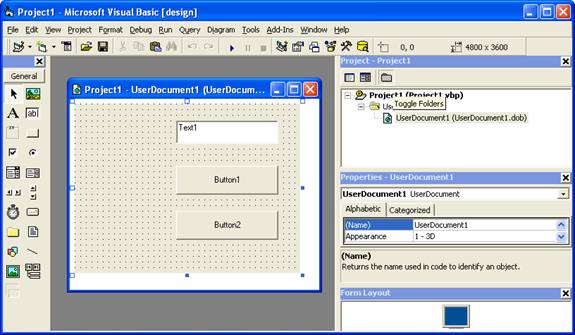
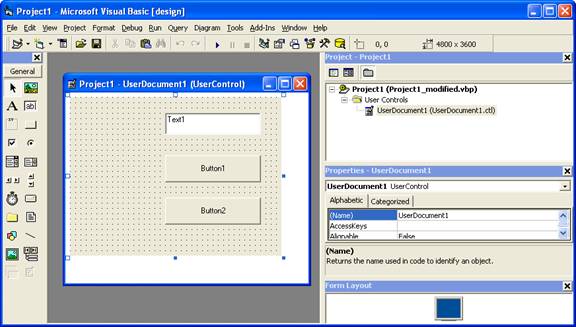
Then after running the tool you will have an Project like the following:
So after you have upgraded the projet with the Fixing tool, open the Visual Basic Upgrade Companion and migrate your project.
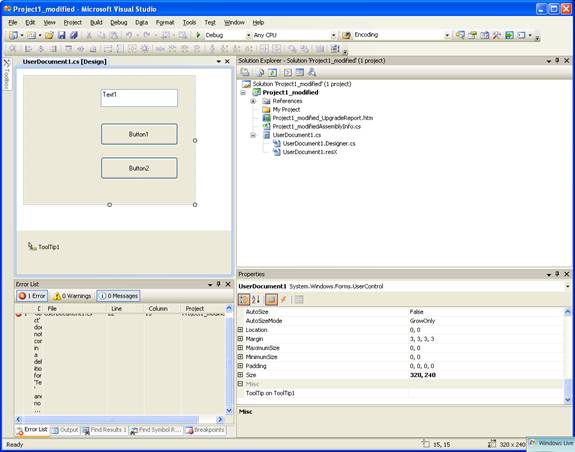
After migration you will get something like this:
To use your migrated code embedded in a Web Browser copy the generated assemblies and .pdb to the directory you will publish:
Next create an .HTM page. For example UserDocument1.htm
The contents of that page should be something like the following:
|
<html>
<body>
<p>ActiveX Demo<br> <br></body>
<object id="UserDocument1"
classid="http:<AssemblyFileName>#<QualifiedName of Object>"
height="500" width="500" VIEWASTEXT>
</object>
<br><br>
</html>
For example:
<html>
<body>
<p>ActiveX Demo<br> <br></body>
<object id="UserDocument1"
classid="http:Project1.dll#Project1.UserDocument1"
height="500" width="500" VIEWASTEXT>
</object>
<br><br>
</html>
|
Now all that is left is to publish the output directory.
To publish your WinForms user control follow these steps.
- Create a Virtual Directory:
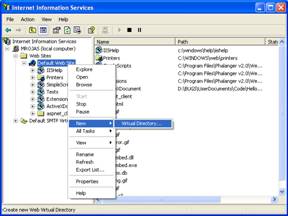
- A Wizard to create a Virtual Directory will appear.

Click Next
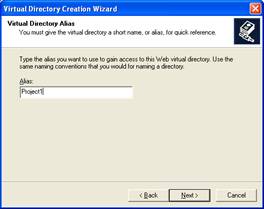
Name the directory as you want. For example Project1. Click Next
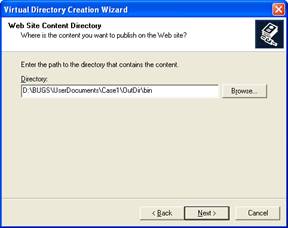
Select the location of your files. Click the Browse button to open a dialog box where you can select your files location. Click Next
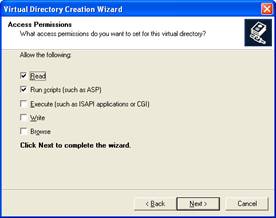
Check the read and run scripts checks and click next
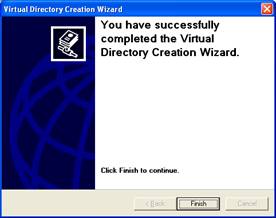
Now Click Finish
- Properties for the Virtual Directory will look like this:
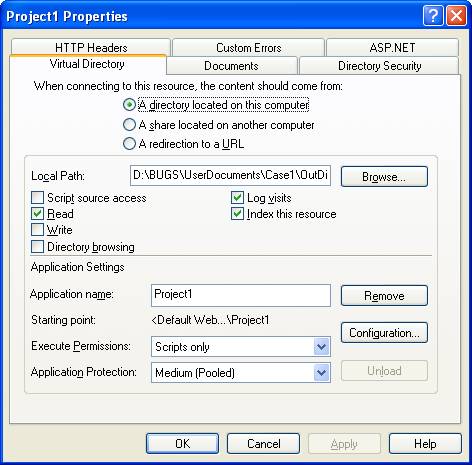
NOTE: to see this dialog right click over the virtual directory
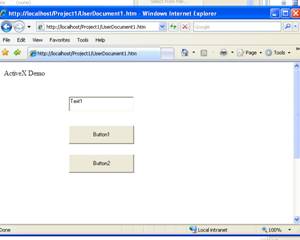
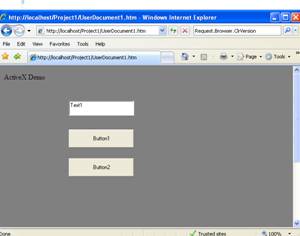
- Now just browse to the address lets say http:\\localhost\Project1\UserDocument1.htm
And that should be all! :)
The colors are different because of the Host configuration however a simple CSS like:
<style>
body {background-color: gray;}
</style>
Can make the desired change:
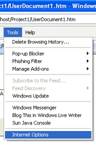
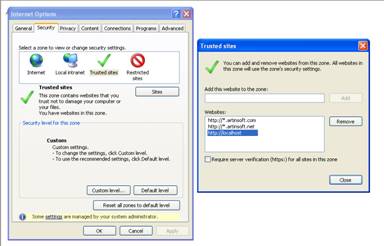
Notice that there will be security limitations, for example for thinks like MessageBoxes.
You can allow restricted operations by setting your site as a restricted site:
For example:
Restrictions
The constraints for this solution include:
* This solutions requires Windows operating system on the client side
* Internet Explorer 6.0 is the only browser that provides support for this type of hosting
* It requires .NET runtime to be installed on the client machine.
* It also requires Windows 2000 and IIS 5.0 or above on the server side
Due to all of the above constraints, it might be beneficial to detect the capabilities of the client machine and then deliver content that is appropriate to them. For example, since forms controls hosted in IE require the presence of the .NET runtime on the client machine, we can write code to check if the client machine has the .NET runtime installed. You can do this by checking the value of the Request.Browser.ClrVersion property. If the client machine has .NET installed, this property will return the version number; otherwise it will return 0.0.
Adding a script like:
<script>
if ((navigator.userAgent.indexOf(".NET CLR")>-1))
{
//alert ("CLR available " +navigator.userAgent);
}
else
alert(".NET SDK/Runtime is not available for us from within " + "your web browser or your web browser is not supported." + " Please check with http://msdn.microsoft.com/net/ for " + "appropriate .NET runtime for your machine.");
</script>
Will help with that.
References:
ActiveX Documents Definitions:
http://www.aivosto.com/visdev/vdmbvis58.html
Hosting .NET Controls in IE
http://www.15seconds.com/issue/030610.htm