Artinsoft\Mobilize.Net helps legacy application to be modernized using the Windows Forms technology. Doing this upgrade revitalizes your application code and allows you to take advantage of the new platforms features like ClickOnce deployment.
What is ClickOnce deployment?
"ClickOnce is a deployment technology that enables you to create self-updating Windows-based applications that can be installed and run with minimal user interaction. Visual Studio provides full support for publishing and updating applications deployed with ClickOnce technology if you have developed your projects with Visual Basic and Visual C#.
ClickOnce deployment overcomes three major issues in deployment:
-
Difficulties in updating applications. With Microsoft Windows Installer deployment, whenever an application is updated, the user can install an update, an msp file, and apply it to the installed product; with ClickOnce deployment, you can provide updates automatically. Only those parts of the application that have changed are downloaded, and then the full, updated application is reinstalled from a new side-by-side folder.
-
Impact to the user's computer. With Windows Installer deployment, applications often rely on shared components, with the potential for versioning conflicts; with ClickOnce deployment, each application is self-contained and cannot interfere with other applications.
-
Security permissions. Windows Installer deployment requires administrative permissions and allows only limited user installation; ClickOnce deployment enables non-administrative users to install and grants only those Code Access Security permissions necessary for the application.
In the past, these issues sometimes caused developers to decide to create Web applications instead of Windows-based applications, sacrificing a rich user interface for ease of installation. By using applications deployed using ClickOnce, you can have the best of both technologies."
Click Once Deployment Strategies
There are 3 deployment strategies:
- Install from Web or a Network Share
- Install from a CD
- Start from the Web or Network share
For a quick overview of how to use the ClickOnce deployment take a look at Shahar Gvirtz's post http://weblogs.asp.net/shahar/archive/2008/01/29/how-to-use-clickonce-to-deploy-your-applications.aspx
It seems ironic but it seems that it is a little more difficult to configure Windows Phone 7 and 7.5 to work with MS Lync that it is to configure an iPhone or an iPad.
Well after trying for a while without success, I found this page: http://leonmeijer.nl/archive/2012/01/25/153.aspx
The steps are (and i quote):
Steps:
I like Windows Phone, I just think their apps need to be more polished.
A common question I get for people that has just moved to Windows Azure Web Roles, is:
I just want to make a little change to a page but publishing takes too long, what can i do?
Well, there are several things you can do. Usually what I find is that their publishing takes too long because they need to upload a lot of data.. but why? The database is in Azure, so you don't have to upload it, and a asp.net web site is usually just some binaries and some text files?
For answering this question I love to use a tool called HDgraph (http://www.hdgraph.com/)
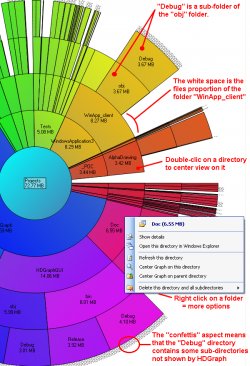
This tool provides a graphical representation of your hard drive allowing you easily identify which folders are the ones consuming most space.
What I usually find is a lot of graphics (jpg, png, gif files), videos (flv, avi), presentations (.pptx) and PDFs files, that are part of the site. No wonder why uploading site changes takes so long.
if you do that you are not really taking advantage of all the Azure platform features.
Azure provides a massive storage mechanism and you should take advantage of it.
But how do I do that?
First Download a tool like Azure Storage Explorer: http://azurestorageexplorer.codeplex.com/
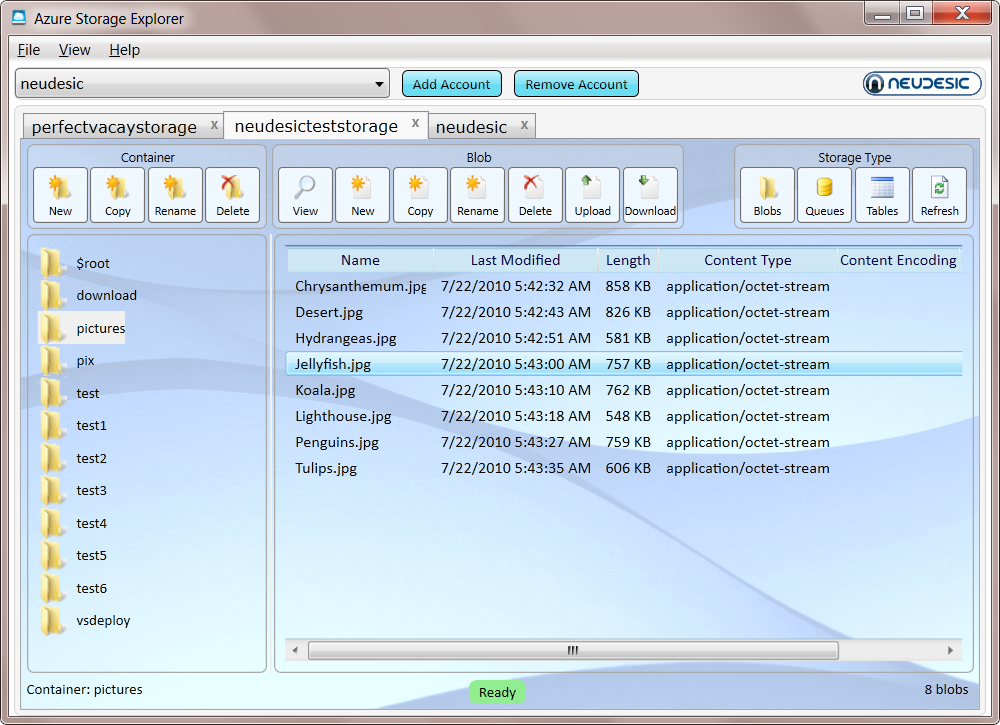
Create a folder (well well a container) for example content in Azure and upload your files to that container.
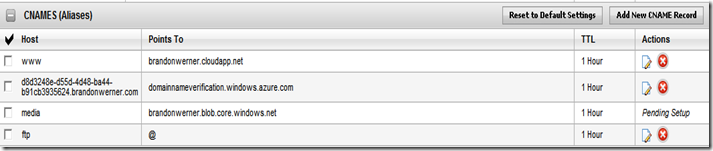
And now is time to set your CNAME record to point to your storage. Normally it will be something like making A CNAME content or media point to mycutesite.blob.core.windows.net.
(If you don't remember what a CNAME is lets say is something you configure with your registrar, the people you pay for your domain, so you can make entries to say for example if the browser navigates to www.mycutesite.com then send those requests to mycutesite.cloudapp.net and if they type media.mycutesite.com they it will redirect them to mycutesite.blob.core.windows.net)
I recommend reading Brandon Werner's excellent for very details quick intro to Windows Azure, from where I took this CNAME entries image.
http://blogs.msdn.com/b/brandonwerner/archive/2009/11/28/how-to-host-your-site-and-content-on-azure-quickly-and-easily.aspx
Again the idea is that you will remove most of the content of your asp.net solution and change your html so all resources will be downloaded from media.mycutesite.com\content
And finally, take advantage of Windows Azure new WebDeploy feature which allows a fast way to modify your pages directly. See (http://blogs.msdn.com/b/cloud/archive/2011/04/19/enabling-web-deploy-for-windows-azure-web-roles-with-visual-studio.aspx)
Windows forms is still a great technology, but by default is not as flexible as XAML or HTML where you can very easily modify the style of your controls.
But that is not entirely true.
Let's review which options do we have for customizing the look and feel of Windows Forms Applications.
Custom Look And Feel
Well the idea is simple. Centralize all the settings for your components and make sure to invoke that logic just after the initializeComponent() method call on the Windows Form constructor.
I will implement a very simple example:
First the class the implements the "theming logic":
using System.Windows.Forms;
using System.Drawing;
public class ApplicationLookAndFeel
{
	static void ApplyTheme(TextBox c)
	{
		c.Font = new Font("Arial",12.0f); c.BackColor=Color.Blue; c.ForeColor = Color.White;
	}
	static void ApplyTheme(Label c)
	{
		c.Font = new Font("Arial", 12.0f); c.BackColor = Color.Black; c.ForeColor = Color.White;
	}
	static void ApplyTheme(Form c)
	{
		c.Font = new Font("Arial", 12.0f); c.BackColor = Color.Black; c.ForeColor = Color.White;
	}

	public static void UseTheme(Form form)
	{
		ApplyTheme(form);
		foreach (var c in form.Controls)
		{
			switch(c.GetType().ToString())
			{
				case "System.Windows.Forms.TextBox":
					ApplyTheme((TextBox)c);
					break;
				case "System.Windows.Forms.Label":
					ApplyTheme((Label)c);
					break;


			}
		}
	}
}
As you see is just very simple code that will just update the settings for all controls, and a simple call in all form constructors and your done:
public partial class Form1 : Form
	{
		public Form1()
		{
			InitializeComponent();
			ApplicationLookAndFeel.UseTheme(this);
		}
	}
A form like:

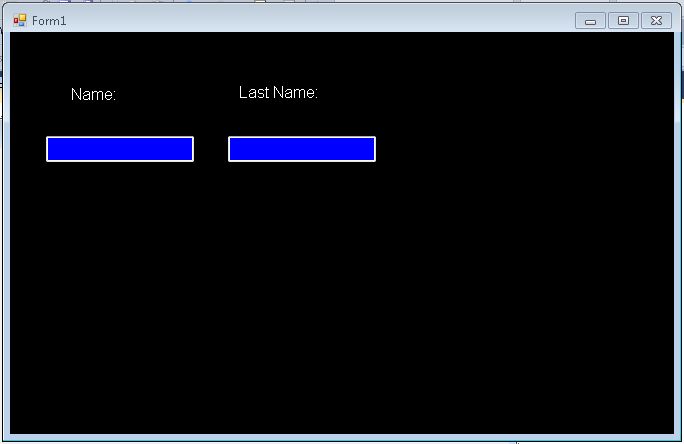
This approach is simple, but could require a lot of work if you have a lot of components, and switching to another look and feel will require a lot of changes, and it does not allow you to customize all of the form.
Customization of non client are (title bar, borders, requires a little more work). You can take a look at Szymon Kobalczyk work in codeplex. There is a lot of information about a setting custom borders for your forms and even a start of a form styling library.
Styling Controls
There are some third-parties that provide some level of Theming/Styling. The main difference is the impact they have on existing applications. I categorize them a Little Changes/Big Changes
Little Changes
Visual Styler.NET from http://www.skin-soft.co.uk/
This is an interesting solution, because it allows you to style your Standard Windows Form controls, with very little changes. You just add a control on you main form and that all. They provide some custom styles and you can built your own. They support styling of ThirdParty Controls but I am not sure how that will work.
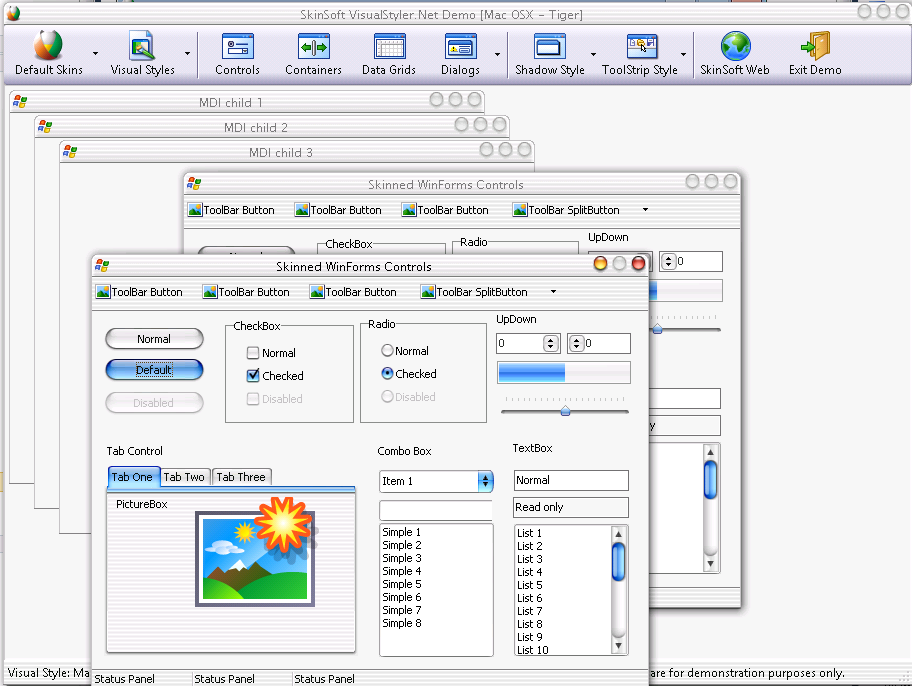
For screen shots and details see: http://www.skin-soft.co.uk/Products/VisualStyler/Overview.aspx
More Changes
I call this "more changes" because all of them are great styling components but in order to style your application you have to use THEIR components. That is change all your TextBox for RadTextBox in the case of Telerik, Button for RadButton, or change your Label for WinLabel and your Button for WinButton for Infragistics and TextEdit for DevExpress...
So it can be a lot of changes. The end result can be stunning, because all of these companies have very very good components, but it is a lot of changes and can affect your application.
But as you can see, Windows Forms still has a lot to offer
There are many types of ToolStrip<Control> classes.
But how can you create your own customized version. Let’s say you want a control that prefixes a label before your combo box?
Ok that is very simple, you just extend the ToolStripControlHost class
First we create our UserControl:
using System.Windows.Forms;

	public partial class ComboBoxWithLabel : UserControl
	{
		public ComboBoxWithLabel()
		{
			InitializeComponent();
		}

		public string LabelText
		{
			get {return label1.Text;}
			set {label1.Text = value;}
		}

		public ComboBox.ObjectCollection Items
		{
			get
			{
				return comboBox1.Items;
			}
		}
	}

	partial class ComboBoxWithLabel
	{
		/// <summary>
		/// Required designer variable.
		/// </summary>
		private System.ComponentModel.IContainer components = null;

		/// <summary>
		/// Clean up any resources being used.
		/// </summary>
		/// <param name="disposing">true if managed resources should be disposed; otherwise, false.</param>
		protected override void Dispose(bool disposing)
		{
			if (disposing && (components != null))
			{
				components.Dispose();
			}
			base.Dispose(disposing);
		}

		#region Component Designer generated code

		/// <summary>
		/// Required method for Designer support - do not modify
		/// the contents of this method with the code editor.
		/// </summary>
		private void InitializeComponent()
		{
			this.label1 = new System.Windows.Forms.Label();
			this.comboBox1 = new System.Windows.Forms.ComboBox();
			this.SuspendLayout();
			//
			// label1
			//
			this.label1.AutoSize = true;
			this.label1.Dock = System.Windows.Forms.DockStyle.Left;
			this.label1.Location = new System.Drawing.Point(0, 0);
			this.label1.Name = "label1";
			this.label1.Size = new System.Drawing.Size(35, 13);
			this.label1.TabIndex = 0;
			this.label1.Text = "label1";
			//
			// comboBox1
			//
			this.comboBox1.Dock = System.Windows.Forms.DockStyle.Right;
			this.comboBox1.FlatStyle = System.Windows.Forms.FlatStyle.Flat;
			this.comboBox1.FormattingEnabled = true;
			this.comboBox1.Location = new System.Drawing.Point(35, 0);
			this.comboBox1.Name = "comboBox1";
			this.comboBox1.Size = new System.Drawing.Size(134, 21);
			this.comboBox1.TabIndex = 1;
			//
			// ComboBoxWithLabel
			//
			this.AutoScaleDimensions = new System.Drawing.SizeF(6F, 13F);
			this.AutoScaleMode = System.Windows.Forms.AutoScaleMode.Font;
			this.Controls.Add(this.comboBox1);
			this.Controls.Add(this.label1);
			this.Name = "ComboBoxWithLabel";
			this.Size = new System.Drawing.Size(169, 22);
			this.ResumeLayout(false);
			this.PerformLayout();

		}

		#endregion

		public System.Windows.Forms.Label label1;
		public System.Windows.Forms.ComboBox comboBox1;
	}
Next we just create an extension of the ToolStripControlHost
using System;
using System.Collections.Generic;
using System.Linq;
using System.Text;
using System.ComponentModel;
using System.Windows.Forms.Design;
using System.Windows.Forms;
using System.Drawing.Design;

[DefaultProperty("Items")]
[ToolStripItemDesignerAvailability(ToolStripItemDesignerAvailability.All)]
public class MyCustomComboBoxWithLabel : ToolStripControlHost
{
	public MyCustomComboBoxWithLabel()
		: base(new ComboBoxWithLabel())
	{
	}
	[Browsable(false)]
	public ComboBoxWithLabel ComboBoxWithLabel
	{
		get { return base.Control as ComboBoxWithLabel; }
	}


	[Browsable(true)]
	[DefaultValue(false)]
	public string LabelText
	{
		get { return ComboBoxWithLabel.LabelText; }
		set { ComboBoxWithLabel.LabelText = value; }
	}

	[Localizable(true)]
	[DesignerSerializationVisibility(DesignerSerializationVisibility.Content)]
	[Editor("System.Windows.Forms.Design.ListControlStringCollectionEditor, System.Design, Version=4.0.0.0, Culture=neutral, PublicKeyToken=b03f5f7f11d50a3a", typeof(UITypeEditor))]
	public System.Windows.Forms.ComboBox.ObjectCollection Items
	{
		get { return ComboBoxWithLabel.comboBox1.Items; }
		set {
			foreach (var item in value)
			{
				ComboBoxWithLabel.comboBox1.Items.Add(item);
			}
		}
	}
}
And Next ...
Well there is not next. You just used it :) And this is how it looks:

If you have a .NET application and then find that you need to move your application or
part of it to a Handheld or mobile device based in Windows CE don't worry.
The .NET has what is called the .NET Compact Framework which is in general
.NET for mobile devices. However review some info before you start your development
because it is not necessary the same.
Differences between .NET Framework and Compact Framework
The CF is great but... it is not the .NET Framework. There
are differences take a look at: http://msdn.microsoft.com/en-us/library/2weec7k5.aspx
Controls
For a list of .NET Compact Framework Controls
See: http://en.wikipedia.org/wiki/.NET_Compact_Framework_controls
Some nice Third Party .NET Framework Controls are:
- http://beemobile4.net/products/ipack/controls
- http://www.resco.net/developer/mobileformstoolkit/overview.aspx
Some useful links:
Need remoting in .NET well you should know that CF does not provide Remoting but there
is company that implements it:
http://gotcf.net/
You can also use DCOM
http://www.codeproject.com/Articles/13819/Bringing-DCOM-remoting-functionality-to-Windows-CE
And for BlueTooth
There are several aproaches for developing BlueTooth with .NET.
1) Bluetooth programming with Windows Sockers.
See: http://msdn2.microsoft.com/en-us/library/aa362928(VS.85).aspx
2) Windows Embedded Source Tools for Bluetooth.
See: http://www.microsoft.com/windowsembedded/en-us/develop/windows-embedded-ce-6-bluetooth-technology-source-tools.aspx
3) 3rd party solution, A nice library is:
See: http://inthehand.com/content/32feet.aspx
Windows Services in CE
See this post: http://bansky.net/blog/2008/04/services-for-windows-mobile-in-managed-code/
and the library is available here:
http://managedserviceswm.codeplex.com/
There is a little problem with my mango :(
Every time I try to add a reference to a Web Service I end up with an empty Reference.cs.
Sad. The bug has already being sent to MS see: https://connect.microsoft.com/VisualStudio/feedback/details/624612/add-service-reference-service-proxy-class-gen-tool-bug
The workaround:
Use the SlSvcUtil.exe that can be found at:
C:\Program Files\Microsoft SDKs\Windows Phone\v7.1\Tools
Just call it with like:
SlSvcUtil.exe http://localhost:50002/DBServices.svc?wsdl
NOTE: For some reason I have found that the 7.1 version of the tool crashes with a StackOverflow.
If it happens to you just use the 7.0 version
How do you write a Windows Service in VB6?
Althought this is not a recommend practice due to the stability issues and VB6 support, if for
any reason you need to do this I provide a guide of how to do that in VB6 and how do the same thing
in VB.NET and C#.
Using the NTSVC.ocx
This is an OCX implement by Mauricio Ordonez some time ago.
It is very simple to use. You just drop it on a form and add some code to your VB6.
Example: VB6 Form with the NTSVC.ocx control
Private Sub Form_Load()
Me.Visible = False
Dim strDisplayName As String
On Error GoTo Err_Load
strDisplayName = NTService1.DisplayName
If Command = "-install" Then
' Enable interaction with desktop.
NTService1.Interactive = True
If NTService1.Install Then
MsgBox strDisplayName & " installed successfully"
Else
MsgBox strDisplayName & " failed to install"
End If
End
ElseIf Command = "-uninstall" Then
If NTService1.Uninstall Then
MsgBox strDisplayName & " uninstalled successfully"
Else
MsgBox strDisplayName & " failed to uninstall"
End If
End
ElseIf Command = "-debug" Then
NTService1.Debug = True
ElseIf Command <> "" Then
MsgBox "Invalid command option"
End
End If
' Connect service to Win32 services controller.
NTService1.StartService
Err_Load:
' Error starting service
End Sub
Private Sub Timer1_Timer()
MsgBox "hola"
End Sub
NOTE: Remember that VB6 is not a supported platform and that even if it is true
that you can still run VB6 code in Windows Vista and Windows 7 MS does not support this
platform anymore.
How can I convert my VB6 service to .NET?
To create a Windows Service in VB.NET follow this steps.
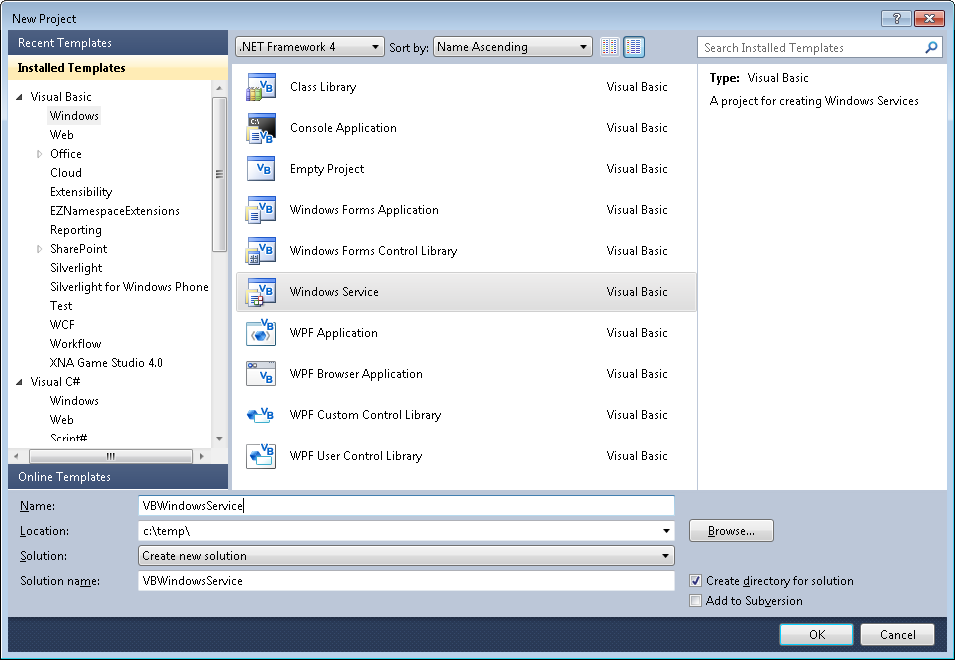
1. First you need to create a Windows Service Project:
a. Open Visual Studio 2010
b. Go to the File\New\Project….
c. Select the Windows Service Template
d. And you just put your code in the OnStart method:
Public Class Service1

    Protected Overrides Sub OnStart(ByVal args() As String)
        ' Add code here to start your service. This method should set things
        ' in motion so your service can do its work.
        ExecuteWindowsServiceCode()
    End Sub

    Protected Overrides Sub OnStop()
        ' Add code here to perform any tear-down necessary to stop your service.
    End Sub

    Private Sub ExecuteWindowsServiceCode()
        'TODO Add Some Code
    End Sub

End Class
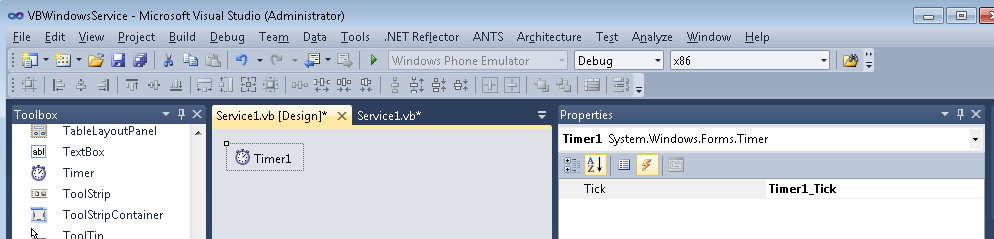
e. Another typical thing to do in Windows Service is to add a Timer Control, you you can have
your windows service performs some actions every number of seconds. To do that, drag a
Timer Control on your Service component, execute the Start method of the timer control on the OnStart method and
handle the Tick event:
Public Class Service1

    Protected Overrides Sub OnStart(ByVal args() As String)
        ' Add code here to start your service. This method should set things
        ' in motion so your service can do its work.
        Timer1.Start()
        ExecuteWindowsServiceCode()
    End Sub

    Protected Overrides Sub OnStop()
        ' Add code here to perform any tear-down necessary to stop your service.
        Timer1.Stop()
    End Sub

    Private Sub ExecuteWindowsServiceCode()
        'TODO Add Some Code
    End Sub

    Private Sub Timer1_Tick(sender As System.Object, e As System.EventArgs) Handles Timer1.Tick
        MsgBox("Viva la vida Loca!")
    End Sub
End Class
If you need to recover some of your code from your VB6 project, download our Visual Basic Conversion Tool VBUC tool.
How do I Install my Windows Service?
In general you just need to use the command line utility installutil.exe for more details see this other post.
Jejeje. Well if you are a phone developer, either an iOS guy who is thinking on offering
his/her apps in the MS Marketplace or just someone with a great interest in Windows Phone
then you should know what mango is.
Mango is a new update for the Windows Phone, and it will mean a lot for developers,
because if you already liked WP7 you will love MANGO.
VIDEO LINK
Mango means HTML5 yes!
Mango means Multitasking!
Mango means Hands-free messaging, did you ever
wanted to send SMS without using your fingers, now you can!
I don’t think is mentioned in this video but Mango is also SQLCE a great alternative
for Android and iPhone developers who were using sqllite.
In iOS SQLite is part of the Core Services and you can easily integrate it in your applications.
Even in Android you have access to this platform.
If you don’t know what SQ Lite this is a quote from www.sqlite.org:
“SQLite is a software library that implements a self-contained, serverless, zero-configuration,transactional SQL database engine. SQLite is the most widely deployed SQL database engine in the world. The source code for SQLite is in the public domain.“
So what is your equivalent in WP7. Well if you want to wait the Mango Release of Windows Phone 7
will include Sql Server Compact Edition, so that will provide a fairly good and supported platform, but
in the meantime I recommend that you check http://wp7sqlite.codeplex.com/
