I found this email in my inbox today:
“Hi Mauricio,I came across a reference to your blog at :http://stackoverflow.com/questions/1286746/c-open-link-in-new-tab-webbrowser-control
I have been studying your writings on extending the WebBrowser control, and verified that the extended web code you wrote for C# compiles and works fine in VS 2010 beta, against FrameWork 4.0.
Many thanks for the valuble code and writing !
I am "stuck" on how to read the contents of an IE browser page when the page is displaying a local file, like the contents of the Favorites folder.
All my attempts to get at the Document or DomDocument by casting it to the usual mshtml.dll interfaces fail.
I am NOT asking you to answer my question, or respond, but if you ever get interested in blogging about this aspect of use of IE, I think many people would be interested.
I have done a lot of research on the net, and posted my own question on StackOverFlow : so far not one real pointer, and, possibly, this is not "doable" (?) : maybe what you are seeing when IE shows a file contents is a kind of "virtual explorer" view that is not parseable.
best, Bill xxxxxx”
And I decided to take at look at it to see if I could be of any help and I found out that it is easy and doable.
So I find an useful link by Andreas M. if you want to look at it.
In general My Favorites, Desktop, etc are special folder. So they need a trick to be able to access them.

Take the code from my ExtendedWebBrowser sample published in http://blogs.artinsoft.net/mrojas/archive/2009/05/01/opening-popup-in-a-newwindow.aspx
and http://blogs.artinsoft.net/mrojas/archive/2009/08/07/newwindow3.aspx and
1. Add a reference to %windir%\system32\shell32.dll
2. Add a new property to the ExtendedWebBrowser like:
    /// <summary>
    /// Returns the shell folderview object displayed in the webbrowser control.
    /// </summary>
    public Shell32.IShellFolderViewDual2 FolderView
    {
        get
        {
            return ((SHDocVw.WebBrowser)base.ActiveXInstance).Document
                     as Shell32.IShellFolderViewDual2;
        }
    }
And now you can access the special folder from your code. As Bill mentioned, that “page” or “special page” is not real HTML and not parseable but you can examine its contents for example you can do something like:
        /// <summary>
        /// Button 1_ click
        /// </summary>
        private void button1_Click(object sender, EventArgs e)
        {
            Shell32.IShellFolderViewDual2 specialFolder = this.extendedWebBrowser1.FolderView;
            string folderName = specialFolder.Folder.Title;
            string parentFolder = specialFolder.Folder.ParentFolder.Title;
            foreach (Shell32.ShellFolderItem f in specialFolder.Folder.Items())
            {
                if (f.IsFolder)
                    System.Diagnostics.Debug.WriteLine("Folder:" + f.Name);
                else
                    System.Diagnostics.Debug.WriteLine("File:" + f.Name);
            } // foreach
        } // button1_Click(sender, e)
The VBUC has a now a nice feature called CustomMaps.This feature allow the users to perform basic customizations in the way the target code is generated.
During migration the VBUC can perform some name changes due to the Keyword restrictions in .NET.
For example VB.NET the some of the following keywords that cannot be used as class or variable names:
Interface, Alias, And, Class, Error, Friend, Loop, MyBase, MyClass, Shared, Property
See here for a list of all VB.Net keywords.
1. Open the Artinsoft VBUC
2. Go to the Tools Menu\Custom Maps Editor

The Custom Maps Editor dialog will show up.
3. In the Custom Maps Editor select New...

4. Type a name and description for your custom map.

5. Create some Custom Maps lines.
Follow these steps:
a. First type a new SourceName. The source name is used by the VBUC to identify the element that you want to map.
NOTE: If you are migrating just one Project, you just enter one custom maps line with the the source name of the class you want to rename. If your are migrating several project you must enter an additional line like <ProjectName>.<ClassName> for example Project1.Interface that is because for other projects that have Project1 as a Reference they see that class as Project1.Interface and not just Interface.

b. Set the Map Type. For classes we call it a Type Map. For Functions, Subs or Properties we call it a member map.

c. We now change the New Reference Name. For a class we call a “Reference Name” to every time a the class is used to define a variable. For example each Dim x as Class1, or every appearance as a parameter, like Sub Foo(x as Class1).

d. We set the Reference Action to Modify.

e. And we set the NewDeclarationName to InterfaceClass and the DeclarationAction to Modify

f. To make sure that Keyword renamed declarations are mapped with your custom maps configuration, you have to add a line just the same as the one you had just entered but type Interface_Renamed in the SourceName

6. Now you have to activate it in your profile. Click on the Edit button for profiles in the main VBUC window

7. If you don’t have a Profile now, In the Profile Maintenance Dialog click New, and type a name for your Profile.

8. In your profile Select the custom maps configuration you just created:

9. Now Upgrade all your code.
VB6 Declarations like:

will be migrated as:
Option Strict Off
Option Explicit On
Imports System
Friend Partial Class Form1
    Inherits System.Windows.Forms.Form
    'UPGRADE_WARNING: (2080) Form_Load event was upgraded to Form_Load event and has a new behavior. More Information: http://www.vbtonet.com/ewis/ewi2080.aspx
    Private Sub Form1_Load(ByVal eventSender As Object, ByVal eventArgs As EventArgs) Handles MyBase.Load
        Dim y As InterfaceClass
    End Sub
    Sub Foo(ByRef x As InterfaceClass)

    End Sub
End Class
And the class definition to:
Option Strict Off
Option Explicit On
Imports System
Friend Class InterfaceClass
End Class
To be able to catch popup windows and open them in your own window you
have to manage WebBrowser events like NewWindow2.
But how do you do that in WPF?
Well it isn’t really that difficult. These are the steps that you have to follow:
1. Add a COM reference to a reference to %windir%\system32\shdocvw.dll
2. Add a new CodeFile to your project. Lets say CodeFile1.cs And put this code:
using System;
using System.Runtime.InteropServices;
[ComImport, InterfaceType(ComInterfaceType.InterfaceIsIUnknown)]
[Guid("6d5140c1-7436-11ce-8034-00aa006009fa")]
internal interface IServiceProvider
{

[return: MarshalAs(UnmanagedType.IUnknown)]

object QueryService(ref Guid guidService, ref Guid riid);

}
3. To make an easy example. Lets assume we have a very simple window like:
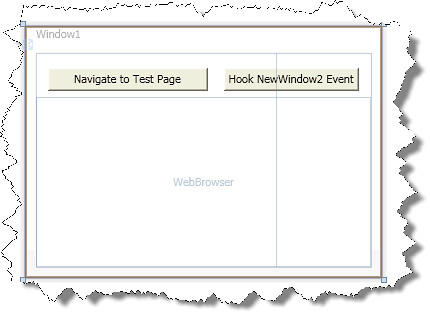
And in that form we need some code like this:
        private void button1_Click(object sender, RoutedEventArgs e)
        {
            Guid SID_SWebBrowserApp =
                          new Guid("0002DF05-0000-0000-C000-000000000046");
            IServiceProvider serviceProvider =
                (IServiceProvider)myWebBrowser.Document; //<—It seams that you need to
                                                         // navigate first to initialize this

            Guid serviceGuid = SID_SWebBrowserApp;

            Guid iid = typeof(SHDocVw.IWebBrowser2).GUID;
            //Here we will get a reference to the IWebBrowser2 interface
            SHDocVw.IWebBrowser2 myWebBrowser2 =
                   (SHDocVw.IWebBrowser2)
                   serviceProvider.QueryService(ref serviceGuid, ref iid);
//To hook events we just need to do these casts
SHDocVw.DWebBrowserEvents_Event wbEvents =
(SHDocVw.DWebBrowserEvents_Event)myWebBrowser2;
SHDocVw.DWebBrowserEvents2_Event wbEvents2 =
(SHDocVw.DWebBrowserEvents2_Event)myWebBrowser2; //Adding event handlers is now very simple
wbEvents.NewWindow +=
new SHDocVw.DWebBrowserEvents_NewWindowEventHandler(wbEvents_NewWindow); wbEvents2.NewWindow2 +=
new SHDocVw.DWebBrowserEvents2_NewWindow2EventHandler(wbEvents2_NewWindow2);
}
void wbEvents2_NewWindow2(ref object ppDisp, ref bool Cancel)
{
//If you want make popup windows to open in your own window
// you need to assign the ppDisp to the .Application of
// the WebBrowser in your window
            Window1 wnd = new Window1();
            wnd.Show();
            //Just navigate to make sure .Document is initilialized
            wnd.myWebBrowser.Navigate(new Uri("about:blank"));
            Guid SID_SWebBrowserApp = new Guid("0002DF05-0000-0000-C000-000000000046");
            IServiceProvider serviceProvider = (IServiceProvider)wnd.myWebBrowser.Document;

            Guid serviceGuid = SID_SWebBrowserApp;

            Guid iid = typeof(SHDocVw.IWebBrowser2).GUID;

            SHDocVw.IWebBrowser2 myWebBrowser2 = (SHDocVw.IWebBrowser2)serviceProvider.QueryService(ref serviceGuid, ref iid);

            ppDisp = myWebBrowser2.Application;
        }

        void wbEvents_NewWindow(string URL, int Flags, string TargetFrameName, ref object PostData, string Headers, ref bool Processed)
        {
            MessageBox.Show(URL);
        }

        private void button2_Click(object sender, RoutedEventArgs e)
        {
            myWebBrowser.Navigate(new Uri("file://D:/MyProjects/ExtendedBrowserExample_v2/test0.htm"));
        }
Now you can manage your popupwindows:

You can download the test application from HERE
Prerequisites:
Performing Continuous Migration with the Artinsoft VBUC and MS Team System 2005 is simple.
The 4 main tasks are:
1. Configure The Microsoft Visual Studio 2005 to use your desired Team System Project.
For details…
2. Upload an initial version of your VB6 code to the Source Control system. For details…
Perform an initial migration an establish a baseline. For details…
3. After that you are all set and you can start doing incremental migration.
For details and an example of continuos migration…
Make an initial migration of the VB6 source code
1. Open the VBUC

2. Create a Migration Solution for your code (for example C:\MergeExample\Sample1)

3. Upgrade your code
4. Open the Explorer and navigate to the location of your VB6 code (For example C:\MergeExample\Sample1)
5. Under the directory where your code is located, create a new directory called GreenCode (For our example this directory will be C:\MergeExample\Sample1\GreenCode )
6. Copy your migrated code to GreenCode (for our example it means copying the contents of C:\MergeExample\Sample1\VB6_UpgradedCode to the C:\MergeExample\Sample1\GreenCode).
All this is important to helps us stablish a base line for comparison and merge
7. Open Microsoft Visual Studio 2005
8. On the Team Explorer locate your project (for example MergeExample) and double click on SourceControl
9. On the Source Control Explorer toolbar click the Add Files button

10. Click the Add Folder… button and select the GreenCode folder we had just created

11. Check in the GreenCode. IMPORTANT. Add a descriptive Comment. We recommed at least setting this information:
Green Code Date VB6 Source Code Date/ version VBUC version used to generate the Green Code 
12. Create a brach of the Green Code

Create a Branch of the GreenCode directory and call it MigratedCode.
For example in the target field type: $/MergeExample/Sample1/MigratedCode

After branching you will node a MigratedCode folder under Sample1 in the Source Control Explorer

>Performing Manual Changes in your migrated code
Now you are ready to perform manual changes in your branch.
Check out for Edit the MigratedCode folder
Modify code
    Private Sub Command1_Click(ByVal eventSender As Object, ByVal eventArgs As EventArgs) Handles Command1.Click
        MessageBox.Show("Command1 was clicked", Application.ProductName)
    End Sub
For
    Private Sub Command1_Click(ByVal eventSender As Object, ByVal eventArgs As EventArgs) Handles Command1.Click
        //mrojas simple change for message box
        MessageBox.Show("Command1 was clicked", Application.ProductName,MessageBoxButtons.YesNo)
    End Sub
Check In of your changes
Changing the VB6 Source Code
If you have changes in your VB6 source code and you want to feed those changes to the ongoing migration, follow these steps.
1. Check out the VB6 source code

2. Overwrite your all sources with the new VB6 source code, or your modify the current version.
For these example we will modify the current version, by adding a new button

and adding some comments to our previous code. So now the VB6 code will be:
Private Sub Command1_Click()
    'This is a sample comment for command1 code
    MsgBox "Command1 was clicked"
End Sub

Private Sub Command2_Click()
    'This is a sample comment for command1 code
    MsgBox "Command2 was clicked"
End Sub

Private Sub Command3_Click()
    MsgBox "The newly added Command3 was clicked"
End Sub
And after the changes we check in it back.

Adding a new comment to identify this version

Performing the Continuous Migration Process
1. Check out the green code

2. Open the VBUC and migrated again the VB6 Code. In our example the code is in C:\MergeExample\Sample1\VB6
3. Copy the new contents of the Upgraded folder and overwrite the contents of folder GreenCode (in this case copy contents from C:\MergeExample\Sample1\VB6_UpgradedCode\Upgraded to C:\MergeExample\Sample1\GreenCode).
4. Check in the Green Code

Add a descriptive comment like:
Green Code 22-09-2009 12:34pm
VB6 Source Code 22-09-2009 12:00pm / version 2
VBUC version 3.0
Now merge with current manual changes
After migrating the modified VB6 source code and checked in it in the Source Control we now have to merge the changes between the new GreenCode and our MigratedCode.
1. Right click on the GreenCode folder and select merge. Put attention to chech that you want to merge the “Selected ChangeSets” and that the target branch is the MigratedCode

Click Next
2. Select the Change sets that you will apply. The comment you use provide a guide to identify which changeset you need.

Click Next
3. Click Finish to perform the Merge

4. During merge conflict might arrise. A resolve conflicts dialog will appear. Clicking the resolve conflicts button will provide different options…

5. In our example we know that we modified the Form1.vb file so we select the “Merge changes in merge tool” option
TIP: Typically you will just keep changes in target branch because you have already worked on those files. Specially for resource files, project files, bitmaps, etc you will leave the file in the target branch.

6. The merge tool will appear showing the different changes and providing you a simple way to select what version to take or to manually edit the result

7. When you are done with the Merge tool click close a dialog indicating that all conflicts have been solved will appear. Click Yes

8. Click close in the Resolve Conflict dialog and if asked to accept the merge result click yes

The Source Control Explorer might show marks in the modified files.

9. Right click on the migrated code and select check in changes

10. Type an appropiate comment indicating which versions where merged and press Check In

And that’s all
Now all we need to do is setup the VB6 code that we will use for migration. To do that follow these steps:
1. On the Source Code Explorer toolback click on the Add Files button:

2. Click the Add Folder button and select the folder with your VB6 files

3. After you select the folder, a list of files found will be shown. Just remove any unneccesary files. For example files like MSSCCPRJ.SCC should be removed. And press OK

Now you have to commit your code the Source Code Repository
4. On the Source code Explorer Right click on Source Control Folder (for this example is MergeExample) and select Check In Pending Changes..

5. Write an apropiate comment and press Check In
To create a new Team System Project in Visual Studio 2005, follow these steps:
1. Go to the File Menu. Select New…, and in the New… submenu select Team Project… to start a wizard.

2. The “Specify the Team Project Settings” of the New Team Project wizard appears. Type the Team Project name. For example type MergeExample and click Next
![clip_image002[5]](http://blogs.artinsoft.net/public_img/0d61167332a7_CAF4/clip_image0025_thumb.jpg "clip_image002[5]")
3. In the following page, select the Process Template for the Team Project. We recommend using the Artinsoft Migration Methodology – v0.8 or later. Click Next.
![clip_image002[7]](http://blogs.artinsoft.net/public_img/0d61167332a7_CAF4/clip_image0027_thumb.jpg "clip_image002[7]")
4. In the following page, type the Title for the Team Project Portal. Type MergeExample. The Team Project Portal provides useful information about your project. Click Next
![clip_image002[9]](http://blogs.artinsoft.net/public_img/0d61167332a7_CAF4/clip_image0029_thumb.jpg "clip_image002[9]")
5. In the following page you select your source control settings.
Select the first option “Create an empty source control folder”. Click Next
![clip_image002[11]](http://blogs.artinsoft.net/public_img/0d61167332a7_CAF4/clip_image00211_thumb.jpg "clip_image002[11]")
6. In the following page a summary of your Team Project settings is presented. Click Finish
![clip_image002[17]](http://blogs.artinsoft.net/public_img/0d61167332a7_CAF4/clip_image00217_thumb.jpg "clip_image002[17]")
7. In the following page the a process bar appears while the project is created. Just wait until the process is done. It normally takes between 3 and 5 minutes.
![clip_image002[19]](http://blogs.artinsoft.net/public_img/0d61167332a7_CAF4/clip_image00219_thumb.jpg "clip_image002[19]")
This post will show you the necessary steps to configure Microsoft Visual Studio 2005 to use a Team System Project. In this example we will use a Team Project created to illustrate Continuous Migration with VBUC and MS Team System 2005, called MergeExample.
1. Start Microsoft Visual Studio 2005
2. Go to the File Menu\Open\Team Project…

3. Dialog is presented, where you can choose your Team Foundation Server, and the Team Project to use. For these Continuous Migration example we’ll assume a project called MergeExample.

4. The Team Explorer is shown, with your selected project.
Expand the elements for the Team Project you previously selected.

5. We now have to map our local directories to bind them to the
source control system. On the expanded tree, double click on the
Source Control Node

6. The Source Code Explorer is shown:

7. Go to the Workspaces dropdown box and select Workspaces…

8. The Manage workspace dialog is shown.
Select the appropiate workspace and click Edit…

9. On the Edit Workspace dialog type a description for your source control and select the source control Folder we had created (for this example it is $/MergeExample) and the directory for your code (for this example it is C:\MergeExample).

NOTE: if a message box about a pending update is shown, just click ok.
Now you have successfully mapped your directories, and you can start setting up your VB6 code for continuous migration
Well, this is actually quite easy.
To get the X and Y of a Cell you just need to do something like:
grid.CurrentCell.ContentBounds.Location
or for the selected cell use:
grid.SelectedCells[0].ContentBounds.Location
And to convert that to screen coordinates do:
grid.PointToScreen(grid.CurrentCell.ContentBounds.Location)
mmm Well I found that
grid.GetCellDisplayRectangle(columnIndex, rowIndex, false) is a better alternative, because it will give you the Rectangle for the whole Cell
I’m an enthusiastic user of DXCore and I have been working on some extensions of my own. But I could not find the DXCore or DevExpress menu.
Well there is a hack for that.
Please invoke the Registry editor, add the "HideMenu" DWORD value to the following Registry key, and set its Value to 0:
HKEY_LOCAL_MACHINE\SOFTWARE\Developer Express\CodeRush for VS\9.1
This should make the "DevExpress" menu visible.
Look at the post for more details and keep enjoying DXCore.