Windows forms is still a great technology, but by default is not as flexible as XAML or HTML where you can very easily modify the style of your controls.
But that is not entirely true.
Let's review which options do we have for customizing the look and feel of Windows Forms Applications.
Custom Look And Feel
Well the idea is simple. Centralize all the settings for your components and make sure to invoke that logic just after the initializeComponent() method call on the Windows Form constructor.
I will implement a very simple example:
First the class the implements the "theming logic":
using System.Windows.Forms;
using System.Drawing;
public class ApplicationLookAndFeel
{
	static void ApplyTheme(TextBox c)
	{
		c.Font = new Font("Arial",12.0f); c.BackColor=Color.Blue; c.ForeColor = Color.White;
	}
	static void ApplyTheme(Label c)
	{
		c.Font = new Font("Arial", 12.0f); c.BackColor = Color.Black; c.ForeColor = Color.White;
	}
	static void ApplyTheme(Form c)
	{
		c.Font = new Font("Arial", 12.0f); c.BackColor = Color.Black; c.ForeColor = Color.White;
	}

	public static void UseTheme(Form form)
	{
		ApplyTheme(form);
		foreach (var c in form.Controls)
		{
			switch(c.GetType().ToString())
			{
				case "System.Windows.Forms.TextBox":
					ApplyTheme((TextBox)c);
					break;
				case "System.Windows.Forms.Label":
					ApplyTheme((Label)c);
					break;


			}
		}
	}
}
As you see is just very simple code that will just update the settings for all controls, and a simple call in all form constructors and your done:
public partial class Form1 : Form
	{
		public Form1()
		{
			InitializeComponent();
			ApplicationLookAndFeel.UseTheme(this);
		}
	}
A form like:

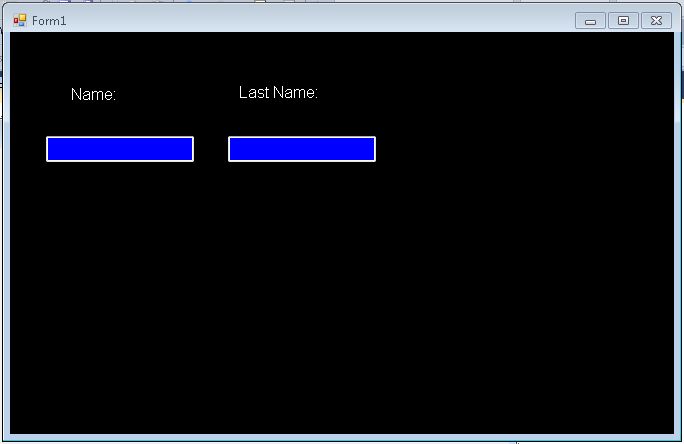
This approach is simple, but could require a lot of work if you have a lot of components, and switching to another look and feel will require a lot of changes, and it does not allow you to customize all of the form.
Customization of non client are (title bar, borders, requires a little more work). You can take a look at Szymon Kobalczyk work in codeplex. There is a lot of information about a setting custom borders for your forms and even a start of a form styling library.
Styling Controls
There are some third-parties that provide some level of Theming/Styling. The main difference is the impact they have on existing applications. I categorize them a Little Changes/Big Changes
Little Changes
Visual Styler.NET from http://www.skin-soft.co.uk/
This is an interesting solution, because it allows you to style your Standard Windows Form controls, with very little changes. You just add a control on you main form and that all. They provide some custom styles and you can built your own. They support styling of ThirdParty Controls but I am not sure how that will work.
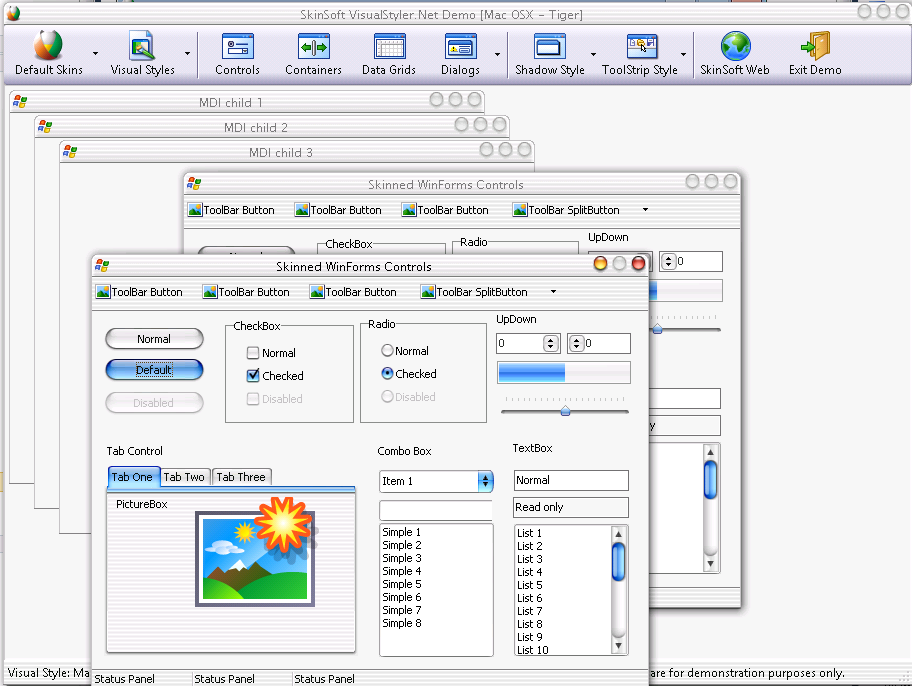
For screen shots and details see: http://www.skin-soft.co.uk/Products/VisualStyler/Overview.aspx
More Changes
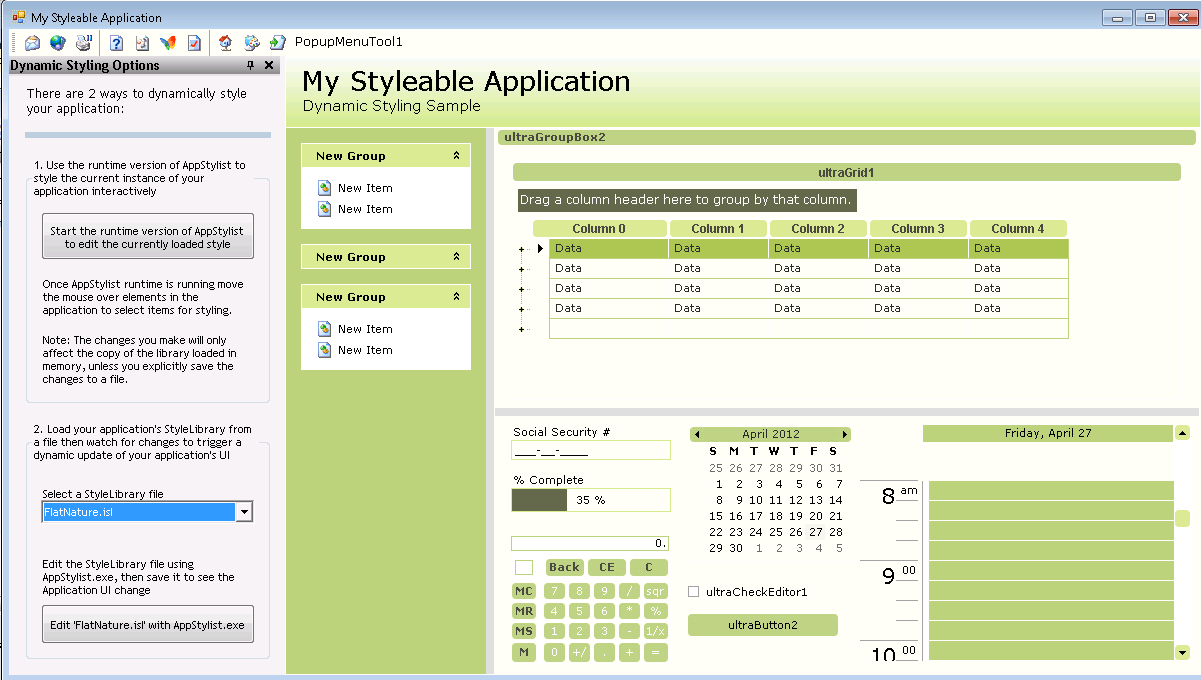
I call this "more changes" because all of them are great styling components but in order to style your application you have to use THEIR components. That is change all your TextBox for RadTextBox in the case of Telerik, Button for RadButton, or change your Label for WinLabel and your Button for WinButton for Infragistics and TextEdit for DevExpress...
So it can be a lot of changes. The end result can be stunning, because all of these companies have very very good components, but it is a lot of changes and can affect your application.
But as you can see, Windows Forms still has a lot to offer
There are many types of ToolStrip<Control> classes.
But how can you create your own customized version. Let’s say you want a control that prefixes a label before your combo box?
Ok that is very simple, you just extend the ToolStripControlHost class
First we create our UserControl:
using System.Windows.Forms;

	public partial class ComboBoxWithLabel : UserControl
	{
		public ComboBoxWithLabel()
		{
			InitializeComponent();
		}

		public string LabelText
		{
			get {return label1.Text;}
			set {label1.Text = value;}
		}

		public ComboBox.ObjectCollection Items
		{
			get
			{
				return comboBox1.Items;
			}
		}
	}

	partial class ComboBoxWithLabel
	{
		/// <summary>
		/// Required designer variable.
		/// </summary>
		private System.ComponentModel.IContainer components = null;

		/// <summary>
		/// Clean up any resources being used.
		/// </summary>
		/// <param name="disposing">true if managed resources should be disposed; otherwise, false.</param>
		protected override void Dispose(bool disposing)
		{
			if (disposing && (components != null))
			{
				components.Dispose();
			}
			base.Dispose(disposing);
		}

		#region Component Designer generated code

		/// <summary>
		/// Required method for Designer support - do not modify
		/// the contents of this method with the code editor.
		/// </summary>
		private void InitializeComponent()
		{
			this.label1 = new System.Windows.Forms.Label();
			this.comboBox1 = new System.Windows.Forms.ComboBox();
			this.SuspendLayout();
			//
			// label1
			//
			this.label1.AutoSize = true;
			this.label1.Dock = System.Windows.Forms.DockStyle.Left;
			this.label1.Location = new System.Drawing.Point(0, 0);
			this.label1.Name = "label1";
			this.label1.Size = new System.Drawing.Size(35, 13);
			this.label1.TabIndex = 0;
			this.label1.Text = "label1";
			//
			// comboBox1
			//
			this.comboBox1.Dock = System.Windows.Forms.DockStyle.Right;
			this.comboBox1.FlatStyle = System.Windows.Forms.FlatStyle.Flat;
			this.comboBox1.FormattingEnabled = true;
			this.comboBox1.Location = new System.Drawing.Point(35, 0);
			this.comboBox1.Name = "comboBox1";
			this.comboBox1.Size = new System.Drawing.Size(134, 21);
			this.comboBox1.TabIndex = 1;
			//
			// ComboBoxWithLabel
			//
			this.AutoScaleDimensions = new System.Drawing.SizeF(6F, 13F);
			this.AutoScaleMode = System.Windows.Forms.AutoScaleMode.Font;
			this.Controls.Add(this.comboBox1);
			this.Controls.Add(this.label1);
			this.Name = "ComboBoxWithLabel";
			this.Size = new System.Drawing.Size(169, 22);
			this.ResumeLayout(false);
			this.PerformLayout();

		}

		#endregion

		public System.Windows.Forms.Label label1;
		public System.Windows.Forms.ComboBox comboBox1;
	}
Next we just create an extension of the ToolStripControlHost
using System;
using System.Collections.Generic;
using System.Linq;
using System.Text;
using System.ComponentModel;
using System.Windows.Forms.Design;
using System.Windows.Forms;
using System.Drawing.Design;

[DefaultProperty("Items")]
[ToolStripItemDesignerAvailability(ToolStripItemDesignerAvailability.All)]
public class MyCustomComboBoxWithLabel : ToolStripControlHost
{
	public MyCustomComboBoxWithLabel()
		: base(new ComboBoxWithLabel())
	{
	}
	[Browsable(false)]
	public ComboBoxWithLabel ComboBoxWithLabel
	{
		get { return base.Control as ComboBoxWithLabel; }
	}


	[Browsable(true)]
	[DefaultValue(false)]
	public string LabelText
	{
		get { return ComboBoxWithLabel.LabelText; }
		set { ComboBoxWithLabel.LabelText = value; }
	}

	[Localizable(true)]
	[DesignerSerializationVisibility(DesignerSerializationVisibility.Content)]
	[Editor("System.Windows.Forms.Design.ListControlStringCollectionEditor, System.Design, Version=4.0.0.0, Culture=neutral, PublicKeyToken=b03f5f7f11d50a3a", typeof(UITypeEditor))]
	public System.Windows.Forms.ComboBox.ObjectCollection Items
	{
		get { return ComboBoxWithLabel.comboBox1.Items; }
		set {
			foreach (var item in value)
			{
				ComboBoxWithLabel.comboBox1.Items.Add(item);
			}
		}
	}
}
And Next ...
Well there is not next. You just used it :) And this is how it looks:

VB6 Migration, HTML5 Forms and ASP.NET Web Forms
If you come from a VB6 background, and your application is still in VB6,
you are probably wondering that this might be a good time to move out of VB6.
But is also a complex time. Which is right path: WinForms, Silverlight, WPF, HTML5?
Choosing the right target platform can be very tricky and depends on many varaiables.
So let's assume in this post that you have already decided that you want to use Web Tecnologies
and why not HTML5 as well.
ASP.NET Web Forms is a good technologie and developing forms with it is also very easy,
but can you develop HTML5 applications with this?
Well Brandon Satrom has a nice column in MSDN Magazine about Web Forms with HTML5 Forms.
He says:
If you’re planning to do HTML5 Forms development with ASP.NET Web Forms, there’s good news:
Many HTML5-related updates to .NET and Visual Studio are being released out-of-band, so you
don’t have to wait for the next framework version to use these features today.
To get started with HTML5 Forms and ASP.NET Web Forms, you’ll need to grab a couple of updates.
First, make sure you have Visual Studio 2010 SP1 (bit.ly/nQzsld).
In addition to adding support for new HTML5 input types and attributes, the service pack also
provides some updates that enable you to use the new HTML5 input types on the TextBox server control.
Without this update, you’d see compile-time errors when using the new types.
You’ll also want to grab the Microsoft .NET Framework 4 Reliability Update 1 (bit.ly/qOG7Ni).
This update is designed to fix a handful of problems related to using the new HTML5 input types
with ASP.NET Web Forms. Scott Hunter covers a few of those—UpdatePanel, Validation Controls
and Callbacks—in a blog post from early August that you can check out at bit.ly/qE7jLz.
Update:
Mobilize.NET and Artinsoft.com company now helps in the HTML5 migration problem from VB6, Windows Forms and PowerBuilder. http://mobilize.net/default.aspx
I was recently trying to get the exact width of a string. And I found that the Graphics.MeasureString does not give an exact result.
I finally found Pierre Arnaud
post in Code Project, which gave me a good explaination and solution of what was happening.
You can see in the image Pierre put in his post:

That Graphics.measurestring will return a size that might be bigger that the actual drawn size, this is due some GDI+ details that he explains in that post.
I really like the second proposed solution:
static public int MeasureDisplayStringWidth(Graphics graphics, string text,Font font)
{
System.Drawing.StringFormat format = new System.Drawing.StringFormat ();
System.Drawing.RectangleF rect = new System.Drawing.RectangleF(0, 0,1000, 1000);
System.Drawing.CharacterRange[] ranges = { new System.Drawing.CharacterRange(0, text.Length) };
System.Drawing.Region[] regions = new System.Drawing.Region[1];
format.SetMeasurableCharacterRanges (ranges);
regions = graphics.MeasureCharacterRanges (text, font, rect, format);
rect = regions[0].GetBounds (graphics);
return (int)(rect.Right + 1.0f);
}