A common question I get for people that has just moved to Windows Azure Web Roles, is:
I just want to make a little change to a page but publishing takes too long, what can i do?
Well, there are several things you can do. Usually what I find is that their publishing takes too long because they need to upload a lot of data.. but why? The database is in Azure, so you don't have to upload it, and a asp.net web site is usually just some binaries and some text files?
For answering this question I love to use a tool called HDgraph (http://www.hdgraph.com/)

This tool provides a graphical representation of your hard drive allowing you easily identify which folders are the ones consuming most space.
What I usually find is a lot of graphics (jpg, png, gif files), videos (flv, avi), presentations (.pptx) and PDFs files, that are part of the site. No wonder why uploading site changes takes so long.
if you do that you are not really taking advantage of all the Azure platform features.
Azure provides a massive storage mechanism and you should take advantage of it.
But how do I do that?
First Download a tool like Azure Storage Explorer: http://azurestorageexplorer.codeplex.com/
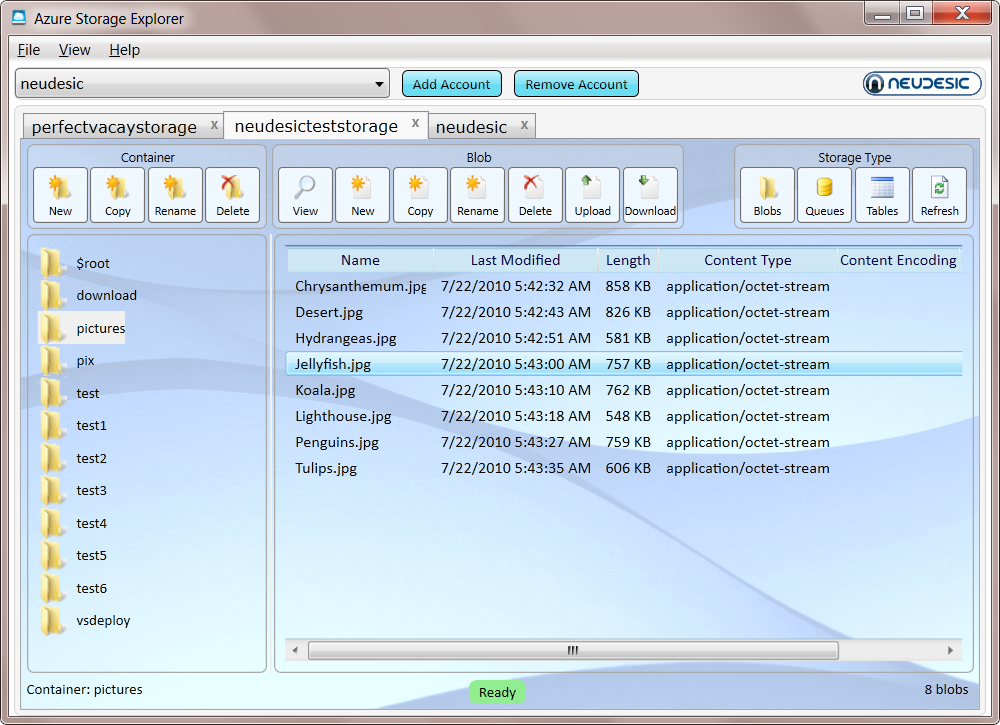
Create a folder (well well a container) for example content in Azure and upload your files to that container.
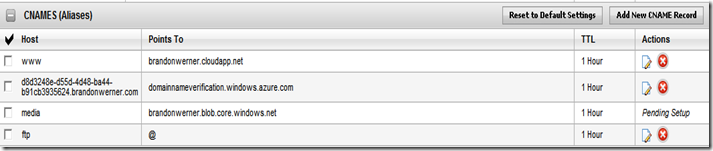
And now is time to set your CNAME record to point to your storage. Normally it will be something like making A CNAME content or media point to mycutesite.blob.core.windows.net.
(If you don't remember what a CNAME is lets say is something you configure with your registrar, the people you pay for your domain, so you can make entries to say for example if the browser navigates to www.mycutesite.com then send those requests to mycutesite.cloudapp.net and if they type media.mycutesite.com they it will redirect them to mycutesite.blob.core.windows.net)
I recommend reading Brandon Werner's excellent for very details quick intro to Windows Azure, from where I took this CNAME entries image.
http://blogs.msdn.com/b/brandonwerner/archive/2009/11/28/how-to-host-your-site-and-content-on-azure-quickly-and-easily.aspx
Again the idea is that you will remove most of the content of your asp.net solution and change your html so all resources will be downloaded from media.mycutesite.com\content
And finally, take advantage of Windows Azure new WebDeploy feature which allows a fast way to modify your pages directly. See (http://blogs.msdn.com/b/cloud/archive/2011/04/19/enabling-web-deploy-for-windows-azure-web-roles-with-visual-studio.aspx)
Azure Storage easily gives you 10TB of storage.
So a common question, is how can you upload information to your Storage Account.
FTP is a standard way of uploading files but is usually not available in Azure.
However is it possible to implement something that mimics an FTP but allows you to save data to the
FTP server?
Well I thought on trying on implementing something like that but luckily several guys have already
done that.
Richard Parker has a post on his blog and has also posted the source code in
codeplex FTP2Azure. This implementation works with clients like FileZile. It only does
Active connections.
Maarten Balliauw also did some similar work. He did not provided the source code but
he does active and passive connections so a mix with Richard’s post can be interesting.
I had a hard time trying to get some diagnostics from a RoleEntryPoint.
I was doing some setup in this entry point and getting some errors.
So I tought, mmmm: this is a Task for the super Azure DiagnosticMonitor.
And I added a bunch of Trace statements and waited to get some output in my WADLogsTables,
but NOTHING!!! ZERO NILCH! NADA!!
What happenned!!!
I took me a while to get to it. So
This is the things. I had to do.
1. First add a file called WaIISHost.exe.config
2. Add the Azure Diagnostics Trace Listener
<?xml version="1.0"?>
<configuration>

  <system.diagnostics>
    <trace>
      <listeners>
        <add name="AzureDiagnostics" type="Microsoft.WindowsAzure.Diagnostics.DiagnosticMonitorTraceListener, Microsoft.WindowsAzure.Diagnostics, Version=1.0.0.0, Culture=neutral, PublicKeyToken=31bf3856ad364e35">
          <filter type="" />
        </add>

      </listeners>
    </trace>
  </system.diagnostics>

</configuration>
3. And very very important, you must go to Copy to Output Directory property for this file and set it to Copy Always.

4. And another thing that you need is a lot of patience. The Diagnostics infraestructure takes a while.
So you add a Thread.Sleep after the Start call
DiagnosticMonitor.Start(storageAccount, configuration);
Thread.Sleep(10000);
5. After you do that you will be able to collect some information from the WADLogsTables
Well I was trying to create a VM Role for Azure and I got this error from my Hyper-V machine.
After some tests I hit my head and got to a clear conclusion: Silly me how could have I missed it.
The problem was I set up the VM with more memory that the available in Hyper-V, so
I changed this setting and my VM just worked!!
If I was not able to transfer any sense of sarcasm, I think that this is really hard to understand error message. 
A common doubt when using you want to use Azure Connect is which platforms does it support.
Remember that in order to establish a VPN between your On-Premises computer and a Web/Worker Role
you need to install a client pieces of software.
But which are the supported platforms.
Normally what you can do is just download it and then if you get something like
”Not a valid Win32 application” it means that it is not supported.
From the MSDN site (http://msdn.microsoft.com/en-us/library/gg508836.aspx in the Prerequisites section ) it is stated that:
Windows Azure Connect supported platforms:
Windows 2003 and Windows XP are not supported.
It is supported in Windows Vista, Windows 7, Windows 2008 and Windows 2008 R2
Are que getting null or empty with some Request.ServerVariables
When you convert your ASP application to run on Windows Azure it is a good
to put attention to the methods that are used to get the user IP Address.
Normally the recommendation will be to use Request.UserHostAddress however
our friend Alex has found that this property can return null or empty.
After some research Alex found that there are several scenarios under which
you must check both the REMOTE_ADDR and the HTTP_X_FORWARD_FOR server variables:
More info:
http://forums.asp.net/t/1138908.aspx and
http://meatballwiki.org/wiki/AnonymousProxy
A possible code snipped that can provide a value for the client address can be:
public static string ReturnIP()
        {
            var request = System.Web.HttpContext.Current.Request;
            var ServerVariables_HTTP_X_FORWARDED_FOR = (String)request.ServerVariables["HTTP_X_FORWARDED_FOR"];
            var ServerVariables_REMOTE_ADDR = (String)request.ServerVariables["REMOTE_ADDR"];
            string ip = "127.0.0.1";
            if (!string.IsNullOrEmpty(ServerVariables_HTTP_X_FORWARDED_FOR) &&
                !ServerVariables_HTTP_X_FORWARDED_FOR.ToLower().Contains("unknown"))
            {
                ServerVariables_HTTP_X_FORWARDED_FOR = ServerVariables_HTTP_X_FORWARDED_FOR.Trim();
                string[] ipRange = ServerVariables_HTTP_X_FORWARDED_FOR.Split(',');
                ip = ipRange[0];
            }
            else if (!string.IsNullOrEmpty(ServerVariables_REMOTE_ADDR))
            {
                ServerVariables_REMOTE_ADDR = ServerVariables_REMOTE_ADDR.Trim();
                ip = ServerVariables_REMOTE_ADDR;
            }
            return ip;
       }
In the previous code the HTTP_X_FORWARDED_FOR value is examined first and if it is not null or unknown then ip address of the client
is gotten from there.
Windows Azure is a great platform and the escalatity oportunities are great,
and deployment time is also great.
You can have all your website up and running in just 10-15minutes.
But… and yes there is always a but.
Sometimes you can have a WebSite that is not that static, that as a matter of fact
you are changing its views constantly. Specially if some ideas are not finished.
And yes you can test locally, but there is also a situation where you might want to have that flexibility.
Well looking around I found a very interesting solution by
Maatern Balliauw. http://blog.maartenballiauw.be/post/2009/06/09/A-view-from-the-cloud-(or-locate-your-ASPNET-MVC-views-on-Windows-Azure-Blob-Storage).aspx
What he proposes is to use windows azure storage as a virtual file system, so you can with simple tools
like the Windows Azure Explorer modify your web pages without the need of going through a lengthy republish process.
So go ahead and keep enyoing Azure
WheWhen you are doing an azure migration, one of the first thing you must do is
collect all the information you can about your database.
Also at some point in your migration process you might consider between migration to
SQL Azure or Azure Storage or Azure Tables.
Do do all the appropriate decisions you need to collect at least basic data like:
- Database Size
- Table Size
- Row Size
- User Defined Types or any other code that depends on the CLR
- Extended Properties
Database Size
You can use a script like this to collect some general information:
create table #spaceused(
databasename varchar(255),
size varchar(255),
owner varchar(255),
dbid int,
created varchar(255),
status varchar(255),
level int)

insert #spaceused (databasename , size,owner,dbid,created,status, level)  exec sp_helpdb

select * from #spaceused for xml raw
drop table  #spaceused
When you run this script you will get an XML like:
<row databasename="master"
size=" 33.69 MB"
owner="sa"
dbid="1"
created="Apr 8 2003"
status="Status=ONLINE, ..."
level="90"/>
<row databasename="msdb"
size=" 50.50 MB"
owner="sa"
dbid="4"
created="Oct 14 2005"
status="Status=ONLINE, ..."
level="90"/>
<row databasename="mycooldb"
size=" 180.94 MB"
owner="sa"
dbid="89"
created="Apr 22 2010"
status="Status=ONLINE, ..."
level="90"/>
<row databasename="cooldb"
size=" 10.49 MB"
owner="sa"
dbid="53"
created="Jul 22 2010"
status="Status=ONLINE, ..."
level="90"/>
<row databasename="tempdb"
size=" 398.44 MB"
owner="sa" dbid="2"
created="Feb 16 2011"
status="Status=ONLINE, ..."
level="90"/>
And yes I know there are several other scripts that can give you more detailed information about your database
but this one answers simple questions like
Does my database fits in SQL Azure?
Which is an appropriate SQL Azure DB Size?
Also remember that SQL Azure is based on SQL Server 2008 (level 100).
80 = SQL Server 2000
90 = SQL Server 2005
100 = SQL Server 2008
If you are migrating from an older database (level 80 or 90) it might be necessary to upgrade first.
This post might be helpful: http://blog.scalabilityexperts.com/2008/01/28/upgrade-sql-server-2000-to-2005-or-2008/
Table Size
Table size is also important.There great script for that:
http://vyaskn.tripod.com/sp_show_biggest_tables.htm
If you plan to migrate to Azure Storage there are certain constraints. For example consider looking at the number of columns:
You can use these scripts: http://www.novicksoftware.com/udfofweek/vol2/t-sql-udf-vol-2-num-27-udf_tbl_colcounttab.htm (I just had to change the alter for create)
Row Size
I found this on a forum (thanks to Lee Dice and Michael Lee)
DECLARE @sql        VARCHAR (8000)
        , @tablename  VARCHAR (255)
        , @delim      VARCHAR (3)
        , @q          CHAR (1)

  SELECT @tablename = '{table name}'
       , @q         = CHAR (39)

  SELECT @delim = ''
       , @sql   = 'SELECT '

  SELECT @sql   = @sql
                + @delim
                + 'ISNULL(DATALENGTH ([' + name + ']),0)'
       , @delim = ' + '
  FROM   syscolumns
  WHERE  id = OBJECT_ID (@tablename)
  ORDER BY colid

  SELECT @sql = @sql + ' rowlength'
              + ' FROM [' + @tablename + ']'
       , @sql =  'SELECT MAX (rowlength)'
              + ' FROM (' + @sql + ') rowlengths'
  PRINT @sql
  EXEC (@sql)
Remember to change the {table name} for the name of the table you need
User Defined Types or any other code that depends on the CLR
Just look at your db scripts at determine if there are any CREATE TYPE statements with the assembly keyword.
Also determine if CLR is enabled with a query like:
select * from sys.configurations where name = 'clr enabled'
If this query has a column value = 1 then it is enabled.
Extended Properties
Look for calls to sp_addextendedproperty dropextendedproperty OBJECTPROPERTY and sys.extended_properties in your scripts.
Specially if you are working with Silverlight and Azure you will end up in situation where you would
like to redirect your WCF Endpoint dinamically ( I don’t think you can guess the GUID that Azure will generate
for your staging enviroment).
Out of the box the silverlight behaviour is that the WCF endpoints are hardcoded in a config file called
ServicesClient.config embedded in the .xap file.
This can be problematic at least for Azure deployment infraestructure because you can deploy to different sites:
Staging and Production.
Each of this Web Sites will have differente URLs.For example phonebook.cloudapp.net or asdf-asdf-asdf-dasxxx.cloudapp.net
So an easy workaround is:
In WCF when a channel is created in code you can specify the endpoint,
so we only need to created different endpoints depending of the site where the the .xap file was download.
The proposed changes will be:
For example if you create services in your App.xaml.cs method Application_Startup
Then you can change your code for something like:
string url = "http://" + HtmlPage.Document.DocumentUri.Host + "/MyService.svc";
EndpointAddress endpoint = new EndpointAddress(url);
var service = new MyService(new ChannelFactory<IMyService>("*").CreateChannel(endpoint)));
This will allow you to just deploy your application to either Staging or Production environment
in Azure with no more code or config file changes.
When we migrate our customers to Azure, we want them to take advantage of
this rich platform.
Even for a simple deployment you get a Windows Azure Storage Account,
and that account means up to 100TB of storage!!!!! So take advantage of that.
One common thing that any enterprise needs is backups.
You need to backups of you email files, databases, documents, etc.
Sometimes you can have a dedicated server for storing that data, but
all hard drives can fail, so you will need to make several copies of your
backup information, probably use a RAID disk, make backups of your backups
on tape, DVD, etc…
What if you could just use your cloud storage, which is triplicated in secure datacenters?
Well you can!
There are currently several solutions.
For example in codeplex you will find projects like: http://myazurebackup.codeplex.com
MyAzureBackup provides simple to use web user interface.
I have even extended some of its functionality to work with a Windows Service that uses
a FileWatcher to upload files from a directory.
And it is easy to use this application as a base for your backup infrastructure adding some
security functionality like encrypting files.
So go ahead and explore all the new posibilities you have with cloud computing
Recently while we were performing the migration of a blog engine in ASP.NET to Azure we had to deal with some issues with
the differences between IIS6 and IIS7.
Windows Azure Web Roles, use IIS7, with Integrated Pipeline mode and that is a breaking change for some ASP.NET sites.
The are at least two main changes:
First is for HTTP modules and handlers.(This info was taken from: http://arcware.net/use-a-single-web-config-for-iis6-and-iis7/)
" For IIS6, they were configured in the <system.web> section, as such:
<httpModules>
<add name="..." type="..." />
<add name="..." type="..." />
<add name="..." type="..." />
</httpModules>
<httpHandlers>
<add verb="..." path="..." type="..." />
<add verb="..." path="..." type="..." />
</httpHandlers>
However, to get these to work in IIS7 you must *move them* from the <system.web> section to the new <system.webServer> section, which is what IIS7 requires when running in Integrated Pipeline mode (it’s not needed for Classic Pipeline mode)
So instead of the above you have this instead:
<system.webServer>
    </modules>
        <add name="..." type="..." />
    </modules>
    <handlers accessPolicy="Read, Write, Script, Execute">
        <add verb="...." name="..." path="..." type="..." />

</handlers>
</system.webServer>
Notice there are a couple slight changes, which means you can;t just copy and paste
these as-is from <system.web> into <system.webServer>:
<httpModules> and <httpHandlers> have been renamed to <modules> and <handlers>, respectively.
Each handler in IIS7 requires a name attribute. If you don;t specify it, you'll get an error message.
The handlers node has an optional, but good-to-define accessPolicy attribute.
This value depends on your handlers, so use the ones that are right for you."
Second
There are some restrictions in IIS7 when you are running in Integrated mode.
For example you cannot do calls to the request property of an HttpContext object.
All calls to HttpContext.Current.Request will have a problem because Request will be null.
You can see more details here:
http://mvolo.com/blogs/serverside/archive/2007/11/10/Integrated-mode-Request-is-not-available-in-this-context-in-Application_5F00_Start.aspx
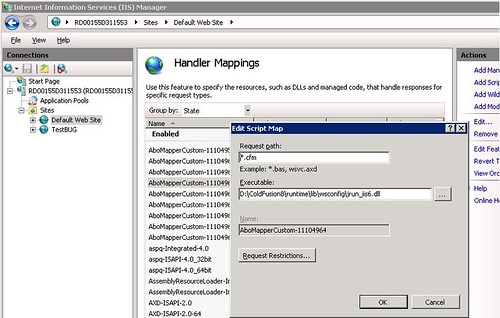
I have been playing around with one of my test Azure Web Roles to determine
if it is possible to run it inside Azure, using a Web Role not just a VM Role.
So far I have been able to run Coldfusion 8 in a Web Role, but I have not been able to fully automate this task,
I had to do a remote desktop to the Web Role and perform the following tasks:
-
Add Features to the Web Roles particulary II6 Management Compatibility
-
Make sure that the Handlers for CFM, CFML, CFC are inplace
If you are doing Silverlight development, one thing that can be cumbersome is keeping in sync
your development and production settings. Specially if you are using WCF services because you have
to make sure that your ServiceClient.config file has the right values.
What I usually do is this.
1. First set fixed ports for my application. See http://blogs.msdn.com/b/webdevelopertips/archive/2008/11/07/tip-21-did-you-know-how-to-set-a-fixed-port-for-the-developer-web-server.aspx
2. Modify my hosts file in C:\Windows\System32\drivers\etc adding an entry like:
#
# This is a sample HOSTS file used by Microsoft TCP/IP for Windows.
#
# This file contains the mappings of IP addresses to host names. Each
# entry should be kept on an individual line. The IP address should
# be placed in the first column followed by the corresponding host name.
# The IP address and the host name should be separated by at least one
# space.
#
# Additionally, comments (such as these) may be inserted on individual
# lines or following the machine name denoted by a '#' symbol.
#
# For example:
#
# 102.54.94.97 rhino.acme.com # source server
# 38.25.63.10 x.acme.com # x client host
# localhost name resolution is handled within DNS itself.
127.0.0.1 localhost
127.0.0.1 productionserver.cloudapp.net
In this way all you have to change is your hosts file and you keep the same settings for development and for production
If you dont have Windows Azure Tools installed
1. Open Visual Studio 2010
2. On the File Menu, Click new, and then click Project. This opens the New Project dialog
3. In the New Project dialog under Installed Templates, expand the Visual C# node
4. In project type click Cloud. A project that says Enable Windows Azure Tools appears
5. In Name type for example EnableTools and click OK
6. A project with a web page will appear. Click the Download Windows Azure Tools button. Close Visual Studio. Download and installed them.

Once you have Windows Azure Toolsl installed
1. Open Visual Studio 2010
2. On the File Menu, Click new, and then click Project. This opens the New Project dialog
3. In the New Project dialog under Installed Templates, expand the Visual C# node
4. In project type click Cloud. A project that says Windows Azure Cloud Service appears

5. In Name Type for example Phonebook and click ok. The New Cloud Service Project is shown
If you are developing a Silverlight application with some services select the WCF Service Web Role. Rename it to something appropriate. In this example will be Phonebook.Web and Press OK

Your solution explorer will look like this:

Now you can developing your application. We already have an Silverlight application (that was migrated from VB6 to Silverlight) and some existing Silverlight Class libraries and Server Class Libraries (Class Libraries compiled with the full 4.0 Framework that will be used in the Server Project Phonebook.Web).
To add your Silverlight app. Right Click your server project (Phonebook.Web), then Properties and in Properties go to Silverlight Application and add Phonebook_Silverlight
When everything compiles Go to the Visual Studio Menu Bar, then Debug and then Start Without Debugging. That starts the local development environment on your computer.

You can now start testing and finish development of your application.
There is something you myst notice. Everytime you start the Cloud Service, the Azure test environment starts. By default it will start in http:\\localhost:81 but there was a previous Development Fabric it will start in http:\\localhost:81. This is important for Silverlight applications because you must configure your service end point to a particular port. Make sure that your ServiceReferences.ClientConfig file is in sync with the port that your DevelopmentFabric is using
|
Notes for Azure development:
Sometimes during development it might happen that you get more than one instance of the Development Fabric. This will affect your silverlight apps that rely on WFC services because each new instance starts on a new port. You can use the CSRun tool to stop all instances.
If you have installed the Windows® Azure™ SDK to the default location, the CSRun tool can be found at C:\Program Files\Windows Azure SDK\v1.0\bin\csrun.exe.Then run C:\Program Files\Windows Azure SDK\v1.2\bin\csrun.exe /devfabric:shutdown
|
Publishing your Application
1. Navigate to Azure : https://windows.azure.com/Cloud/Provisioning/Default.aspx
2. On the page that says My Projects. When you are starting you will only see one project line. Click on it

3. Click on New Service

4. Click on Hosted Services

5. In the Create Service page, specify the service properties. In this example we will use Phonebook.Web for service label and a short description and press next.

6. Now your hosted service needs a public url. You must check availability. In this example we will use phonebook. Hosted Affinity tries to group your services and storages in the same area. We have a SQL Azure database that is hosted in North Central US, so we will create a new AffinityGroup and call it PhonebookGroup. Press Create

7. After Creation your Service is ready, and you can start the deployment.

8. In Visual Studio 2010 Right click your Cloud Service. And Select Publish…

9. The Publish Cloud Service Dialog appears. From the Credentials drop down list select <Add>

10. From the Create or select an existing certificate select <Create>.
10.1 In our example we will enter a FriendlyName for the new certificate of PhoneBook.

10.2 Click the “Copy the full path” link in the dialog. Then Open your browser and navigate to https://windows.azure.com/cloud/provisioning/ and click on your project

10.3 Now click on account.And in the Account page click on Manage My API Certificates

10.4 Click the Choose file and paste the full path you had copied before and then click upload

the installed certificate will be shown below.

10.5 Now navigate to AppFabric by clicking AppFabric on the left hand side. This will show your subscription ID. Select it and copy it. You have to pasted on the dialog box in Visual Studio on the textbox that says above it “Copy the subscription ID”

and name those Credentials PhonebookAccount and press OK
11 You need a storage account. If you have not created one. Then you have to follow these steps:
11.1 Open your browser and navigate to https://windows.azure.com/cloud/provisioning/ and click on your project.
11.2 Now click on New Service

11.3 Now click on Storage Account

11.4 The Create Service Page is show. Enter a Service label and Description and Click Next

11.5 Select a name for the public URL, check its availability. And select Affinity.And press Create

12. Press OK on the Publish Cloud Service Dialog

13. Visual studio will upload your application to the cloud

While your application is in staging the only problem might be that the published URL changed and that might be conflictive for your ServiceReferences.ClientConfig.
Once your application is on Staging you can switch it to Production and your are ready for business.
One of the first steps to put your database in Windows Azure is to put your data on the cloud.
1. The first step is to log in to Azure
1.a) Go to https://windows.azure.com/Cloud/Provisioning/Default.aspx
1.b)Type your user name and password.
1.c) When your are logged in go to SQL Azure option on the left hand menu.
1.d) You will see a list of your projects. Click on the project.

2. You must accept Azure Terms of Use

3. Now create a server. You must indicate an administrator username and password. Azure will set the server name.
Press the Create Server button and continue.

4. Now let’s create a new database.Press the Create Database Button

5. Just type your database name, edition and size. Editions can be Web or Business.
At this moment Size for Web Edition is 1GB or 5GB and for Business is 10GB, 20GB, 30GB, 40GB and 50GB.
Prices varies according to the options that you select.
For my purposes I will select a Web Edition of 1GB

6. You should be able to see your new database in the Databases list.

7. Configure Firewall settings so you can connect to the new database.

7.1 Press the Allow Microsoft Services access to this server checkbox.
That will add a Rule Name that allows access from 0.0.0.0 to 0.0.0.0.
Select the rule and press Edit. You must can type something like 0.0.0.0 to 255.255.255.255 to allow access to all IP Address.
Moving your data to SQL Azure
The easiest way to upload a SQL Server database to SQL Azure is to use
the SQL Azure Migration Wizard this is a great tool that you can download from
CodePlex http://sqlazuremw.codeplex.com/
1. Download the tool. In my case I installed it in D:\SQLAzureTools. Run SQLAzureMW.exe

2. Select SQL Database and press Next

3. Select your database and press connect. That will add your database to a list. Click on your database name and press Next

4. Select the tables and other object that you will move to your SQL Azure database

5. Press Next a Summary is presented with all options

6. The wizard will generate a BCP file and a script for your tables.

You can connect to run your scripts with the following command:
> sqlcmd -S tcp:<servername>.database.windows.net -U <username>@<servername> -P <password> –d <database>
Depending on your configuration you might have problems with BCP. In general you need something like:
To export data:
bcp PhoneBook out c:\temp\Phonebook-c.dat –S <Server> –T –c
-T means a trusted connection and native format
To import data
bcp Phonebook.dbo.Phonebook in c:\temp\Phonebook-c.dat -c -U <username>@<servername> -P <Password> -S tcp:<servername>.database.windows.net -c
After importing your data, you are set to keep on developing your applications on Azure
NOTE:
If you dont know the schema name connect to your database and run something like:
SELECT '['+SCHEMA_NAME(schema_id)+'].['+name+']' AS SchemaTable FROM sys.tables