If you still have Visual Studio 2003 projects and you are just in the process of upgrading / modernizing them, then the following addin will be very helpful. Mike Meinz, took a very useful macro and package it as a VS 2012 addin
See: http://www.codeproject.com/Articles/528990/A-Visual-Studio-add-in-to-move-Windows-Forms-Desig
For us who each day move lots of code from Vb6 and VB.NET to MVVM. ASP.NET MVC, etc, this kind of tools become very handy.
When I use SQLServer 2008 Express for my development tests, I always forget which things I have to do in order to make my SQL Server 2008 Express instance available to other machines over the networks.
So to not forget that again this are the things that you have to check to be able to acces sql server express from other machines:
1. Go to the Start Menu\All Programs\Microsoft SQL Server 2008 R2\ and run SQL Server Configuration Manager
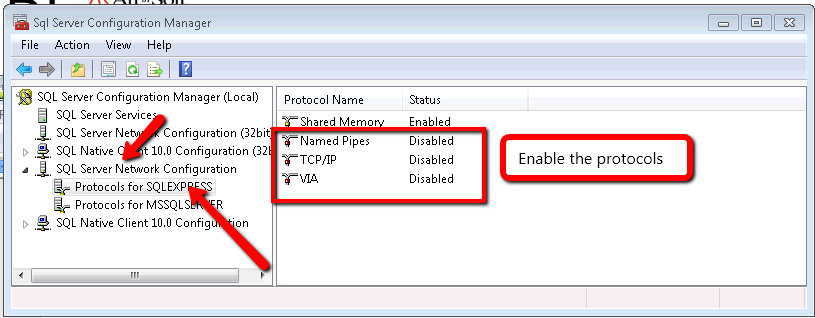
2. In the SQL Server Configuration Manager Window, expand the tree on the left and expand the SQL Server Network configuration element on the tree. Make sure that at least TCP/IP protocol is enabled.
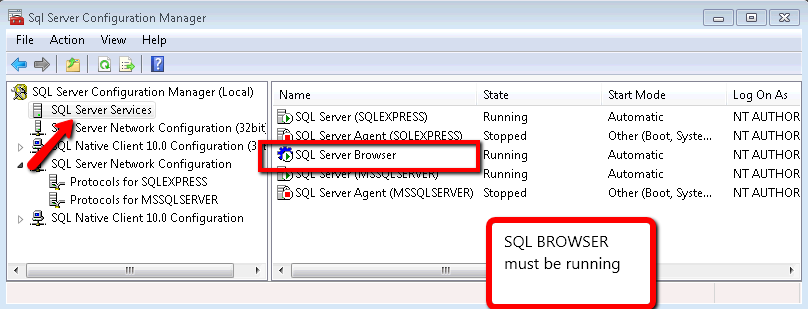
3. Now Click on the SQL Server Services element on the tree and make sure that the SQL Server Browser service is running. It is needed in order to make other computer able to see your server.
The following C# code shows how to use WMI to query printers information, set and get default printer.
public bool SetDefaultPrinter()
{
    System.Management.ManagementObjectSearcher search =
                   default(System.Management.ManagementObjectSearcher);
    System.Management.ManagementObjectCollection results =
                   default(System.Management.ManagementObjectCollection);
    System.Management.ManagementObject printer =
                   default(System.Management.ManagementObject);


    search =
     new System.Management.ManagementObjectSearcher("select * from win32_printer");
    results = search.Get();
    //Get Default Printer
    System.Management.ManagementObject defaultPrinter = null;
    foreach (System.Management.ManagementObject foundPrinter in results)
    {
        System.Management.PropertyDataCollection
              propertyDataCollection = foundPrinter.Properties;

         if ((bool)foundPrinter["Default"]) // DEFAULT PRINTER
         {
              System.Diagnostics.Debug.WriteLine(foundPrinter["Name"]);
              System.Diagnostics.Debug.WriteLine(foundPrinter["Location"]);
         }
     }


     //Sets new default Printer
     foreach (System.Management.ManagementObject foundPrinter in results)
     {
         System.Diagnostics.Debug.Print(foundPrinter["Name"].ToString());
         if (foundPrinter["Name"].Equals("PDFCreator"))
         {
             System.Management.ManagementBaseObject outParams =
                   foundPrinter.InvokeMethod("SetDefaultPrinter", null, null);
             if (outParams == null)
                 System.Diagnostics.Debug.WriteLine("Unable to set default printer");
             Int32 retVal = (int)(uint)outParams.Properties["ReturnValue"].Value;
             if (retVal == 0)
                return true;
             else
                return false;
         }
     }

    return false;

}
This post will show you the necessary steps to configure Microsoft Visual Studio 2005 to use a Team System Project. In this example we will use a Team Project created to illustrate Continuous Migration with VBUC and MS Team System 2005, called MergeExample.
1. Start Microsoft Visual Studio 2005
2. Go to the File Menu\Open\Team Project…

3. Dialog is presented, where you can choose your Team Foundation Server, and the Team Project to use. For these Continuous Migration example we’ll assume a project called MergeExample.

4. The Team Explorer is shown, with your selected project.
Expand the elements for the Team Project you previously selected.

5. We now have to map our local directories to bind them to the
source control system. On the expanded tree, double click on the
Source Control Node

6. The Source Code Explorer is shown:

7. Go to the Workspaces dropdown box and select Workspaces…

8. The Manage workspace dialog is shown.
Select the appropiate workspace and click Edit…

9. On the Edit Workspace dialog type a description for your source control and select the source control Folder we had created (for this example it is $/MergeExample) and the directory for your code (for this example it is C:\MergeExample).

NOTE: if a message box about a pending update is shown, just click ok.
Now you have successfully mapped your directories, and you can start setting up your VB6 code for continuous migration